Today was remarkable for two reasons. The first is that I finished the school year during which I have been driving school busses daily. I'm now quite comfortable behind the wheel of a school bus. That's quite useful because I own a school bus! The second is that I found the auto darkening welding helmet I bought at the weekend works well.
After returning home somewhat early today, the last day of school being a half day, I pulled out my work and commenced welding. I have to say that being able to see what I'm doing makes a massive difference. Today's welding didn't go brilliantly though. I was having a terrible time trying to strike and maintain an arc. A few times it went well but it didn't seem to matter whether I used thin or thick rods. It was just one of those days.
Pulling my work out, I could t find the side I'd cut for it so I had to cut another. This actually went better. The previous side had been way undersized. This worked out better. I'll have to finish welding some gaps but uts now looking good. I'll also have to grind off excess welds and try to tidy up the edges. It's looking good. It's heavier than I thought it would be so I'm thinking of adding a support to aid the skirt in carrying the weight.
No photograph today. Not because I didn't think about it but because my work looks very similar to the last photo albeit with a new side installed. The next stage will be to fill the holes, grind it to a prettier shape then add a flange in order to mount it to the skirt. Back bracing will then be needed nit to mention the hose connection.
Now I can see to weld, progress might accelerate.
Wednesday, May 31, 2017

Saturday, May 27, 2017
Welding blind
I've had it with my cheap Walmart welding helmet. I can barely see the work to weld so I end up burning holes in metal sheet, dragging the rod across things I don't need to drag it across and welding work that has shifted during welding that I could have seen shifting had I had a better mask. Looks like since I have to rush off for chicken feed tomorrow that I might as well pick up a decent auto adjustable welding helmet. I've jibbed at the cost for a year but I really cannot bear to use that horrible Walmart blindfold any more. I might as well be welding with a cardboard box over my eyes!
Having said that, today I cut more of the old steel table top and made a back, bottom and a side for my ventilation unit. The back and bottom are one piece of steel that I folded by hand. Some of the welding needs completing and some needs tidying up but it's beginning to look quite recognizable now.
 My CPU fan goes in the top and a lawnmower engine filter goes in the front. And yes, I was photobombed by a big yellow spider. Heaven knows how venomous that one is. Most things in South Carolina seem intent on doing humans in. Perhaps it's an Isis spy?
The plan is to complete the welding, put the other side on and make a removable top that will attach to the air tubing. Then I'll have to put some flanges on the unit, a door with a vent and mount it on the skirt on the bus. The floor of the compartment is sloped so that ingested water can drain out.
I had a look at the steel from my old microwave. Aside from being pathetically thin, it's pretty rusty. Looking at it, that microwave screams cheap. It was $50 and lasted about 2 years. It took 15 minutes to cook a plate of food so it wasn't exactly speedy. I can't say I was sorry to see it go. I'm surprised how poorly made it is though.
Having said that, today I cut more of the old steel table top and made a back, bottom and a side for my ventilation unit. The back and bottom are one piece of steel that I folded by hand. Some of the welding needs completing and some needs tidying up but it's beginning to look quite recognizable now.

The plan is to complete the welding, put the other side on and make a removable top that will attach to the air tubing. Then I'll have to put some flanges on the unit, a door with a vent and mount it on the skirt on the bus. The floor of the compartment is sloped so that ingested water can drain out.
I had a look at the steel from my old microwave. Aside from being pathetically thin, it's pretty rusty. Looking at it, that microwave screams cheap. It was $50 and lasted about 2 years. It took 15 minutes to cook a plate of food so it wasn't exactly speedy. I can't say I was sorry to see it go. I'm surprised how poorly made it is though.
Sunday, May 21, 2017
Rain stops play... again!
This weather is ridiculous. Hot and sunny one minute then pouring with rain and thundering the next. How am I supposed to get anything done?

The sum total of today's work is nothing much. I went over some of my welds again with a different rod. Then I filled in the two screw holes I drilled yesterday using my welding rod. Then I ground my welds smooth and drilled better placed holes to attach my CPU fan. I only drilled two holes because it's not a high stress application. I added a pair of brackets to the CPU fan mount that will allow me to install a separate top on my ventilation duct.

Then an epiphany struck me. Instead of making a square box structure, I could take a piece of flat steel sheet, weld it in place at the bottom then bend it upward to make a natural curve that would ensure ingested water would find a way out. Cutting the sides would be more interesting but welding shouldn't be any harder. Of course, by the time I'd grabbed some steel sheet to cut, it had begun to rain and I had to hurry indoors.
Talking about ideas, I looked into water heating. For $100 approximately, it's possible to buy an electric instant water heater. It takes 27 amps but my breaker boxes could be readily rewired to 50 amps. I have a 20A cord that could be replaced by a 50A cord. There's nothing remotely challenging there. I'd been thinking of adding a water inlet anyway. There's nothing to say hot water has to be supplied to the handbasin and not just ported in a jug from the shower.
Similarly, I've been considering a flush toilet rather than my current dry toilet. I'd have to install a septic tank but now that my welding is getting better, I see no reason why a modified beer keg could not be used. I rather suspect that whatever I flush into a beer keg would be far better than what was in it originally.
There is no limit to the upgrades it's possible to do to a motorhome. This ventilation system was unplanned but given the 100F inside yesterday, seems necessary. Once it is done, I might have to add more solar capacity. It's something I'd been thinking of anyway.
For the moment, the plans are thus...
1. Install ventilation unit.
2. Fix 120v wiring.
3. Wire wiper switch.
4. Get the bearing steamed and greased, the kingpins checked, the pedals sorted out and work the short out of the electrics.
5. Retitle as a motorhome.
Saturday, May 20, 2017
Harbor Freight didn't have it!
No Saturday is complete without a trip to the hardware store. Today it was a trip to Harbor Freight to look for some 309L welding rods. These are barrier rods that allow me to weld stainless steel to mild steel. Harbor Freight had only 6011, 6013, 7014 and 7018, each of which is fine for its purpose but not for what I wanted to do. They did, however, have a multi pack containing two grinding disks, three flap disks and 5 cutting disks. That proved a valuable find!
I continued my hunt for welding rods but while Northern Tool had 308L and bronze rods, no 309L. It was the same story at Home Depot and Lowes (hiss, spit). In the end I didn't find my 309L rods but I did find some 312 rods at Tractor Supply. They were horribly expensive!
Back on the ranch, I pulled out my stainless tube and found a spare stainless sink tailpipe. The tube screws into the tailpipe. My idea was to weld the tube to my ventilation box. Things are in constant flux though. As I cleaned up my blobby welds I realized there are various alternatives to my plans. Of course, if I'd built the thing from plastic planking, I'd have been done and dusted a while back! I decided to go durable though and that means steel and welding.
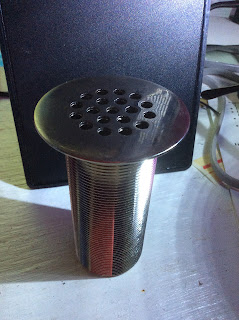 Looking at the stainless sink tailpipe, I realized I had found my ventilation inlet. All I need do is to make a 1.5 inch hole and pass a new tailpipe with a nut through the floor. It's straightforward then to put a tube between the two tailpipes. This could even be as simple as a piece of large diameter Pex hose pipe held on with jubilee clips.
The holes for the fan didn't go in the right place, sadly. I decided to drill two holes rather than 4 because it's not a high stress activity. As the nuts for the number 8 bolts are somewhat small, it's not possible to weld them in place. That had me redesign my vent a little. I am designing it so I can replace my fan if required or even remove it and replace it with a small but potent bilge blower. Today aside from the two holes (which I might redo tomorrow), I decided to add a flange to the top of the unit that I can screw a top onto. I prepared all the surfaces and will get onto that tomorrow. The bottom also needs to be removable in order to also facilitate easy fan replacement.
 The temperature outside the bus was way cooler than inside. Inside it was 100F while outside it was 80 or 90. When fresh air is coming in, the temperature will be much cooler. The shower tailpipe will be a great ventilation inlet as it can be stood on without issue and can be laid flush with the floor. Indeed, when I next visit the hardware store I might get a larger diameter tailpipe for the bus interior as I feel I might yet end up with a bilge pump.
In my redesign of the top of the ventilation unit, I decided to make the top removable in order to make access to the fan easier. That allows me also to upgrade the pipe at the top of the unit to a larger size by simply making a new top plate. That will allow for an upgrade from 1.5 to 2 inches for a 2 inch bilge blower.
I was beaten today by the heat, humidity and mosquitoes. Thus, after planning my flanges I headed indoors. Tomorrow I shall weld together the rest of my filter box structure, weather permitting, and make a start on the top and bottom. The door is going to be very simple. I'll just solder a nut to the back of the flange
that I'll install on the edge of the filter box. Rather, four nuts. Once the door is bolted on with lock washers, all should be fine. For security, I suppose I could use 1/4 inch torx bolts. The door can be very simple - a rectangle of steel with a single vent and a rib that presses the filter into place.
One of the other things I got today was a set of small grinding wheels for the pistol drill. Those will be handy for cleaning blobby weld on the inside of my frames. I'll try to clean those tomorrow too.
I continued my hunt for welding rods but while Northern Tool had 308L and bronze rods, no 309L. It was the same story at Home Depot and Lowes (hiss, spit). In the end I didn't find my 309L rods but I did find some 312 rods at Tractor Supply. They were horribly expensive!
Back on the ranch, I pulled out my stainless tube and found a spare stainless sink tailpipe. The tube screws into the tailpipe. My idea was to weld the tube to my ventilation box. Things are in constant flux though. As I cleaned up my blobby welds I realized there are various alternatives to my plans. Of course, if I'd built the thing from plastic planking, I'd have been done and dusted a while back! I decided to go durable though and that means steel and welding.

The holes for the fan didn't go in the right place, sadly. I decided to drill two holes rather than 4 because it's not a high stress activity. As the nuts for the number 8 bolts are somewhat small, it's not possible to weld them in place. That had me redesign my vent a little. I am designing it so I can replace my fan if required or even remove it and replace it with a small but potent bilge blower. Today aside from the two holes (which I might redo tomorrow), I decided to add a flange to the top of the unit that I can screw a top onto. I prepared all the surfaces and will get onto that tomorrow. The bottom also needs to be removable in order to also facilitate easy fan replacement.

In my redesign of the top of the ventilation unit, I decided to make the top removable in order to make access to the fan easier. That allows me also to upgrade the pipe at the top of the unit to a larger size by simply making a new top plate. That will allow for an upgrade from 1.5 to 2 inches for a 2 inch bilge blower.
I was beaten today by the heat, humidity and mosquitoes. Thus, after planning my flanges I headed indoors. Tomorrow I shall weld together the rest of my filter box structure, weather permitting, and make a start on the top and bottom. The door is going to be very simple. I'll just solder a nut to the back of the flange
One of the other things I got today was a set of small grinding wheels for the pistol drill. Those will be handy for cleaning blobby weld on the inside of my frames. I'll try to clean those tomorrow too.
Sunday, May 14, 2017
Welding again
Today started with a plan. Yes, I have them occasionally! Anyway, the plan was to work on the ventilation system. Had I the bravery to put roof vents into my bus, a powered ventilation system would be unnecessary but I'm not going to poke holes in a perfectly good roof fir whatever reason!


I started by welding a small square of angle together. I felt really proud when I'd done it. Then I noticed how warped my creation was and then how one angle wasn't right and I couldn't even fit the CPU fan the box was designed for. So, out came the angle grinder and version 2 took shape. Now the reason it was off kilter could have been due to the angle maker I bought from Harbor Freight. While it gets the 90 degrees right, the horizontal hold can slip a little.

Above, you can see the fan holder beginning to take shape. The plan is to have the fan at the top and the filter on the front of my ventilation unit. It's done this way to try to keep water out of the mechanism. The next challenge will be a vent and filter changing door. For that I'm leaning toward a removable door that presses the filter into place and just screws on.

That's the unit so far. I was wondering how to attach the fan. I'd been thinking of a spring clamp. Then somebody suggested making the bottom removable and using ordinary screws. Well, I could do that but M5 is way too big for the holes in the fan. 10-24 is also too big. I'll have to try smaller bolts. The best solution would have been roof vents but as my bus was not equipped with emergency escape hatches. Thus I have to do what I can. This might not be the full solution but it should help. The white roof and the heat extraction fans have already helped. If necessary, I can always upgrade the extraction fans to something more powerful. For $30 each there are CPU fans that claim 200 cubic feet per minute. My bus interior is 24 feet by 6 feet by 7 feet approximately or around 1,000 cubic feet though it'll be less because of stuff inside. That'd take two fans at a combined 400 CFM around 150 seconds to expell all the air in the bus. For the mention though, I'll go with what I have planned.
Saturday, May 13, 2017
Bring me some wine!

As the bus badly needed tidying inside, I set to. Rather, I would have set to but needed containers for all the loose bits and bobs that have been floating around in cardboard boxes. The bus looked like cardboard city inside! A trip to Dollar General was in order where they had two packs of three plastic food boxes. Just the ticket! Needless to say, I also had to stop for fuel. My little SUV isn't bad at 19mpg but 18 gallons (which is what I usually put in) doesn't last more than about a week. Thank heavens fuel was only $1.95 a gallon!


As far as I know, things I need to do are to add a forced air ventilation inlet and complete welding the ventilation unit together. Then there could be security bars added to the back window. I need to touch up the outside paintwork. The wiper still needs to be wired correctly at the switch end and I need to check the kingpins, steam and grease. The last part, steaming, greasing and checking thevkingpins probably needs to be done by a real mechanic. Not a work mechanic who's doing it as a favor but somebody interested in being paid to do it. It costs more but the results are far more satisfactory. I learned a long time ago people doing things as favors etc do a half assed job - the same as those miserable trade deals.
Thursday, May 11, 2017
Overheating
Today was horribly hot at 97F inside the bus. I made the mistake of wearing jeans which didn't help either! Put simply I didn't do much as I spent the day feeling the effects of the heat.
I have had various ideas about putting an outside air intake into the bus. One was to put an intake under the bus. That would have been simple for installation but not for changing the filter. Another was to put the filter and fan inside the bus skirt with air being drawn through a vent through the skirt then pumped through the floor. That all seems a lot of work though!
The latest idea is to copy the existing vent in the side of the bus and pull air in through the side and pass it into the cabin through a filter. After looking at the existing intake, it seemed rather much of a challenge to use it but that might be possible. It merits further investigation.
While I was out today - being my birthday I had the day off from work - I browsed Lowes looking at things for my ventilation plans but ended up buying nothing. I looked casually for plumbing parts but decided not. In the end, the only money I spent was $2.53 in Starbucks for some very mediocre coffee.
Returning home, I cut some more angle iron ready to weld together to hold a CPU fan but did no welding. It was just too hot. Maybe the weekend will be better.
I have had various ideas about putting an outside air intake into the bus. One was to put an intake under the bus. That would have been simple for installation but not for changing the filter. Another was to put the filter and fan inside the bus skirt with air being drawn through a vent through the skirt then pumped through the floor. That all seems a lot of work though!
The latest idea is to copy the existing vent in the side of the bus and pull air in through the side and pass it into the cabin through a filter. After looking at the existing intake, it seemed rather much of a challenge to use it but that might be possible. It merits further investigation.
While I was out today - being my birthday I had the day off from work - I browsed Lowes looking at things for my ventilation plans but ended up buying nothing. I looked casually for plumbing parts but decided not. In the end, the only money I spent was $2.53 in Starbucks for some very mediocre coffee.
Returning home, I cut some more angle iron ready to weld together to hold a CPU fan but did no welding. It was just too hot. Maybe the weekend will be better.
Subscribe to:
Posts (Atom)