Saturday, August 28, 2021

Worked on the leak

Today was a hot day and the week had been exhausting. Working from 6 til 4:30 with about 3 hours of breaks during which I have to sit and nap in a hot car is not refreshing. Due to the Covid situation, the work breakroom with its delicious air conditioning is closed. 

So today I did get to the bus. The first thing I did was to set out my hinged solar panels and run the twin extraction fans. Those 5 panels produce 50W between them and are aimed squarely at the sun. The other 80W of solar panels are not aimed directly at the sun but pick up plenty power.

Turning the twin extraction fans on, there was ample power from the panels. Strangely though over the 30 minutes the fans were running, the battery level went down from 100% to 90%. Within 10 seconds of turning the fans off, the batteries were back at 100%. I'm not sure why that's happening when there's surplus solar power and nothing is being overloaded.

I regard my hinged solar panels as a great success and the next project will be to hinge the two 20W panels. That should give me 90W of hinged panels plus two separate 30W panels, two flexible 10-12W panels, an epoxy 5w panel and the 15W Harbor Freight panel.

Following all this, I attended to the leaking light fixture. Today I smoothed some of the caulk that I've been using around the edges of the mount. If there's a leak in the mounting caulk, that'll sort it out. If it's leaking elsewhere then I'll attend to that in due course.

Meanwhile I also had another go at caulking around the sheet of plywood installed over the two windows I blocked off. I need to apply more caulk but needed the stuff installed to cure first. Then I can see where I need to put more. The last stage will be painting it.

The solar panels I've been using are pretty darned heavy which is why I'm really glad I'm using small panels. For panels that can just be set outside and taken in at night or in bad weather, those light epoxy panels seem ideal. The flexible panels are just horribly expensive.

The 5W epoxy panels are available on eBay and are very light, having no frame. If they were available in bigger than 5W or 10W I'd have bought several just to put up inside the windshield and to place outside as required. This is a market that the solar industry seems to ignore. Perhaps making cheaper panels without those heavy aluminium mounts just makes the panels sell for too little money? I like the flexible panels - not for the flex but for the lightness. Imagine one screwed down to a lightweight plastic or wooden frame. It'd make life so much more pleasant.


Sunday, August 22, 2021

How to find a leak!

Three problems were resolved today, all within an afternoon. How about that for progress?

The first problem - now that the control console can be opened and closed properly, having put rivnuts in place of the widening sheet metal screw holes - was to eliminate the buzzer. As per the circuit diagram there was a wire (in this case two wires) coming from a master plug. Those wires disappeared through a hole under the console so like as not they're going to come out in front of the heater fans. It really wasn't worthwhile looking for a way to remove those wires so I just capped them.

Having put a little red cap on the wires I traced the video cable. There was a problem in that I was not getting video from the new camera. It had been working but tracing the video cables proved fruitless. Everything in the console looked good so I just closed the console and left it at taking the buzzer out of the circuit. 

But wait, there's more. While I was in the console, I removed the horn switch that I had installed and the wiring that both I and the hillbillies had used because the horn actually works through the steering wheel button. That was a task well done.
The next step was to check to see if the video cable was disconnected at the back. Indeed, it was. Now it is reconnected so there should be no more issues.

While I was working in the bus it began to rain. Within a few minutes water began to come down, dripping in two places off the head protector above the back door. 
Earlier in the day I'd looked using an endoscopic camera inside the back of the bus and found no evidence of leaks but had discovered some rusty spot welds. Nothing I can do about those! Not having my endoscope, I put my finger up and felt around. I felt wetness.

There was a line of wet coming from the wire to my door side top marker light. That's the leak likely identified. None of the others appeared to be leaking. I'll have to go back up there and squirt some form of sealant up there just to seal around the wire. With luck, that will be all the leaks dealt with.  The front marker lights need to be checked for leaks too. That can be done another day though.

Sunday, August 15, 2021

Beep beep'm beep beep yeah

"Baby, you can drive my car
Yes, I'm gonna be a star
Baby, you can drive my car
And maybe I'll love you"

So sang the Beatles back in 1965, a full 29 years before the bus was even built. Today the horn worked though the horn button. Interestingly the brake booster didn't whir until my foot was on the brake so that's two things resolved or is it more?

Today I went inside the big black box on the right. That's where all the cables join. Having already fitted spade connectors to the separated horn wire and connected the red wire to the line that led to the actual horn, I found that the two horn ends will just clip together nicely using the spade connectors. Clearly not much wire was missing.

Starting the bus it was surprising not to hear the brake booster. Perhaps the air that was in the line is now not in the line? It did work when the ignition was off, which was good. So, the horn was connected properly and seemed to work so perhaps prematurely removing the red wire was  next. The only problem will be if the horn button is bad and the horn sounds randomly while driving. 
It was intended that I'd get to the disconnected video cable and the buzzer, using the space occupied by the buzzer for a new fuse panel. It was just a bit much sitting inside a hot cockpit though. It was 98.5F in the shade and I wasn't in the shade.
A few weeks ago, I hinged a pair of 10W solar panels and a trio of 10W solar panels. Today I changed some of the connectors and added connectors so it will be possible to connect one or all on each hinged set in order to generate power. I've used the standard SAE connector on one panel - that will connect into the solar system. The other connectors are some cheap low amperage connectors found on eBay a year or two back. They're not that good and certainly can't take water bad weather but they're fine for fold-out panels that are just placed in the sun, on the ground for a little temporary extra power. 

Adding up my solar, I have...
  1. Two flexible mystery panels that have great claims but actually produce somewhere around 10-12W so we'll say two 10W flexible panels giving a total of 20W
  2. Two 10W panels hinged together producing a total of 20W
  3. Three 10W panels hinged together producing a total of  30W
  4. Two 20W panels completely separate producing a total of 40W
  5. Two 30W panels completely separate producing a total of 60W
  6. A single 15W panel producing a total of 15W
  7. A single 5W panel producing 5W
  8. Two 10W panels mounted permanently on the bus producing a grand total of 20W
So, the grand total of power potentially available is around 210W of which with everything running all at the same time is going to exceed demand tremendously.
And finally, my tires are all around the same age. DOT 0210 means the 2nd week of 2010. Thus they're all 11 years old and undrivable so I'll have to get somebody in to change them. 

As of today, things that I know that need to be done...
  1. Remounting the one sidelight above the side door and using rivnuts instead of self-drillers.
  2. Replacing the push button switch and a voltmeter above the microwave.
  3. Remove the buzzer in the console.
  4. Clean paint off the windscreen
  5. Complete replacing the brake lines.
  6. Put the solar power wire to the driving battery compartment so the batteries can be kept topped up.
  7. Rework the right wiper mount.
  8. Replace the tyres
There might be more to do but those are the main things. I would like to put bars over the windows so we can call that point 8. I have to test the roof vent and if it fails, put a hood over it.

Well, things do seem to be coming along well. In that lot there's one big job - the brake lines and that's really about it. I put a temporary fix on one of the batteries but it seems to be holding so I might or might not rework that. As a friend says "there's nothing so permanent as a temporary fix".

Saturday, August 14, 2021

A leak stopped?

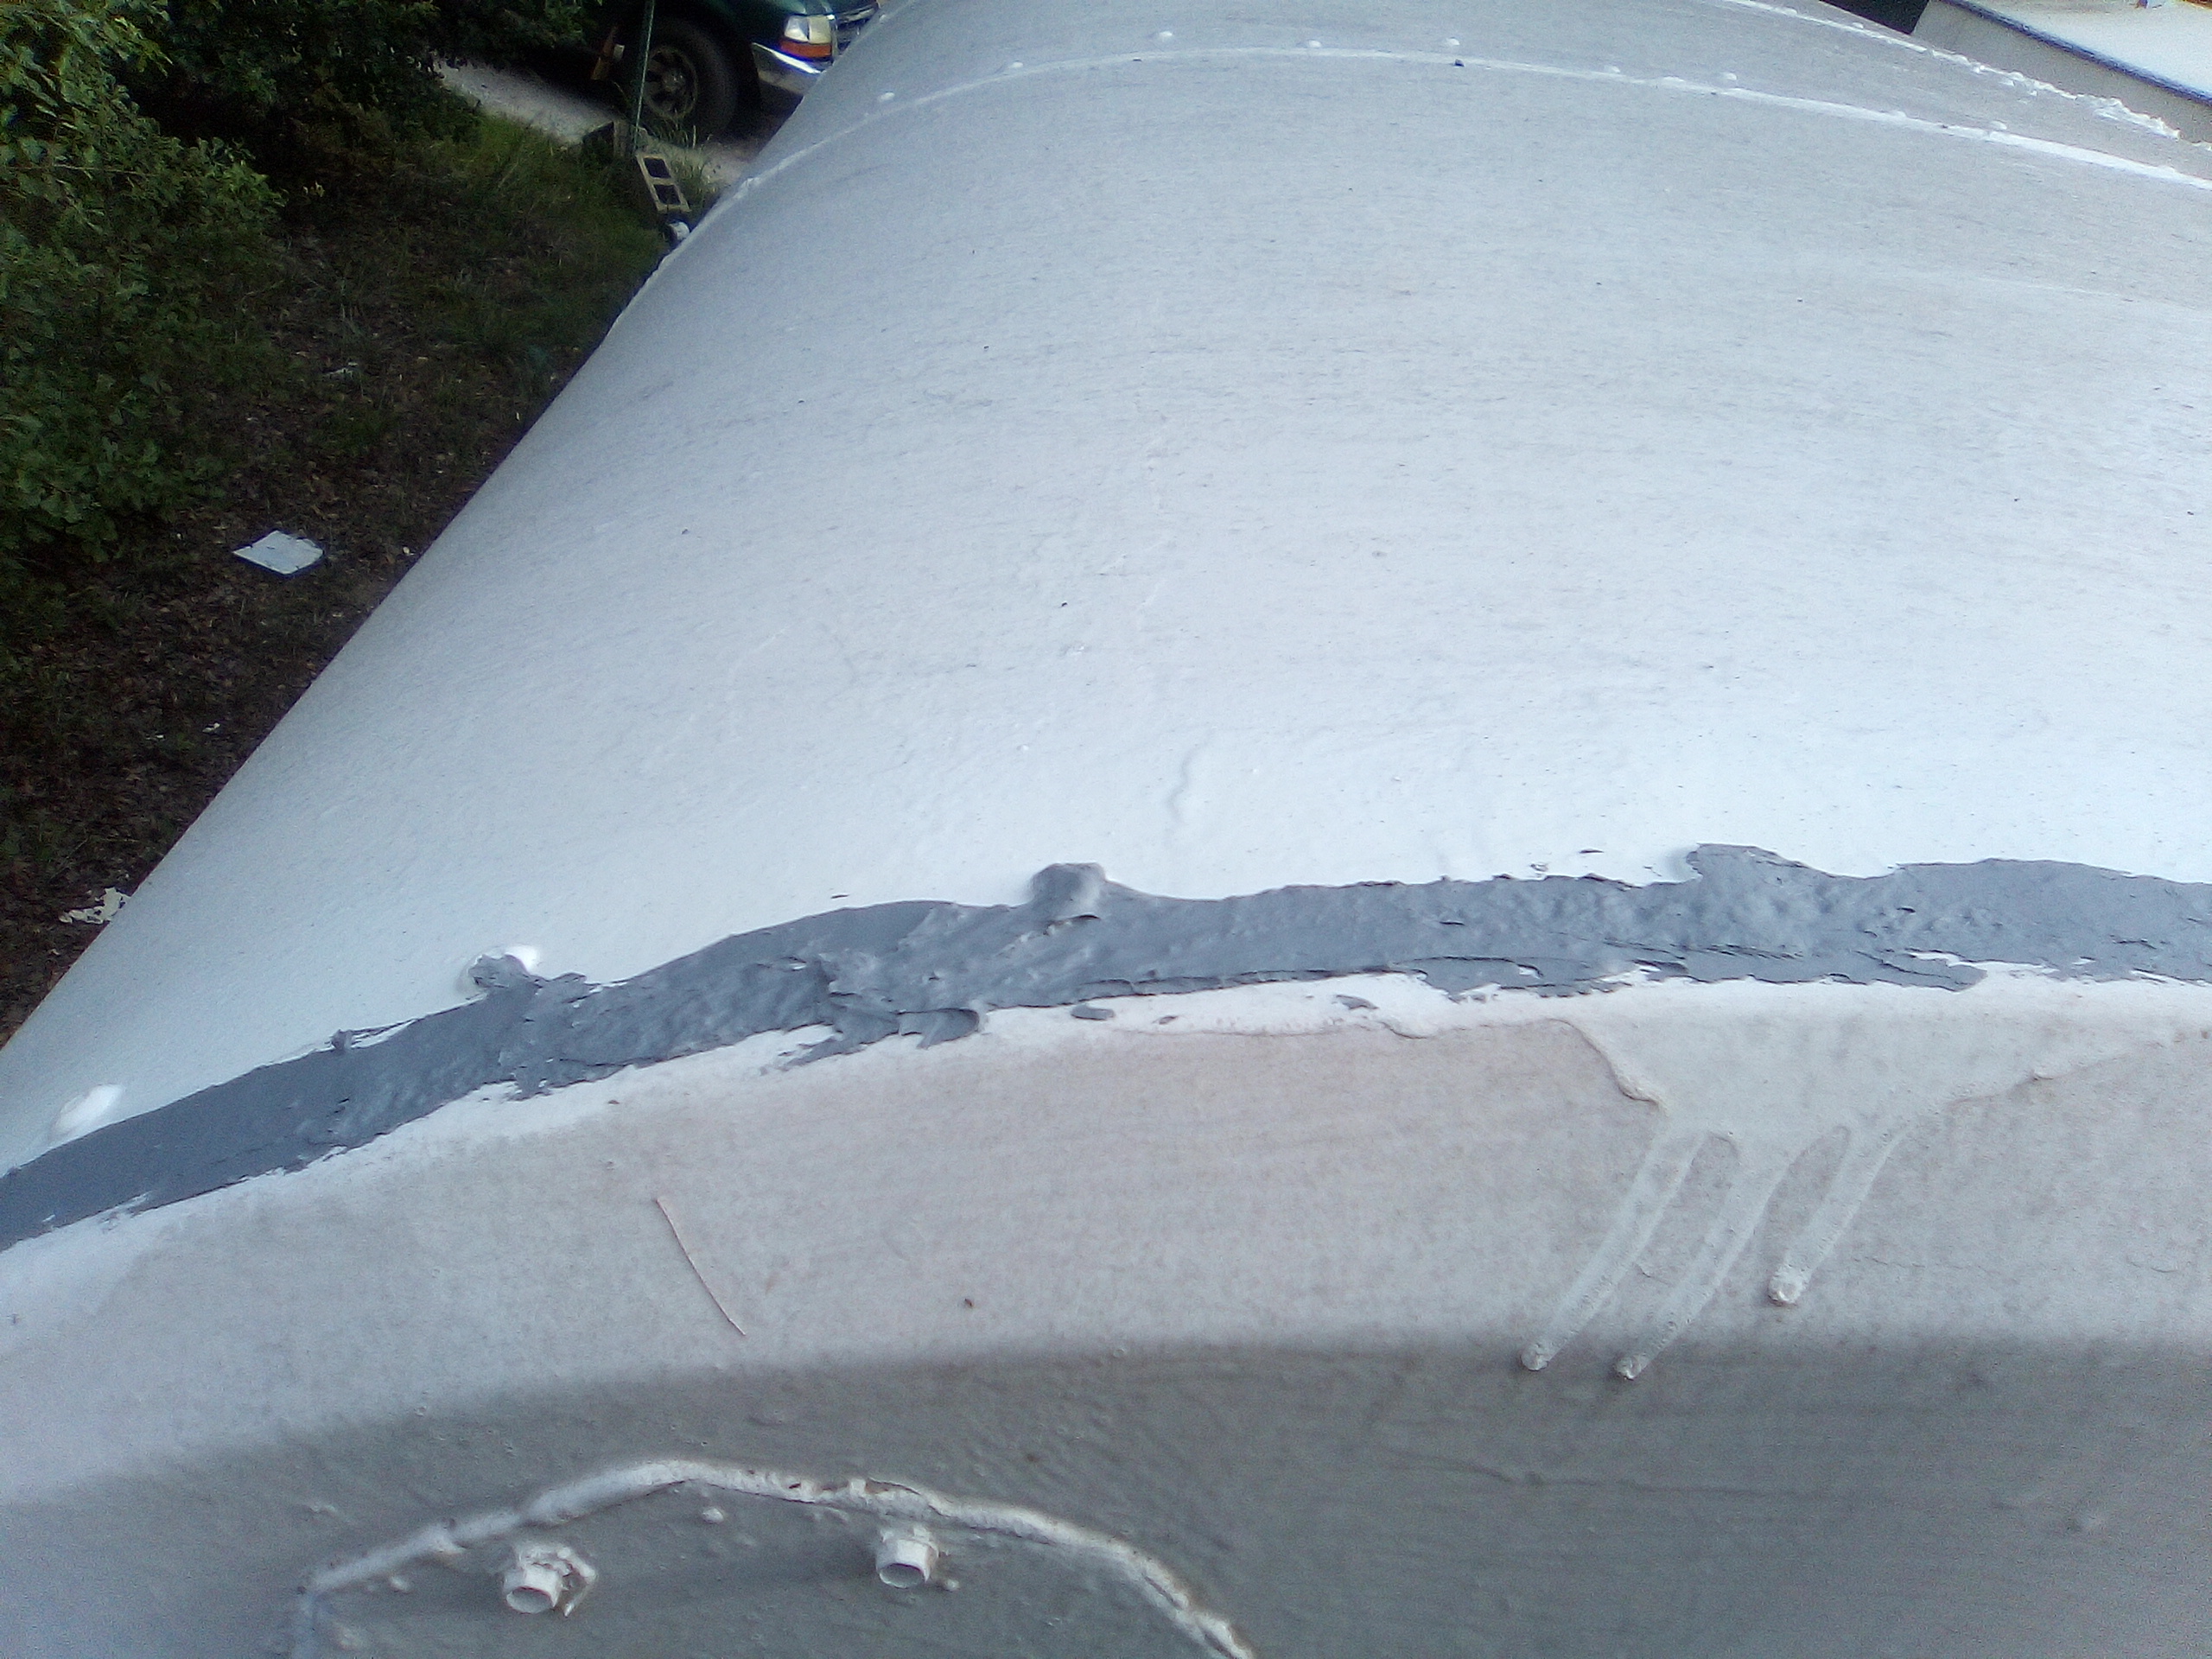
Leaks are no good whatsoever and the leak at the back had been leaking for quite a while. Today, from the vantage point of a stepladder it became evident that the leaks were due to some poor seam sealing whoever had done the sealing ten years ago had done. 

It was slow work with a nylon brush in the pistol drill but better doing that than using the cupped steel brush in the angle grinder and getting shrapnel everywhere. The debris field was narrow enough to be swept with a hand brush from the step ladder. Once that was done, the shiny metal was sprayed with the first spray can that came to hand, bearing in mind there was no rust and it had been bone dry for days.
Once the painted seam had dried, Dynatron Seam Sealant was used. It was a previously used tube. The key to keeping opened tubes is to cut a small hole in the nozzle then to fill that with a screw when done for the day. Keeping that tube in an air-conditioned building also ensures it keeps. 
Applying the caulk was a case of squiring a bead as far as the arm could reach then smoothing/spreading it with an old blister packet from a pack of screws. That worked really well, was cheap and disposable. On the Dynatron website it's mentioned that the caulk can be put on with a brush. That would be the end of the brush though.

Aside from the very back seam, the only place now that water could be coming in would be the previous seam. That looked OK on the last visit to the roof. It's unlikely to be seepage from the lights as when my hand was up inside the roof cavity, the damp was above the lights. Similarly the rivets at the backs of the solar panels seem pretty leak-proof. It is now a case of waiting for the next rainstorm.

While the caulk gun was out, I switched caulk tubes and completed caulking around the wooden panel in the bedroom above the bed. That is now ready for paint. One day I'll get to that. I probably need to touch up the whole bedroom. That was painted in haste and not very well.

Speaking of other things, the horn button and horn relay seem to work. When the horn was connected to the horn button and the engine was off, the horn was almost imperceptible. I'd assumed that the horn relay was bad. Wiring the horn back to the hillbilly wire had the same result. When the engine was on, the hillbilly horn wire made the horn sound loudly. I suspect that the same result will happen when the original horn wire and button is used. That makes me suspect the hillbillies couldn't hear the horn with the engine off and just rewired it. 

A lot of people rush in to do things without thinking and without questioning why things are as they are. A very popular thing is to remove the vent from the roof that keeps the insulation dry. Not smart! The horn looks like another example. I could go on about masks and the Covid virus too. People whining about and refusing to wear masks while claiming Covid is non-existent without realizing a mask is a sensible backup should their opinion be wrong and scientific evidence be right. 

So, the back seam is done. The horn will probably be working next time I work on the bus. If the horn button works then the hillbilly wire might as well be removed. It would be entertaining to rig it to a train horn but extra loud horns are actually illegal. An entertaining idea but not worth pursing. There is no reason as far as I can tell to have an extra wire in the engine bay so I might as well retire it.

When running the engine the other day, the Hydromax kept running. When the engine was off, it only ran when I put my foot on the brake. Having researched hydraulic brake boosters there are likely two solutions. Either it is the air in the back brake line or it is the pressure switch at the top of the brake booster. The latter is the most likely. 

Things remaining to be done....

  • Back brake lines
  • Switching the horn over
  • Reworking the right wiper mechanism
  • Testing the new roof vent and putting a hood over it if needed
  • Removing the buzzer from the console
  • Small internal electrical fixes
  • Bars over the windows. Measuring, it seems 3 bars will be sufficient though it would be possible also to use a perforated sheet. Bars look more prison like, however.

Saturday, August 7, 2021

A sub-job completed

 
Today started with thinking about the horn circuitry. It dawned on me that I have not seen a horn relay anywhere. Looking around online didn't reveal any information whatsoever about a horn relay for a 1994 Carpenter 3800 with an International/Navistar chassis. Looking at the wire from the horn switch, it seemed very light for 15A horn units. Perhaps that's why the hillbillies put a thick, direct wire in place? The fuse for the horn is 15A and that's to the right of the steering wheel. The puzzling thing is what remains of the wiring goes straight to the horns. I shall have to ask the work mechanic if he has encountered any busses with horns wired direct to the button, without any relays.

Meanwhile I felt like working on the screws that hold down the top of the control console. Originally it was held down by sheet metal screws that had become so worn and loose that they didn't have very much effect. I'd replaced them with self-drillers but even some of those were now loose. 

Rather than using my Harbor Freight hand rivnut tool I used the older method of two wrenches, a bolt and a washer. That worked quite well.

The process is pretty straightforward. A nut is put on a bolt followed by a washer or two then the rivnut. The whole lot is put into the hole and the bolt held firmly so it cannot turn. The nut is then unscrewed. The rivnut then expands and clamps itself into the hole.
When the rivnut is in place it provides a much better way of securing things than a simple sheetmetal screw binding on thin sheetmetal. That works the first few times but eventually gives out as the hole becomes bigger. Then it's a race to use ever bigger screws.

Once the rivnuts were all in place it was really easy to fasten the top of the control panel down. That will now not shake nor rattle as it has in the past, leading to a much quieter ride.

This was not a task high on my to-do list but it was something that had been niggling me for a while. I can honestly say I detest unnecessary noise when I'm driving.

Having got this far I looked under the hood at the horn wiring. Taking off the wire nut and electrical tape the hillbillies had put on, I put spade connectors on the wire plus an extra bit of wire so that it was possible to connect the original two horn wires. That's when I realised neither of those wires came from the horn button. They headed in different directions.

I'm nowhere nearer working out what the disconnected wire is and to be honest that does not immediately interest me. I'll find that out in due course. While I was in there, I hosed out the inside of the cover over the cable junction to free it of nasty rat debris.

Connecting the two bits of grey wire and pressing the horn button, the horn relay clicked loudly but the horn sounded feebly. It sounds more like a bad horn relay to be honest. Temporarily I reconnected the red wire - so much simpler when I use the correct spade connectors! Tomorrow, weather permitting, I'll trace the wire from the inside of the bus. I'm pretty sure now that leads to a horn relay. If need be, I can use my endoscope to locate the relays but I'll bet when I find them they'll be in an obvious place!

There's no hope of asking the bus maker since Carrpenter went bus in 2001. That's 20 years ago. I doubt anybody working there even remembers that they worked there.

Friday, August 6, 2021

Nearer to solutions

Today I went shopping - I needed to get another tube of caulk to do the rear roof seam which appears to leak despite not appearing to initially (hence I never bothered sealing it). My first stop was O Reilly's. They had no caulk. I proceeded on to Walmart to do the grocery pickup. That was a complete shambles.

There are 19 pickup bays and the staff seemed to have extreme difficulty in servicing just one bay. I believe I waited 15 minutes before somebody came out to check on me (despite my arrival already having been announced online). It was a full 30 minutes after that that the groceries finally appeared.

My next port of call was Advance Auto and they were out of the caulk I wanted. That was pretty incredible! The only other place was Autozone. In there I did find two tubes of caulk but needed only one. Picking it up, I joined the line and waited. The staff did not seem to bothered about manning the tills or talking to the customers. After probably 20 minutes I gather from the customer in front that their computer system was down. That would have been nice to know! I put the tube of caulk down there and then and walked out. When a company has been shut down by technology problems they need to hang up a sign that says "closed for business". They also need a manual backup method!
Having got the groceries home and unloaded, I looked under the hood of the bus. I'd ascertained using a voltmeter a few minutes earlier that the horn button actually worked. That means I don't have to fight to undo the screws. 

Following the wires into a plastic box, I removed the cover and found a rat nest (minus rats) as well as a bundle of wires. Looking at the wires it seems that rats chewed through one wire and bit on a couple of others. The chewed through wire is the horn wire. The hillbillies that owned the bus before me put their own wire that bypassed the horn switch and the horn circuitry inside the cab. Heaven knows why!

It looks as though I should just join the grey wire that's been chewed off to the grey wire to which the hillbillies that owned the bus before me had twisted a red wire. Those guys hadn't even removed the rat nest!

Curiously there's a mysterious wire with a connector that has been disconnected. Heaven knows what that's for. My next mission under the hood will be to connect the horn wire correctly while leaving the red wire until such a point as I'm sure the horn really works with the steering wheel button. 

Meanwhile I looked at the control console and how the lid won't secure well. It seems very much that it should be possible to install rivnuts and 10-24 machine screws to hold it down properly. While I was at it, I looked at the buzzer and found it had a white wire with black dashes on it. That, according to the circuit diagram led to the back door etc but the wire seemed to go forwards rather than back. That merits further investigation as do the two grey wires that came from the buzzer and also went forward. 

A new Tractor Supply opens locally soon. That will be an easy trip for me to get the aluminium I want for the roof vent - though I have yet to remove the tape to test the roof vent for leaks.