Sunday, January 26, 2020

There they are!

That's the new charge controller. It is heavy and big. I looked and it has three different ways of mounting it. On the back there are what look to be threaded screw holes so it can be mounted to brackets or something. There are also keyhole cutouts so it can be hung on something. There were also some small mounting brackets with threaded holes that allow me to mount it on a surface using my own screws. Measuring the holes allowed for screws, having mounted the brackets to the controller, it seemed they were 4.3 or 4.4mm in diameter. I suppose I could drill the hole bigger and use one of my 8-32 bolts. That would probably work best. I have a pile of 8-32 bolts somewhere and lock nuts too. 
Today being Sunday and a day when not much happens, I didn't do a lot. In fact aside from going to the store to pick up some food, nothing much did happen. There were the usual people dressed to the nines for church but that was about it. No knock-down drunken brawls or long walkup gunfights on Main Street. Even the meth heads were behaving themselves. In fact the most exciting thing to happen today was that a leaf fell off a tree.
This is the old charge controller. This was allegedly USA made which is why it cost me $30 rather than the usual $10 for a Chinese charge controller. Oh, I have a long history of Chinese charge controllers. They usually end up blowing themselves up after a few months.

I've been through several of the blue ones with the digital display and several of the black ones with LEDs. I've had them rated at 10A, 20A and 30A but curiously the connectors are not capable of taking wire of greater than 14 gauge. Even more interestingly, none has survived beyond about a 6amp load. They're probably good for charge controlling but not good at all for discharge controlling.

Notice that the battery says 65%. The batteries have been charging now for the whole day since there's nothing but sunshine. I even have the little fake 60watt panel that produces 10watts standing in the sunshine. Two 35AH batteries with virtually no load should charge rapidly. In fact, earlier in the day they were reading something like 86%. Now despite constant charging they read just 65%.

Looking at the space where the charge controller is located, I do have sufficient space to install the new controller though I'm going to have to go into the panel behind and dig out the spray foam I put in there a while back. That stuff is the worst nightmare for bus constructors! It promises so much yet yields so little and causes so many problems. Once that's done I'll be able to get in and bolt the new controller to the panel.

I'm really not sure whether it's the charge controller that's at fault or the batteries at this point. If I were a betting person I really wouldn't know which way to go. Having got the controller, the next step in logical sequence is to install it. This one comes with a temperature probe that's supposed to be sited near the batteries. That's no problem. Just siting it underneath the bus is good enough.

I looked up the cost of replacing the AGM batteries with LiFeP04 batteries and the price was outrageous. For 100AH they wanted $1,500. Even a 30AH was $250. For the same money I can get three Duracell 35AH AGM batteries. Even crazier, neither has much of a life span. 2-3 years max.

It looks like I have quite a few projects on the go. I'll have to get them done one at a time. I'll have to concentrate on finishing things rather than starting new ones:
1. Replace the roof vent.
2. Redo the panel on the bottom of the back door.
3. install the new charge controller.
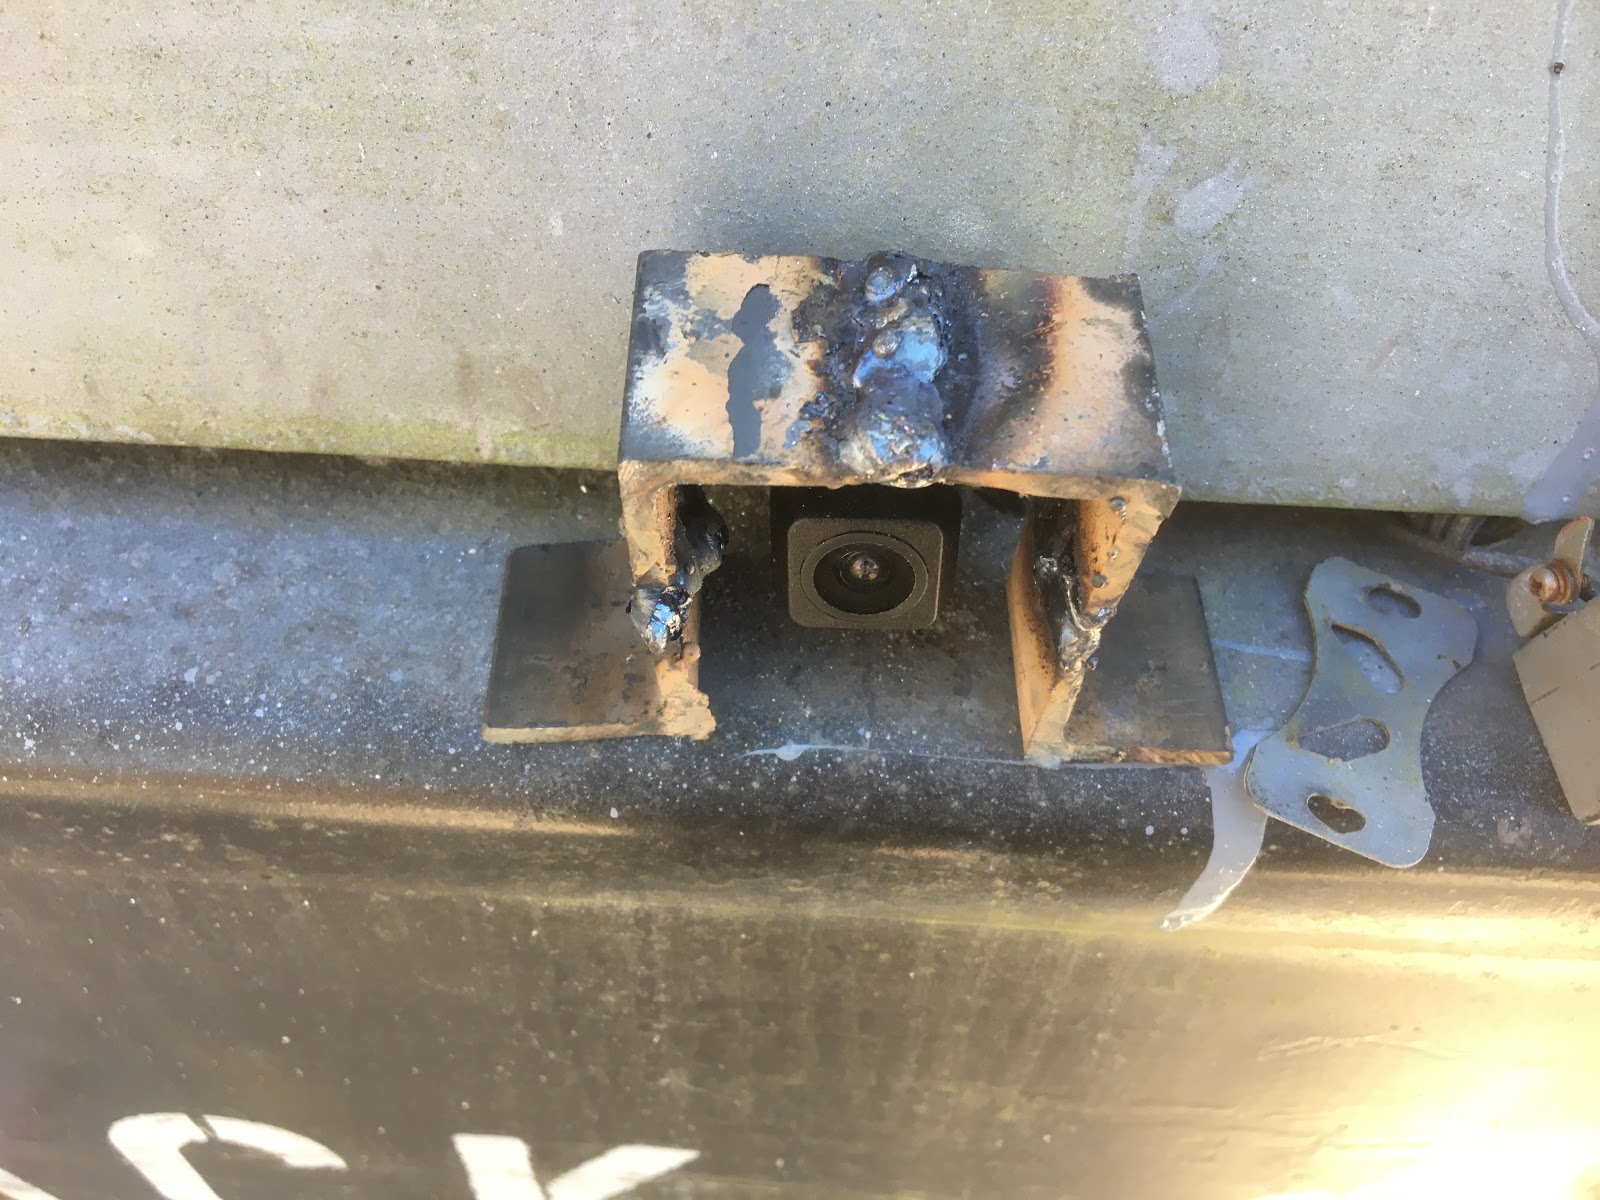
4. Install the relay and solar power line so I can power the front and rear cameras when the bus isn't running.
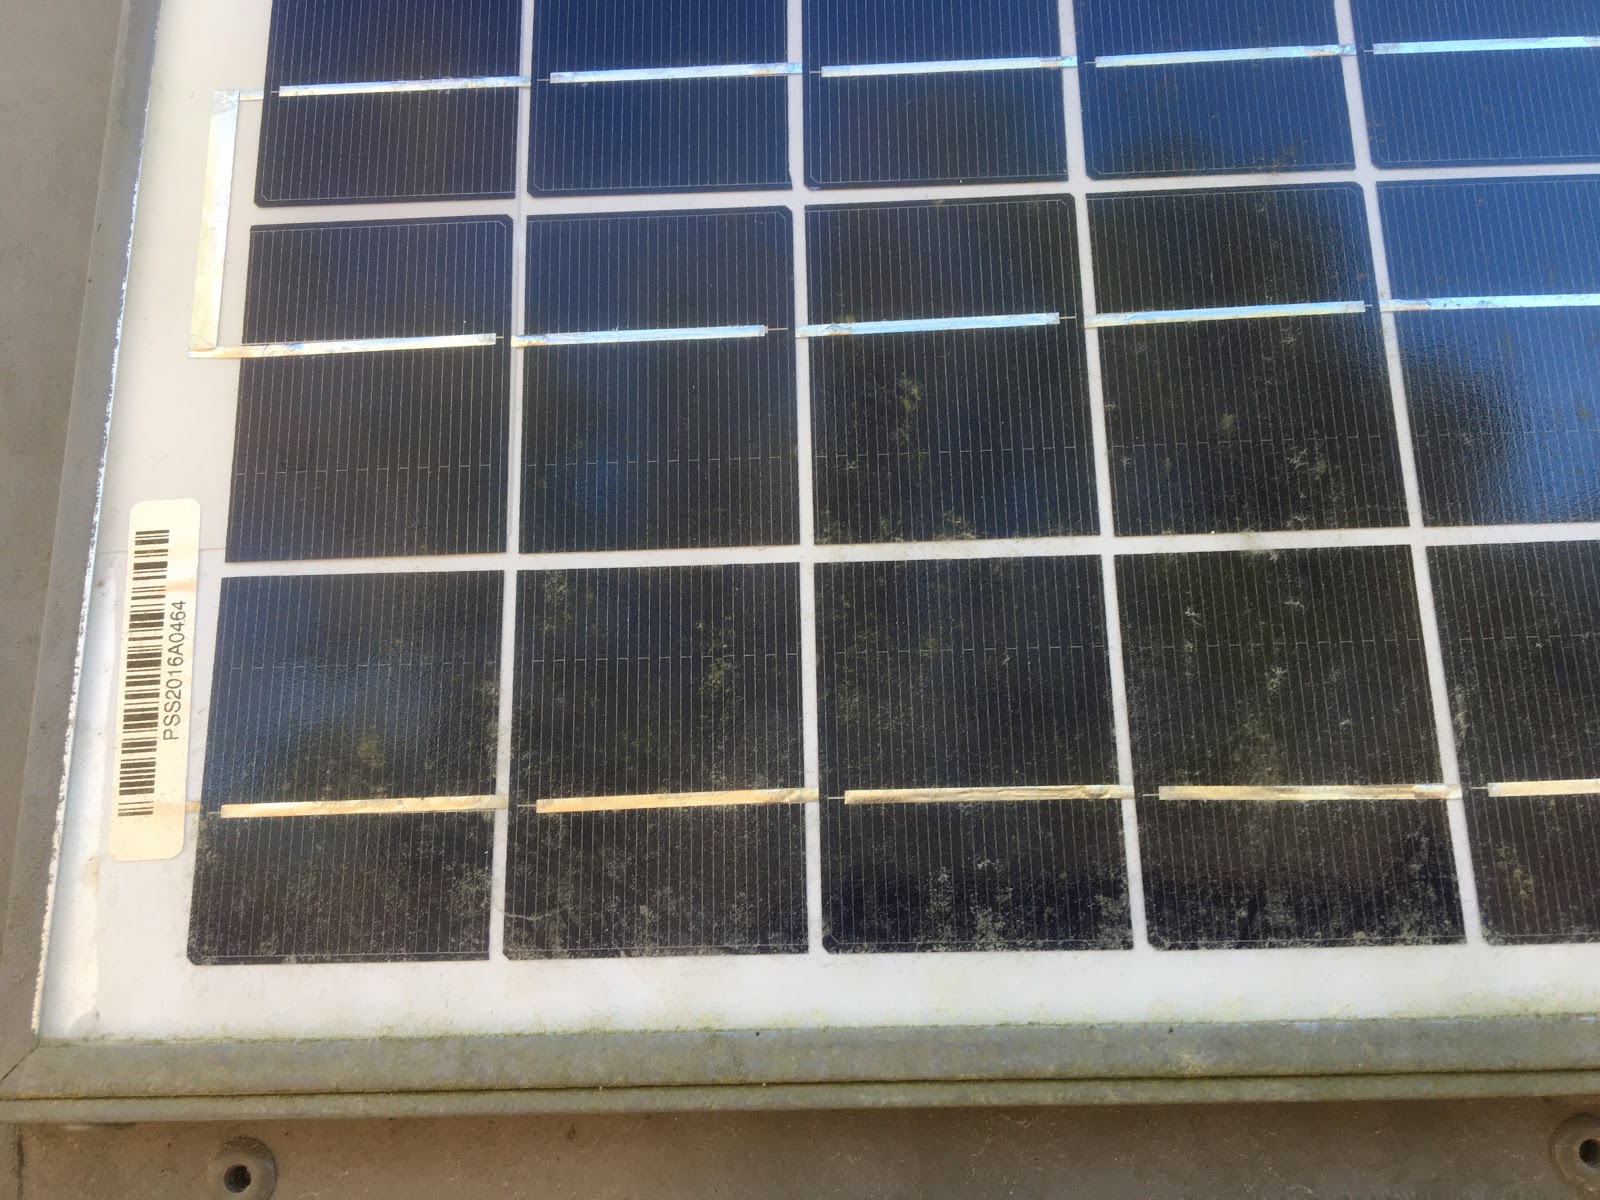
5. Install the new solar array at the front, replacing the compromised plastic solar panel.
6. Continue to close up the other windows on the back of the bus.
7. Install security mesh over the side windows, each side.
8. Install new tyres.

Having done all that I should be free to use it for a summer jaunt.

While I was rooting through one of the boxes of screws and what not, I noticed my hands smelling of pee. Then I remembered a rat had been in the house where the box of screws and what not were stored. In fact, not just a rat as it turned out but a whole colony of rats. Everybody moved out of that house just in time! If I suspect a rat in my bus then I will have no hesitation in driving it to a remote location and fumigating it with hydrogen cyanide gas. It's relatively easy to make and will be my final solution to the rat problem. My extraction fans will clear the air relatively quickly.

So, at about 4:45 I disconnected the solar power and the battery from the charge controller. Nothing - absolutely nothing can be discharging the batteries now. When I did that, the controller was reading 56% or in reality 56% of the 50% I should regard as maximum discharge of a battery. In other words, 78% of where it should be.

Roughly an hour later, at 5:40 I reconnected the battery and the solar panels. The battery was reading 52% of capacity available. Interestingly, all three independent volt meters wired into the system read 12.7v. The solar power coming it was around 10.7v by then or basically no contribution with a PWM controller.

Interestingly, 52% of 50% is 26% and that would make for a 76% full battery. According to a table of values I found, a 75% full battery should read 12.6v and a total of three volt meters told me the battery voltage was 12.7v. A few minutes later after using some lighting to find something and setting the security camera going, the metered voltage had indeed on one meter dropped to 12.6 but another read 12.7 so it must have been close.

Though I'd like to point my grubby little index finger at the charge controller (because I have a new one and because it was cheaper than new batteries), I have to accept that it probably really is the batteries that are on their way out. Word has it that even deep cycle batteries just don't last too long. I think the Harbor Freight one could have been a little abused anyway. I'll have to add a battery tester to my next Harbor Freight trip. Now that won't be this month but could figure into a trip next month. I had an unplanned expense this month so I had to mortgage the pussy to pay for it.

Saturday, January 25, 2020

Curiouser and Curiouser cried Alice

Looking around, I couldn't see Alice. I guess the big limousine must have taken her away. Needless to say the thing that has been curious over the past few weeks has been the battery power problem in the bus. It has been totally mystifying as 35W should be perfectly adequate to power both my door lock and my security camera and charge the batteries. Needless to say I had an extra 30W added to that lot.

Anyway, today my last (the very last) pair of solar panels arrived. They're 10W panels from eBay that are allegedly Aleko but I do not see the maker's name on them. Could it be a Chinese forgery of a Chinese product? Surely not - the Chinese are far too inscrutable for that! Indeed, the suspicious mind within wonders whether it's part of an equally inscrutable Chinese plot.
Putting a meter across them, they produced power and on the 250M setting on the meter, the amperage swing half way across. Whatever that means, it's probably good. I have no idea what half the funky things on that Walmart meter are actually for. Resistance and voltage yes - I can cope with those.

Putting my watt meter on the panels produced a big fat nothing. As a test, I put the meter on a 30W panel and got a good reading. Putting it on a 5W panel yielded nothing so I'm betting that watt meter has a high threshold.

Today I checked on the battery. It has power going into it from a 30W panel, a 15W panel and two 10W panels. This means it has power coming in from 65W. I even put a second 30W panel on the ground facing the sun. After a while I checked the battery level on the charge controller. It read 86%. That was excellent. Since the sun has been belting down today I have been getting plenty power. I was therefore somwhat puzzled a while later to read 72% on the battery.

Turning the power to the bus off for a while, I was perplexed to see the battery was even lower later. Nothing could be using that power! I turned the solar power off and left the batteries hooked up solely to the charge controller. When I looked later, the battery level was even lower. This began to give me an idea of what the problem might be. It's either a duff charge controller or a duff battery. There's an off chance something might have attacked my wires, causing power drain but while it's not inconceivable, it's unlikely.

There are two batteries in the system. One is a Harbor Freight 35AH battery. The other is a Duracell 35AH battery. Both are the U1 size.  If one of those is bad, it should be my suspect Harbor Freight battery but it could also be the Duracell. I shall have to remove them and see which one it is. For the moment I'm not quite sure what the problem actually is. I have narrowed it down to likely candidates.
I tried my flexible solar panel today. It's allegedly 60W but I can tell you right now that is a complete fabrication (eBay sellers lying again, really). It should, pointed directly at a bright sun, have produced 5A. That's more than enough to power my car tyre pump. That takes 4.5A. Nothing though - it didn't do a thing. My watt meter did read the incoming power at between 6 and 16W. So, it's not a 60W panel as sold. In fact I believe it's probably a 15W panel, possibly a 20W. Nothing more than that. Basically, it's good for charging cellphones on the go.

I do seem to be coming across nothing but garbage on eBay. I did decide never to buy on eBay again and started buying from Walmart. I really don't know what's happened - it's as though eBay has become as bad as it used to be back in 1995 - pretty much like the seedy bar where you could go to buy your own hub caps back.
The sun was pretty bright. As can be seen here, that flexible panel was churning out a massive 9W, lending credence to my theory that it's actually a 10W or 15W panel and nothing more.
Today I pulled the card out of my C-DVR that's hooked up to my backup camera that I've set as a dashcam on the bus. I had some ropy video but adequate to show what happened in the event of a collision or somebody doing something stupid on the road. Once I can get the power problems sorted out on the bus then I will put a relay in the console that will power the C-DVRs from solar power when I'm parked and from the bus battery when I'm driving. That'll probably need a line from the ignition switch. Looking at the video, I could see fairly clearly everything that was going on in front of the bus.
A few days ago, another backup camera arrived. I connected it to my portable screen and was perplexed to find the image was on its side. After some cursing and bafflement due to the non existent instructions I figured out that the camera rotates and swivels in the mount. It also has a flush mount that will allow me to mount it flush with the skirt above the back bumper. That will save me a lot of hassle as I broke the last camera as it protruded.  That in turn will allow me to use the replacement camera I did get before, as a replacement for the top camera. This time I'll put a rain hood over the top camera as water seems to have seeped into it, despite claims of waterproofing.

As far the new solar panels - they'll need some testing before I'll use them. It could be that they're no good. Who knows, from eBay any more? The only reason I got them from eBay was because Walmart was up to their usual price trickery. Watch prices of things on their website and you'll see them going up and down like a whore's drawers. I can literally see a different price every day on some items. The solar panels they had which said "Aleko" on them were $18 each then suddenly they were $25 each. That was when I went to eBay. They're back down now to $17.98! Of course Walmart's trickery doesn't end there. Their "Free delivery" isn't really free when they tell me at the same time I can save $1.18 by picking up from the store (which fortunately happens to be right close to my work place).
A few days ago a Renology Rover arrived. It was half the price it cost everywhere else at Walmart so that was an online purchase. It's absolutely bloody massive. Given the issues I've been getting with power (which are probably a bad battery) I figured a top notch charge controller might help. Certainly it might help by milking more power out of the panels in low light situations. I'm going to have a battle to find somewhere to put the new controller!

One of the other things I did today was to make some foamboard masks. I cut out two, the size of my 20W panels with added flanges and two the size of my 10W panels also with added flanges. The flanges are the aluminium angle strip I'll rivet to the panels in order to secure them to the bus in the manner of my rear panels. It's pretty much a template to see the best arrangement of panels at the front. I have a single 15W panel with built-in screw holes right now. I have to replace that as the plastic bezel was damaged by vandals. That makes it unsafe and I don't want it falling in front of my face when I'm driving. I have a feeling I'll be putting a single 20W panel with a 10W panel each side. I might end up with three 10W panels - it all depends on what I can work out as being best.

Checking the battery a couple of hours after disconnecting everything bar the controller, the controller informed me the batteries were at 43%. I've got the controller set to where if the batteries are at an actual 50% capacity then the indicated capacity will be 0%. Thus right now the batteries are probably somewhere around 70% actual charge. That tells me that (since the indicated capacity dropped from 86% to 43%) I probably do have a dead battery.

At the moment I have a Duracell deep cycle and a Harbor Freight deep cycle. Neither particularly impress me. At $100 on average for a battery, they're not that cheap either. The ideal would be a lithium battery but they're completely outrageous prices. I just have to identify the dead battery and replace it. The Harbor Freight battery was purchased in July 2018 so it's around 18 months old. The Duracell battery seems also to have been purchased in 2018. I'll have to test both and see what happens. I've suspected the Harbor Freight battery for a while. I hadn't realised they were both as new as they are. Maybe my next purchase will be a battery tester?


Tuesday, January 21, 2020

It arrived

My new MPPT charge controller arrived today. Looking at it, I'm scratching my head as to where to put it. It's absolutely flaming massive. Needless to say I bought the 30A version when the 20A might have sufficed. What blew me away was the sheer size of it!
The thing is massive and has a humungous heatsink. It's supposed to max out at 400W of solar power. Well, all my panels combined add up to less than 200W right now, including the two that have yet to arrive. I still have to decide how I'm going to attack putting a new panel on the front of the bus. Two 10W panels gives me 5W more than before. My two 30W panels can still be set up inside the bus. My two 20W panels can still be set on the ground in direct sunlight. The two oddball panels - the "60W" that seems more like 10W and the 5W panel are more likely of use as solar demonstrators.
As can be seen in this picture, there's really not much real estate at the back for my new solar controller. Complicating the matter is that I have to be very careful about making new holes in the panel. I was dumb enough to inject spray foam into the cavity which has had the side effect of fixing into position the wires behind the panel that would otherwise just be brushed aside when I'm drilling or whatever. I had thought the new controller would be the same size as the existing controller.

Looking at the manual, I'm quite surprised that it gives me the same information (or lack of it) as my existing PWM solar controller. Clearly I'm going to have to connect the panels to the controller using SAE connectors so that I can put a watt meter in place occasionally. I'll do the same with the load side too as that way I'll be able to meter electricity usage more accurately when needed.

Already inside the bus I have some cheap digital Chinese volt meters and unsurprisingly, I can get different voltages displayed on each one - all in the same ball park but while one says 12.6v another will say 12.5 and another will say 12.7. There surely can't be that much voltage drop as the cables are all plenty thick enough for the current needed by those meters.

If I can't get the new controller to sit neatly in a vacant space, I'll have to move a few things around. That's more work than I wanted but if it'll achieve my goal then I'll do it. Part of the problem is the organic nature with which the system has grown.

Sunday, January 19, 2020

Solar enhancements

As this is a three day weekend I spent the first day hunting for a ladder that should have been around but wasn't. Perhaps it was pinched? Given the fact somebody stole the outgoing mail just before Christmas and there have been people cruising past at about 5mph clearly looking for bad things to do, it would not greatly surprise me.


In the end I decided that since I needed a ladder to get onto the hood of the bus to measure my solar panel precisely. I'd already ordered a pair of 20W panels to replace the vandalised 15W panel, but had based my measurements on what I could see of the tape measure held up from the ground. Those panels arrived a few days ago. Also arriving yesterday was the 60W flexible solar panel from China.

The solar panel from China was allegedly 60W but looked exactly down to the cell count like the 30W panels the Chinese are also selling. I had my doubts. It arrived in a very battered box.
With the way that box was bent and the way it was open, at first I thought whatever in must be surely broken. Then after realising it was a flexible solar panel, I was utterly amazed to find it intact inside the box. Whatever else was missing, I don't know.
Sadly there is no information on the underside of the panel to tell me what wattage it is. Given though that it has 36 segments like my 30W panels I doubt very much that it is any higher than 30W. Indeed, putting it on my solar system which has an almost depleted battery I got almost 10W out of it, angling it right at the sun, according to my watt meter.
There's the front of the panel. Notice that the wire connector is a humongous bulge on the back. That really and truly destroys any idea of mounting the thing flat on the roof of the bus. Honestly I'm not that impressed by this thing. The only thing this panel has going for it is that it is very lightweight and easy to put in the windscreen. 
Needless to say the panel came with the usual bizarre assortment of connectors. Nobody but nobody uses cigarette lighter plugs and sockets (well, I do and I'm slowly eliminating them). The first order of the day was to put an SAE connector on the panel so it will mesh nicely into my solar system since I have standardized on SAE connectors. I did try the funky connectors that came on my 30W panels but they were so hard to work with that I just cut them off and installed SAE. The 20W panels came with no cables which is my preferred route. That leaves me free to put the cable and connector of my choice.
I did get onto the hood today and measured the solar panel space accurately. It seems that my measurements of the other day were a little off. Putting the two 20W panels up there would be so tight on space that it's debatable as to how practical it would be.  Measuring carefully, though it would probably be possible to install three 10A solar panels, it makes more sense just to install two. That's still an increase of 5W over the existing 15W panel.
Looking carefully at the hood I can see the footprints left by both the copper that investigated the vandal that came around. Oh boy, was that an affair. I've probably not said what happened there...

There's vacant trailer on the property and it was being renovated in order to make it habitable. The painter brought (during school hours) her school-age son along. His footprints were everywhere. All around the bus, on the hood, inside the house, on the hood etc. The steps to get onto the hood had been flipped down, the battery door latch had been pulled so hard that it had jammed, but entry had been foiled by my lock. It looks like my locks kept the villain out. The solar panel had damage that was not present last time I'd looked which had been the previous day. The bezel was cracked as though somebody had tried to pull it off or had been on the roof. When confronted, it was total denial. Indeed it was hard to get any truth out of the painter. She told the people that hired her that she lived in Sumpter but turned out to live in Lexington. Just about every question asked came back with a provable lie. The people that hired her will not be hiring her ever again. As for the paint job - I hope she didn't cost much!
There's another view of the footprints on the hood. It can be hard to see them but they're still there a month after the vandal was on the hood. He must have been dancing on the hood or something. It was just unfortunate that my dashcam wasn't running at the time. It has been running 24x7 ever since.
As I mentioned I needed a ladder to get onto the hood. I'm not a sprightly young chicken any more. I'm older, fatter and not that flexible. Thus as ladders cost about $100 each and I already had several pieces of unused 2x4, I spent $25 on some 3/16th 4 inch screws and built a ladder. That took a couple of hours but an 8 foot ladder is a very handy thing to have. 
I've used that ladder a lot today and it's both comfortable, stable and safe even though carrying it, it's a bit heavy. I shall be using that ladder a lot. Bonus - nobody is likely to want to walk off with a home-brew ladder because they can't sell it. Nobody is going to fund their meth habit
Wiring up the new solar panel (the flexible one) I found one of my brand new SAE connectors didn't work. It conducted no electricity. Of course I found that out after I'd assembled everything. Fortunately I'd already tested all the other components so the diagnosis of the likely problem was pretty easy. Snipping it out of the circuit and testing it with my meter proved that indeed there was no connection on the negative side. Needless to say I reminded myself that skin and soldering irons don't go too well together when I was maneuvering wire ready to solder. I've done that plenty of times!
I've been having a problem with low power in the batteries. Today being the first really sunny day I plugged in my two external 30W panels and placed them directly in the sun. The battery voltage began to shoot up. While I was at it, I looked at my rear solar panels and saw they were filthy.
You really can see the dirt on those. No wonder I wasn't getting too much power out of them. As for the front panel, replacing it will give me more power. I'm also wondering how much power I'm getting out of it anyway since the vandal tried to pull it off. Mind, I was never very impressed by the fact it was held on by just four screws or by the fact the casing was plastic. It looked good which is the only reason I bought that particular solar panel. I liked the black of an amorphous panel as it looked to me more like a destination sign. The new panels will be identical to the rear panels. I bought two 10W panels via eBay rather than from Walmart because Walmart raised its price by $6 overnight. I might order another at some point.

The plan is to put the two new panels onto my aluminium angle bracket and hold it up in place. If I think I can get away with a third panel I can then order a third panel and have 50W total of built-in solar capacity. If not then I'll stick with two and 40W. My existing dashcam and door lock seem to have overpowered the existing 35W of built-in solar power due to the overcast skies over the last few weeks.
There, you can see clearly the much that came off the solar panels. That was a white kitchen towel. Awesome was sprayed on the panel and wiped off together with the dirt.

In order to get the batteries back up to power I've had the two portable 30W panels stood in the sunshine. That should work a treat fairly quickly. On the way I have an MPPT charge controller to replace my existing PWM controller. The only thing that really persuaded me to buy MPPT was that I read about it boosting a low solar input to a usable level. That would be great since incoming solar power has been really low.

As far as the flexible panel goes, I can definitely see a use for that. Nice and light, easy to hang in the bus windscreen and easy to store. I'd looked at putting the epoxy panels in the windscreen before as they're really light and easy to store.

While I was on the bus hood I looked at the roof. The vent is showing signs of rust so it's a very good thing I bought a replacement vent. I'll have to install that on a dry day. The elastometric roof paint is crumbling and peeling in places. I can see I'll have to wash the whole roof and go up and put more paint on the roof. That's no problem. Actually, it might be worth building some scaffolding from 2x4 and using my ladder to access it. Realistically it probably wouldn't take more than $30 of wood and maybe $30 of screws.

As for fixing the welding on the back door, I'll do that when I get myself a wire welder. That'll have to wait a couple of weeks though as I have a dental appointment coming up that's not going to be cheap and my government dental insurance only covers 10%.
There're my two 30W solar panels busily making electricity for me. The battery has gone from 12.2v to 12.8v. That's pretty much 70% of where it should be - at the time of blogging. Of course when I get the two new 20W panels connected that'll give me a total of 100W of portable power and my onboard 40W for a total of 140W. I'm not counting the "60W" flexible panel yet nor my 5W epoxy panel as the 5W panel is just used for testing things and I'm not sure just yet quite how much power that flexible panel actually produces.

In a few days when my MPPT controller arrives and when that has been installed I should get both better performance from my panels as well as more information about what's going on. My current PWM controller does just fine but wastes power when there's plenty sunshine and doesn't make much use of power when there's little sunshine. I'm hoping that it's going to act differently compared to my PWM controller when it comes to running the fans. Maybe it'll take power from the panels and supplement from the batteries. If it'll do that then there's no need for a flexible panel on the roof. Actually I bet that if there had been roof mounted panels, that little vandal would have been up there to dance on them.

One of the expenses coming up sometime will be tyres. The tyres on the bus are goodness knows how old. I know I've had them there since 2014 and that'll be 6 years in November. They were not new when I had them either and what's worse - the back ones are remolds (and the wrong size). That'll set me back a pretty penny! I'm estimating probably $1,500 though it could be more depending on who does them and what brand I get.

Monday, January 6, 2020

It's depressing!

Today I had a good look at the door and the whole door back panel is warped. I'm not surprised it doesn't fit perfectly any more. I'm pretty sure the double-glazing foam tape I put in will stop water ingress though I'll have to investigate other solutions. I'm kicking myself for not taking the cheap-ass approach to making the door secure which is simply to paint over the glass on the outside and rivet a steel panel on the inside. The current steel panel inside is just screwed into place. That would have saved all the complications. As this is a Carpenter it's unlikely I'll ever find another door.
I looked at the broken camera. It's the camera bracket that has broken. The camera still works just fine. Fortunately I have a replacement which I have just installed. The whole problem was caused when I started to cut the steel to go over the back window. I dropped it while trying it in place and that broke the camera mount. See how everything goes back to that bloody window?
As something had dropped onto the camera I looked into putting a protective bracket over it. Well, that went together nicely.
Trying it over the old camera with the broken bracket, it worked fine. It wouldn't fit over the new camera and bracket because I changed the screws to self-drilling screws. I also noticed that since the bottom of the bodywork above the bumper has been pulled outwards at some point, the protective bracket would not have fitted properly anyway.

I'm quite depressed by the way that a simple idea like making the back door more secure has caused damage that I can't repair to the back door. There's nothing I can do to unwarp it. I had a good look today and I used an iron bar to try to adjust it - all to no avail. I guess it will have to remain as it is.

So many things have gone belly up lately that I'm wondering if it's the universe trying to tell me I need to stop working on the bus. To be honest I think it's probably pretty well completed. There are outstanding projects and I'm wondering whether I should proceed with them.

Changing the roof vent in an attempt to stop the leak.
Putting in a battery holder for a 3rd battery
Putting an extra fuse box inside the console to handle all the console additions I've installed.

There are a ton more ideas I've had and things I've wanted to change or achieve.

I do need to repair the vandalized solar panel. It was a Harbor Freight 15W panel. I liked it because it was black and looked just like a destination sign. I had doubts about the cheap-looking plastic it was housed in and those doubts were confirmed when it was vandalised. Whether it'll be possible to repair it is unknown. I have some pretty good sized mounting holes to plug if it's not.

Looking around at replacement solar panels it seems that there's just nothing available of a similar size and capability. There are bigger capacity panels but not the same size. I do note that solar capacity seems to have increased dramatically in the last few years while panel sizes have shrunk. That lends a lot of credence to an opinion I read a few years ago that one should only buy the bare minimum of solar panels because down the line a year or two they'll be better and cheaper.

I want to touch up the roof paint and some of the interior paint. I did look into switching out the power inlet to a 20A inlet but the problems involved with doing that are plentiful. I'd have to make a shim to hold the new socket as it's way smaller than my Nema 6-30 socket. Thus it wouldn't fit in the existing fixtures.

Looking around the bus, it's hugely cluttered. It's probably well past time I started clearing up inside, putting the tools and supplies in a shed and then saw what needed doing or not. I've been working on this bus since January 2015 so it's time to start using it. There are things that are a little primitive but they all work. I have solar power. I have running water. I have a bed, a shower, cooking facilities etc. The extraction fans work - just not brilliantly unless I power them direct from solar panels.

There are a few upgrades to make things easier to use that I'd still like to do but everything works as it is. Heck, I even managed to get the front and read digital camera recorders to work. At the moment I have a security camera running 24x7 in the front of the bus. That is very simple. I connected a long USB cable to one of my USB outlets and put an old car dashcam on a wooden block in the front window.


Saturday, January 4, 2020

I did warp the door

That welding I did the other day did actually warp the door by quite a bit - half an inch at the top! I didn't find that out until later in the day today though.

Today started with my looking at the sorry mess that the spray can and Dollar General masking tape made of my rub rails. Where I did the rub rails with a brush I had barely missed with the brush. The one side of the bus that I did entirely with a 75 cent paintbrush from Walmart took very little time to fix. There was hardly any black paint where there shouldn't have been.

The other side where I sprayed took forever to clean up. I did in fact resort to some of the better quality masking tape I bought from Walmart. That worked really well and now my black rub rails look really good.
I don't really have a good before picture but the rub rails looked very fuzzy because of the spray spatter. That all took a very long time. The lesson there is to paint with a brush - not one of those spray cans. To be quite honest I think spraying is really quite anal. Sure - if you're prepared to mask everything and spray in a clean room, you'll get a great result. That's not what most of us have. I was painting in a strong wind, outdoors, between rain showers today.

I tried to install the new 5-15 inlet that arrived the other day and found that it was just a shade too small to fit the mounting hole and the inlet box. I need some kind of flange to make that work. As I didn't have anything conveniently to hand, I put that idea to one side for now. It is not forgotten though. I have a feeling that I might have a sheet of aluminium or steel somewhere that will do the job. Thus, after dismantling my power inlet I had to put it all back together! I'll eventually make an insert but not right now.

The back door looked fine. I opened it and saw the floor inside was wet. All the dry sand from sandblasting was wet. I scooped all that out and opened the inside panel of the door to see if I could see daylight through my welds. No daylight and there was wet inside the door which wasn't welcome. No chance of putting Bondo in there today. I was sure there was a fault with the panel so I looked very hard at it before closing the door in the hope of a better chance of seeing daylight.

Looking up out of exasperation I saw daylight. The top of the door near the hinge had warped away from the bus by about 1/3rd of an inch. That was unwelcome. It was then that I remembered I moved a window back in 2014 or 2015 and used some double-glazing padded tape. Hunting around I found it in a shed in really poor condition. There was enough though to use to seal the gaps. I'll have to wait for the next rainstorm to see whether it has worked.

So, a day of solutions and interesting issues. All of the workarounds will work. Things are not as problematic as they were at the end of last year. I've still not tried again to get that God-forsaken screen to work so I guess I'm going to end up eating the $30 it cost from Walmart. I deplore not sending junk back but I'm running out of time to do things.

Thinking again about the problem of the extraction fans that will keep the bus cool, I looked online and saw an 18 inch by 24 inch 60 watt flexible solar panel. Now that can just be glued to the roof and the cables fed in through the hole that the upper reversing camera uses. I'll have to replace that camera anyway since it has water inside. Then I can power the fans directly from solar, using my voltage controller to limit operation when there's not enough sunlight. That will then free my existing solar setup from having to power the fans and will eliminate my need to install a 3rd battery.

Oddly enough this is exactly why I have the two 10W panels at the back. Those were put there to power my twin CPU extraction fans. Now though I have fans that are way more powerful and remove far more air albeit at a greater noise level.

I still have to work on the 15W panel at the front that got vandalized. Ideally I'd replace it or repair it. I have not found anything of a similar size that's also an amorphous panel. I might end up having to close up the holes and do away with that panel. It might be that the 10W panels are all I'll need to power the door lock and lighting etc but I doubt it. I do still have my 30W panels. Needless to say, given the price of $25 I couldn't really turn my nose up at it. Having said that, it could be another scam where I order the thing, it never arrives and then I have to order another while getting a chargeback on the first.

As the new panel won't likely arrive until some point between January 23rd and March 5th, I have plenty of time. That gives me time to see if I need to do more to the back door, change out the roof vent, repaint the roof, work on the power inlet, change the lower rear camera and put a protective hood over it, fix what's wrong with the front-facing camera and work on some Bondo inside the back door to seal up the backs of the welds. There are likely other things too.

The inside of the bus is full of house flies at the moment. I've been baffled by that. There must be something dead nearby (pretty sure it's not me even though I sometimes smell like it)  because I had a few in my car and there were a ton on the hood of the bus.
Part of the problem is we have not had a cold winter. It's now heading into January and we've not had a prolonged cold snap. The most we've had is a week so the insects etc are all pretty much still present. All the insects that normally hibernate are still active.

Having fiddled with the bus today I ended the day chainsawing some trees. I must be not that great at it as two fell on me. Fortunately they were only 5 inches in diameter and 15 feet tall. I just pushed them away. As for the rest of the trees, I had two left to fell when the chain leapt off the chainsaw. I noticed that though the oil reservoir was chock full, the blade was dry as a bone. More things to fix, I guess!

I'm still thinking what text to put on the panel in the back door. Perhaps "Caution. Inmates Inside".

Thursday, January 2, 2020

Black lines etc

Rain was forecast for 2 pm so I zipped out early to get work done on the bus. It seems my welding from the other day has warped the back door a shade. It doesn't make any real difference to anything bar it makes the door slightly stiffer to latch.

Over the last few days I've been working on painting the rub rails black since the paint likes to come off them quite frequently, revealing the original black paint. If the grey under the black comes off, it will reveal black. I'm fine with that. As I worked it began to rain so I ended up just doing the center of the rub rails toward the front on the driver's side. The other side I completed yesterday.
There are quite a few paint dribbles but that's nothing major. I'm going to have to go around and touch up with a brush and a paint can. The worst touching up I'll have to do is where I sprayed. Even where I put masking tape, spray paint seeped under the tape. Spray just does not seem to be all that great. I found that when I put the text on the back bumper. My solution was to spray a roller so it had very little paint on it then to roll. When I brushed over a stencil or sprayed over a stencil, the results were very raggedly and disappointing.
Now this rub rail has been hand painted with the lines kept by hand. Sure, I'll slip occasionally and occasionally there will be dribbles but I think that's perfectly acceptable. As I said, I got all but probably the last 10 feet of rub rail completed - that's 3 rub rails per side. There are some on the back end that I haven't yet touched for a very good reason. Those rub rails are heavily coated with Bondo dust from when I sanded the Bondo yesterday.
That's how the back door looks now. I'd hoped to have it all flush but c'est la vie.  What I can do now is to try building up with Bondo to make a rectangular or rounded section around the weld. Perhaps I'll use some half PVC tubing if I can get it to make a form for Bondo. Then I can put more text in the center and make a feature out of the problem and disguise it that way. Maybe a sign that says "Dangerous Cargo Aboard".
This is the Nema 6-30 that I've got installed as my power inlet right now. I honestly do not see any fathomable need for a 30 amp supply. Though I'm wired from the inlet to the box for 30 amps, the cable I bought (because I was being cheap) is 20 amps and the breaker inside is 20 amps (because the cable is 20 amps). Inside I have a microwave that probably uses 10 amps and a dorm fridge that uses probably 7 amps. I have three sockets - one dedicated for the fridge and two other that can switch between whatever items I want to use. I don't have a TV or anything like that. In fact my appliances are very simple - a $30 Walmart Microwave, a $10 electric kettle and an old dorm fridge that was thrown in with the bus. I believe that works but I'm not 100% sure. If it doesn't, it'll get replaced by a cooler. I'm just not a great electricity user.
The above is the new inlet. That arrived today. Checking it out with the plugs on my extension cable, it appears they will fit inside. Thus one day I shall have to head under the bus to switch out the inlets. That won't be today though.

One of the advantages of a straight plug is that if it gets yanked, it comes straight out. With my locking plug, there could be damage to the inlet if somebody yanked it while trying to steal it or tripped over it or I simply drove off with it connected. Another advantage is that 20A extension cords are readily available and inexpensive. In an emergency even a 15A extension cable is usable as long as care is taken not to exceed 15A.


Wednesday, January 1, 2020

Tidying the mess

Today I headed to Walmart to get some things to complete work on the back door. I'm beginning to wish I'd left it well alone! Anyway, if you remember, a few days ago I sprayed two of the rub rails black.  The masking tape didn't really work (does it ever) so the grey body got black on it. After that I gave up on masking tape and figured it's easier masking the rails and touching up the body. These spray cans don't contain much paint and cost a heck of a lot of money. Thus today I bought a pot of black paint and some throwaway paintbrushes. 

After I got back I cut some wood and put sandpaper around it then started sanding the Bondo from yesterday. That was painfully slow! I couldn't find my sander but I did find my pistol drill with an abrasive disc. That was perfect and I had very quickly both turned myself into a snowman (with Bondo dust) and I had pared the Bondo tendrils down to something that looked reasonable. I saw a few holes in the Bondo and used the crack filling Bondo tube that I'd also bought.
While the Bondo crack filler was drying, I painted the top rub rail by hand with a paintbrush. I did a far better job by hand than the spray can ever did. In fact I might well get a can of grey paint rather than use the spray can and touch up where I over-painted with a paintbrush. Spray cans are handy and good for general touch up but they're not that good for anything else.
I passed by the pack end and hit the bare metal with what was on my paintbrush. Then I painted some of the rub rails at the back on the other side of the bus. That was somewhat chilly as I was both in the shade and it was beginning to get late in the afternoon. Remember - it's pitch black by 5:30pm now as it's still winter.
After I gave up on painting rub rails for the day, I sprayed the back grey again. Whoops! Some of the black paint hadn't dried enough and blended with the grey. I'll have to hit it all again tomorrow. I spotted a few holes that I'd missed too.

When the outside of the patch is finally sorted out, I'll sand blast inside and put Bondo inside. That'll make it much more solidly mounted and add the final rigidity. I bought a huge bucket of Bondo that was amazingly only $15 - the exact amount I'd paid for my smaller tub of the stuff a year or two back.

The backup camera came to grief a few weeks ago. I dropped the metal sheet on it while I was trimming it to size. What I'll do is to weld together a couple of steel angle sections, drill holes for the screws and weld the angle to the top of the bumper. Then I can simply bolt the camera through the steel brackets. That'll give it an armored shell that an elephant can dance on without any harm coming to the camera. I have a couple of spare cameras.

The roof-line camera seems to have got water in it, judging from the misty appearance of the images. I'll see about replacing that and giving it a hood. That's all electronics though and electronics are not giving me a good time right now. Thus that's not a priority.

A couple of days ago I was amazed at the number of hits my blog had. It seems a lot of people started whining and moaning because I commented on the meth heads working at Walmart. Honestly it does not surprise me that Walmart employs meth heads. Right now it's very hard to find staff for anything. When you do, it's usually the dregs at the bottom of the barrel. Walmart has never had a very high caliber of staff in my experience and they're getting worse, not better. None of the staff there are willing to take ownership of a problem. That's even if they have the thought capacity to understand what is required.

Ages ago I worked in retail as a supervisor. The standard of my cashiers was woeful. Their attitudes to work were woeful too. The job was their livelihood and they treated it like a detested homework assignment from high school. Nothing I could do would improve their performance. I wondered how they managed to bathe, wear shoes and not make messes in the house. Walmart has the same issue I believe. Thus they pay the absolute minimum, get the absolute minimum and provide the absolute worst service.

And finally, what with it being New Year I'll wish you the same that you wished for others last year.