Saturday, October 8, 2022

Strange springy looking things

After being injured at work on May 3rd I was pretty much out of action until I was finally cleared by the doctor to return to work around the end of July. Straight after that I caught Covid and spent a not very fun two weeks sick with Covid. My symptoms were far lighter than my partner's she spent 5 days in bed not eating and not doing anything. I at least managed to get out of bed and though I did nothing much I was up and about for the first (worst) three days. After that I slowly improved. I had a total lack of taste and smell which was very disconcerting. I knew my sense of smell was going when I smelled freshly baked bread in the middle of the night when nobody was cooking. I don't feel even now that I am fully recovered. I got past the majority of the symptoms in about 2 weeks. The lack of sense of taste and smell lingered for a few more weeks.

Following Covid (I knew I was sick but tested negative for the first two days before positive on the 3rd) my immune system has taken a beating. I came down with an ear infection that for a while robbed me of my sense of hearing. That responded to antibiotics but isn't right even now. The doctor I saw the other day says he's seeing a lot of bacterial infections laced with viral components. 

I feel that the Chinese enforced mask mandates and enforced quarantine is quite likely because they know more about this virus than anybody else; almost as though they engineered it. The refusal to wear masks in the West seems silly given that Covid keeps attacking and weakening people then a raft of strange new infections that most people never go down with are becoming widespread. The two are linked in my opinion. It's as though Covid was the primer for all kinds of other infections and repeated Covid infections weaken the immune system further and further until finally the common cold will finish people off.

But sickness aside. I bought these springs the other day on eBay. A massive $10 expenditure which is about the price of a Big Mac these days. They're intended for use with brake lines. It seems that a coil spring such as these wrapped around the brake line will allow the brake line to be bent without kinking. I have yet to try them. They arrived last week.
This is another of my ideas. This is just something I'm playing with right now. I went to the dollar store and bought a sheet of white card, a circular brush and some magnets. I'm thinking of using a hole saw on some steel in that kind of pattern to make a security screen over the outsides of my uncovered windows. It'll have the effect of looking even more like a prison bus. The plan is a small gap above and below the security grille so I can slide a bottle brush in to keep the windows clean. A lot of maths went into the placement of those black circles. The plan is to make every window secure. This will have the advantage that I won't have to keep the blinds down in order people can't see in. It will reduce light but not as much as keeping the blinds down does.

The first priority will be to replace the back brake lines and to clean the back brake pistons. After that, the right wiper mount. Other than that there are minor projects that can be done anywhere at any time. The tyres were done last December and the bus has not moved since - and that's 100% due to my work injury putting me out of action followed by repeated infections starting with Covid.

Meanwhile I found Progressive has a nasty clause in their policy that limits me to 100 miles radius of my home address. That's fine - I will switch from cheap-arse Progressive as soon as I want to travel. I much prefer State Farm's policy even though it does cost double.


Thursday, July 21, 2022

Letter to Karen

 Dear Karen,

Your idea of building a fantastic bus conversion with a built-in washing machine, clothes dryer, shower with 100 gallon water tanks, fridge, freezer, electric cook top, microwave and oven to live in permanently is utterly devoid of any sense of reality.

Let's take this apart one little bit at a time:

  • Washing machine. This will use a horrible amount of water. At least 19 gallons per load. That means you will need to be plumbed in to a water supply. Sure - you can carry 100 gallons but that means also you'll need 100 gallon tanks for waste water.
  • Clothes dryer, fridge, freezer, electric cook top, microwave, oven. Just how are you going to power them? If you went full solar you're talking about $3,000 of solar panels plus probably $2,000 of batteries or even more if they're lithium. That's $5,000 that could be put to other uses.
  • Shower - unless you're into 3 gallon or less showering, the average shower uses 50 gallons a day. That's half of your 100 gallons. Two days and you're out. That's not very much is it?
Where are you going to park your bus conversion, Karen? I hear you say "boondocking". Where would that be? Are there any signs up anywhere saying "boondock here"? You do know that every scrap of land belongs to somebody? Then there are local bylaws and HOA rules where RVs are not allowed even on your own property. That means paying rent to park it, Karen. Not very boondocking is it? 

Oh, Karen, I forgot, yes - you can probably park it behind an abandoned filling station on Route 66 - until somebody sees you. Then it's (take your pick):
  • A robbery and possibly a murder with or without rape from passing lowlifes.
  • An unpleasant encounter with meth-heads or worse that live in the abandoned filling station.
  • A policeman turns up in the middle of the night and tickets you - in your nightie - for illegal camping.
  • The property owner turns up with a bulldozer and bulldozes your abandoned vehicle off his property or has it hauled to the junkyard by a wrecker.
So, Karen, where do you plan to park your bus conversion? Will you be squatting on government land? Yes - squatting - that's what "boondockers" are. Boondockers are squatters and while squatter's rights are a thing on paper they don't mean anything in the real world. Let me tell you, Karen, how it is in the real world....

In the real world people have guns and are very happy to use them. No court will ever convict a landowner who shot a trespasser when the explanation is that the trespasser threatened to kill them. There are no living witnesses. So, Karen, how do you plan to squat?

The next thing, Karen, are you going to spout on about getting full insurance for your dodgy conversion? Yes - you hired "professionals" many of whom will be unlicensed contractors but I hate to break it to you - no insurance company will ever insure your conversion as an RV despite what you read online. There are two reasons for this. First - the "RV" is still a schoolbus no matter how much you try to disguise the fact and hence not a purpose built RV. Second - the construction and planning was all done with no oversight by any professional body.

As for value. How much is your conversion worth? Is it worth the $5,000 you paid for the bus? Is it worth the $100,000 you spent to "convert" it? Is it worth more? Well, it's actually a $5,000 bus that you spent $105,000 on. That's all it'll ever be worth. No matter how much you spend on a $5,000 bus it'll only ever be a $5,000 bus.

So, Karen, time to get off your high horse and time to stop believing the garbage you see written on Facebook. You do know that the people that post the most and spend the most time on Facebook are the people that don't have jobs, real lives, money or the bus conversions they claim to own? Yes, Karen, that does include you!

Grow up, Karen!


The bus owner.

Tuesday, July 19, 2022

Why the long gap in posts?

 On May 3rd I had a work accident that has had me laid up ever since. Nothing permanent, thank goodness, but it does mean that I am off work for the moment and have been for a while. Without going into further details nothing more is likely to be done on the bus for a while.

Meanwhile I have been working on other projects including some computer programming and electronics as those are light things that won't involve carrying anything heavier than my small laptop.

I had been planning a summer trip. There's really not much remaining to be done on the bus. The essential is the back brake line. There's reworking the right wiper mount but that's it. The tyres are new but have not been used since installed in December. I've not driven an inch. I last bled the brakes in April so I should be able to move the bus a bit. Now that I've healed some, I can probably do that.

I bought the bits to add second solar inputs beside the two existing solar inputs on the side of the bus but in the meantime have redeployed the 15w panel elsewhere. I have the two 20W panels as one unit and three 10W panels as one unit. I have a further two 10w panels as one unit. The two 30w panels are not one unit. If they were all put on at the same time then I could probably do it using just one splitter. The ideal would be to add the second solar inputs.

So, I have two tasks that should be done. I have several tasks that it would be nice to do. Other than that the bus does appear to be completed for the moment. The seam sealing seems to have worked although I have not driven the bus since so I don't know what will shift when I'm driving. The white outside is now getting pretty grey so it does need a wash. The white paint has come off in a few small areas but the plan is to sand and spray where it does come off.

The plan for bars over the windows still exists.


Sunday, June 5, 2022

My suspicions were correct.

A while ago I bought a couple of packs of red and amber LED side markers. I was going to use them but had second thoughts based upon the lousy reliability of LED anything. Thus far my experience of LED lighting has been utterly dismal. To recap my experiences...

Out of a dozen or so LED household bulbs from many different suppliers and manufacturers one one is still in service. Just one. That's utterly terrible reliability from bulbs whose manufactuers slap such unbelievable and farcical claims as "lasts 15,000 hours" on the packets. 

Inside the bus I had LED lighting running 12v LEDs. Those would last maybe 10 - 12 hours before they burned out and blew the fuse as they went out. That got exensive fast. Not only was I having to replace a bulb but also a fuse. The bulbs weren't cheap either. In the end I fixed that by replacing all my lighting units with units that were rated for halogen bulbs and installed halogen bulbs. Problem solved. Subsequently I tried some LED bulbs with a BA12 mount (same as the turn signal and brake light bulbs) and found they made the light units as hot as the halogen bulbs. No saving there! Needless to say I can get halogen bulbs cheaply and easily. The LED things are just horribly expensive. 
Being of suspicious mind, after deciding against using the LED sidelights and deciding to go back with identical incandescent sidelights I thought I'd test these "wonderful" LED "miracles". One was wired in the back yard to a solar panel so that it had power for 12 hours a day. 

The LED remained lit for 60 days but was not illuminated at night as the sun, curiously, doesn't shine at night. Thus it was lit for approximately 720 hours. That is a far cry from the thousands of hours it's supposed to remain lit! In driving terms, as I drive with the lights on for safety, that's 720 hours of driving or at an average of 40mph that's just 28,800 miles. Not very long and not very worthwhile, particularly on commercial vehicles. A school bus I drove one year covered 240 miles a day. That's less than a school year. 
Looking at the side of the LED it's possible to see a small circular heat mark beside the resistor. No wonder the thing went out. As the LED was now pure junk I dismantled it for investigation.
One of the LEDs turned out to be totally dead. The other surprised me. Putting current through it directly it turned red. Putting current through the resistor it turned amber. The other LED did not work at all. I would have put photographs of the changing colors but the LED fried itself before I had the opportunity to take a photograph.

The board is marked 7986 and LM10884. A google search came up with an out-of-stock product (imagine that!). 

The only place I am using these lights is as a stairwell light. There, it will be on for a few minutes at a time so 720 hours should last a good few years. On the stairwell I have one and it's red. It gives enough illumination to see the stairs on the blackest night but doesn't produce enough light to be really visible and won't destroy night vision. 

Having investigated that light, it's now in the household rubbish, waiting to go to the dump. The other LED lights left over are just stored in a box, awaiting a good idea. They will not, of course, be used on anything as mission critical as vehicle lighting. Incandescent bulbs just last longer. As an example of that, on my car which I have had for the past 16 years, I have had to replace two headlamp bulbs and three number plate lights. The third brake light desperately needs replacing but it's one of those ridiculous LED things and they quit making them. There is apparently a halogen replacement but I have yet to find that myth as a reality.

So, the takeaway from this is that I was dead right to be skeptical. It will be a dark day in Hell if they quit making incandescent bulbs.


Friday, February 18, 2022

Yay brakelines.

The day was forecast to be 60% rain so I didn't expect to do much of anything on the bus. I have several other projects on the go including some computer programming, putting some electronics together etc. As it looked decent I did do some work outside. Nothing under the bus however.

This miserable brake line "forming" tool came from Harbor Freight. Thus should be given a great big miss as it doesn't form brake lines. First the 1/4 inch gripper is way too small. Second all it can do is fold brake lines, not bend them.

That was my attempt at a 90 degree bend using the Harbor Freight brake line forming tool. It is a 90 degree bend but the tube is narrowed to the point of it ceasing to have any viable function. I'll go back to the old tube bender that I've used before. That, surprisingly enough, was cheaper and also from Harbor Freight but cruically - it works.
The old brake lines were supposed to be fastened by the bolt on the left. Well, that didn't work so after a lot of issues I did get them fastened separately. The line on the right needed a spacer which was provided by a 1/4" rivnut and fastened by a 1.5" self-drilling metal screw. It took a long time to do this simple thing as I was trying other ideas using materials lying idle. 

That was a frustrating couple of hours as I'd do half of what I'd planned, put a piece of the thing I was working on down and turn round to find it had vanished. Then I'd have to start again and the same thing would happen again and again and again. In the end though, this far simpler approach seems to have prevailed.
I had another go with my solar water heater. I suspect the collector needs to be bigger but as the plexiglass/perspex had come unglued I sprayed the inside black using the last of a can of black spray paint. Then I screwed the plastic back over it. That should work better to trap heat.  Tomorrow I might have another go at setting it going but I'll keep my tubing short this time around. Tomorrow also I need to get under the bus and work on those brake lines. I only have a 4 day work window this time and one day has already been blown.


Sunday, February 13, 2022

Yay and whoops.

Today I took the scrap steel that I'd used to test my wire welder and cut it to make two legs to which I could fasten a cross bar to hold the D cell batteries in place.
The steel was cut with the angle-grinder and then drilled. I tapped two holes to 8-32. That needed an 11/6 drill bit and I know I had one. I just couldn't find it so I used the nearest and tapped them. The tapping worked and the cross bar held in place nicely.

While I was hunting for my drill bits I took a step forward and put all my spanners (wrenches) into a big plastic ammunition box then I took the screwdrivers out of my drill bits box and put them in the now empty box. Now I have separate boxes for drill bits/taps and screwdrivers. Given the bulky nature of screwdrivers, if I buy more, they might end up in a bigger box too.

Having cut the steel, drilled, tapped and spray painted it, I put it in place. 

It will definitely hold the batteries in place. I'll need a crosspoint screwdriver to remove the batteries but that's fine. They're the batteries for the door lock and I do not anticipate changing them more than once a year. That part of the system is now very tidy and completed. The cross bar is a piece of brass that I bought for a purpose that I cannot recall and which never got used. I'll just regard that as a successful project that cost no extra money.

I looked at the timer relay and other relay that I had to work out how to wire so that the light would go off after a minute or so and really didn't feel like working it all out. What I had in place - an on-off pushbutton switch works. The relay thing would be a great idea but I just didn't feel like working on it. While I have the relays and spent money on them, I probably will just keep them to one side and proceed on with just the switch. There's a lot to be said for KISS (keep it stupid simple). 

After that I found out again why I rarely work on two projects in a day. I found some wood to cut to make a baffle around the back of the switch. The plan was to glue it around the switch and screw a metal plate over it so the back of the switch is protected from things banging around as they're thrown in the closet. 

My 45 degree cut wasn't quite 45 degrees. That was the first clue that it was time to finish for the day. Still, it could have been used. I sprayed the wood white and the spray just didn't dry like it did on the metal - possibly because the temperature had dropped some. 

While the paint was almost dry, I went inside and put cable wrap over the wire from the battery and light to the switch. Then I clamped a slightly sticky painted block to the bench outside to cut a cable groove, after of course knocking the pair of blocks off the spray cans they were sitting on to cure straight down the stairs onto the ground.

So I cut the cable groove. And cut it in the wrong place. That means the cutting, painting etc was all in vain. I'll start afresh with a new piece of wood next weekend.  
The groove looks great but should have been in the other piece of wood. 

Once I have the little protector installed around the back of the swtch and the wire conduit fastened into place I'll be able to call and end on operations inside the closet. I should be working on brake lines next weekend anyway. I want to get the length from the engine to the differential done and the bit around the differential done too. I still have a couple of things to work on under the hood that I'm not 100% happy with yet.


Saturday, February 12, 2022

Success with the wire welder

A long time ago, not quite before the dawn of man, I bought a Harbor Freight 125A flux-core welder. I never had any luck with it but today I pulled it out to have another go. The results were way better than I had anticipated.

Though I have burned through the thin sheet metal (taken from an old fridge) a few times, the beads have gone on. I really needed to put a faster wire speed. The power is set to low and though I have not made good beads, I have achieved something. As I said, the wire speed needed to be faster. The steel measures at 1mm thick so, quite thin.
Here I've welded some 2mm thick steel bracket to a 3mm thick steel bar. The bracket was found lying in the road after having been run over along with a few others. The brackets looked interesting so I'd picked them up. The 3mm steel was part of an old project on the bus that has been eliminated.

Again the wire speed is too slow but the welds have taken well. I beat that with a hammer and could not make the two come apart. On the whole, this experiment has been extremely successful. I had put the wire welder away because I just couldn't weld with it, sticking to my stick welder. I'd bought it so I could weld thin sheet metal but ended up being unable to and riveted the metal instead. Now I have another tool in my welding armory.
Today also I found my hot glue gun and hot glued the cable loom to the ceiling of the bus so the wire to the light is well supported and out of the way.
Inside the closet the wire has been tidied up with cable loom glued into place with the hot glue gun. Those things are useful! While doing all this, I realised the steel bar I welded can also be used to keep the batteries in place. Tomorrow I might get on and build a battery claping device as well as looking into putting the timer together for the light switch. There is progress, albeit slow.

Next weekend is a 4 day weekend for me and will be 60F or therabouts. Not exactly warm but the best I will get before Easter. I will head underneath to do the brake lines next weekend.


Saturday, February 5, 2022

New door lock controller and entryway light installed


Today two things happened. First the entryway light was installed. That wasn't screwed in but rather was attached with some "super strong" double-sided tape. This was the tape that I was considering using to attach a flexible solar panel to the roof. It didn't seem all that sticky but time will tell. I can always hot glue as was the original plan. The hot glue gun was in hiding though and might take a hunt to locate.

The second was that the door lock controller was replaced. It had been a cleverly wired relay in combination with the switch but it had not really been installed with permanance in mind. This time it's different. It's also a far neater installation.
I still have some cable-wrap to add but that can be done tomorrow. This setup is a lot tidier. I'm also not using crimp connectors as much since I managed to pull some straight off the wire without much difficulty. 

Originally the plan had been to run the doorway light and the door lock off the D cells but since there was power left in the AA cells, there didn't seem to be much point in taking the AAs down. What happens with used batteries is they get put in a drawer for later use then ignored in favour of fresh batteries. Everybody does that so slightly used batteries end up getting left to lose their charge, leak and get tossed out.

A plan was formulated to install a couple of relays - one being a timer relay - to control the light so it could be turned on with a single button push then turned off. That hasn't come to fruition yet. There's time though. The plan was to install it after completing the door controller anyway.
This was the old door lock controller. It looks worse than it is. Wiring always looks a horrible jumble of spaghetti. Occasionally the odd lunatic will say "oh that looks like a fire hazard" because they know nothing about wiring. It worked very well for the last 5 years or so. Tidying it was only a thing when I also wanted to install the doorway light.

As far as the actual light is concerned, it was screwed to a leftover block of vinyl plank (remember I used those on the bathroom floor). The piece of vinyl plank measuring about four inches by one by one was taped to the bus ceiling. The light is still a leftover red LED sidelight. The switch is still an on-off pushbutton. 

You might think that this didn't take very long but when you're trying to work around a lot of wire connections and each one has to be right in order for it all to work, it does take time. Time and plenty testing. I follow a philosophy of do one thing then test it before going on to the next. This takes a lot longer but elminates the frustration of having to take it all apart to start again. Getting it right first time, every time, saves time.

The task tomorrow will be to work with the other relays and try to make the light turn off automatically after a minute. Once that's achived I can switch the pushbutton switch out for a different pushbutton switch. I also have to finish cable-wrapping and fully attaching the switch plate for the pushbutton switch. I have to say what I've done today looks a heck of a lot neater. One thing I might need to do is to add a securing bar over the D cells. I thought I might over the AA cells but it turned out to be unnecessary. Only time will tell there.


Saturday, January 29, 2022

First test


Those are the stairs on my bus - yes, they are a mess - but they are illuminated by the light of a single two LED red marker light. 

Though it can't be seen, the marker light is temporarily held in place by a single neodymium magnet. It's centrally located above the stairwell. I had wondered whether I might need a second LED light but this seems to illuminate the stairs enough to see the stairs and not so much that it's dazzling or announces "Hey there's a light on in that bus". It preserves night vision and gives enough light to see while consuming just 0.2W. There's not much not to like about it!
In the dark with just the marker light for illumination, it does look rather like one of those movie explosions. Having said that, it's pretty darned good. I might add another of these inside the galley since there's no way of seeing one's way in there to hit the first light switch.
The lower battery bank - the AA batteries - are what used to power the door lock until I switched to the D cells above. None of the wiring is in its final configuration. Tomorrow I will probably work on the door lock circuit and tidy that up. Once that's done I'll turn my attention to the lighting.
That's the switch for the lighting circuit right now. That's a straightforward on-off switch. The future switch will be just an ordinary momentary pushbutton switch. That will fire a SPDT automotive relay and that will lock on, firing a DPDT timer relay from eBay and putting power to the light. The timer relay will wait a minute or so before firing at which point it will disconnect the power to the whole circuit, cutting the light out.

Once all that is done and wired tidily, the door lock circuit will be in its final (so far) evolution as will the new stairwell light. The only thing against me tomorrow will be the cold weather.


Saturday, January 22, 2022

Half a job done.

It was cold this morning and it snowed last night. Overnight it dropped to 29F and was still only a degree above freezing by sundown today. It was warmer in the sun but only because there was no wind. Not a day to go under the bus!
Today I didn't complete the task I wanted to complete. I did get the new D cell battery holder into place. That is a huge step forward. I also installed a fuse box at the end of the battery holder. I had wanted to put crimp spade connectors to connect to the fuse box but I couldn't get the first one to grip even with my extra powerful crimper. In the end I simply soldered to the fuse box. The other side can be spade connectors. 
The messy bundle of wires will be tidied up later. I ordered a relay but it has not yet arrived. When that arrives, it will be screwed to the bulkhead on the right and wires of appropriate length installed. What's there now is just a jerry-rigged affair that had worked for the past 5 years. The bigger batteries and the fuses are a great step forward. 
The experimental set up with the time-delay relay probed the time delay was in the wrong direction. It would delay before it activated rather than delaying after activating. That made it a bit nonsensical. I had to get a second relay to put with it in order that I could have it latched on then the other relay could activate a minute later, breaking the connection. It's fiddly wiring but it'll work.
This is the relay. I bought this from Autozone on Thursday. What a nightmare that was. I walked in and browsed the entire store looking for relays and could not find any. Eventually I approached a disinterested sales clerk. He asked what I was looking for and I said "relays". He pointed to the electrical section so I told him I'd looked. He went and looked then to prove me wrong. Seeing that there were no relays, he asked the usual nonsensical question: "What car is it for", I told him I wanted their cheapest relay. He said he had to look it up by car. That was pure nonsense! Clearly the fellow did not know anything about what he was doing. Having said that, the staff in the store was totally different from the last time I was in there.

While the moron was playing with his computer searching through Ford Explorer parts - he'd decided to look up Ford Explorer relays for some unknown reason - I looked up the Autozone website. Up came relays and I sorted them, cheapest first. The fellow as on about a relay for that Ford Explorer that was $20. That was nuts! I showed him the one I had found on the website. Nope - didn't have it in stock. I showed him the next one which was about $6. Yes. That was listed so he trotted off to get it. Then having found it, I bought it. 

Where does Autozone get its staff? The bargain bin at the lunatic asylum?

So, the door lock works though I do need to replace the relay with one that has a base. That relay arrives likely on Monday. To get to South Carolina from New York it seems to have had to wander off into Georgia. That's not a straight line! Having been out in the cold for an hour or so working on installing and wiring the new battery pack, it was time to head back inside. I was frozen. Tomorrow I'll have a go at wiring the time delay relay pair for the stairwell light.
 

Saturday, January 15, 2022

A long hunt

Today I decided to get on with replacing the battery holder for the door lock. Well, perhaps I should back it up a bit. In my spared box I found a 4 D cell holder and a pair of 2 D cell holders. Given that D cells are heavy it's going to be a better idea to mount my batteries flat. The AA cell holders grip the AA cells nicely so I never had to worry. 

That's the old setup. I can tidy those wires up a little though. Behind the aluminium plate is some spare AA cells and a relay. That relay controls the door lock via the keyswitch. The keyswitch is rather bizarre in that instead of being On 1, On 2, Off which would make sense it's On 1, On 1 & 2 and off. That meant I had to do some fancy wiring with a double-pole relay to make the lock open and close.

The old relay works just fine but isn't mounted in any meaningful way. It's just rattling around loose behind the aluminium plate. A new relay has been ordered that has a base. 
After having mounted the battery holders to a suitable piece of plywood and soldered the connections then hot glued the wires into place it was time to populate the holder with batteries and test the wiring. That's when I hit a huge snag - I knew I'd bought batteries at Harbor Freight some weeks ago but could not find them. I couldn't remember what else I'd bought in that shopping trip either so I didn't know what the batteries were likely to be sitting beside. I went to the bank website to try to find how much I'd spent there and when as a clue. The bank website did not cooperate and wouldn't let me in. That old trick it has of refusing a perfectly good password. It'll play that game for weeks on end then suddenly let me in using the password. If I change the password, it'll complain the new password is wrong. I learned long ago that these banking websites go through phases of silliness like that.

Having no idea where the batteries were in order to test the battery holders, that put rather an end to matters for the moment so I sat haranging politicians for their lack of morals via Twitter then suddenly realised I'd bought a big plastic ammunition box in which I should store all my socket tools and wrenches. Then I remembered I'd had the lady serving me at Harbor Freight put everything inside the ammunition box instead of in a plastic bag. Bingo - all I had to do was find the ammunition box. That was a matter of a very few seconds.

So, the battery holder was filled with batteries and tested. It worked fine. Then I realised I needed a relay that had a base that could be screwed down. I ordered one. While I was looking around the bus I even found a 4-fuse holder. The door lock has run without a fuse forever and a day. Time that had a fuse on it. Same for the LED marker lights. Those will run off AA batteries - that way if the LEDs are left on then the door lock won't be dead.
I can see another trip to Harbor Freight in the near future. I might need another 90 degree drill attachment in order to get everything screwed down correctly. I certainly need more angle brackets. I'll probably put up two LED marker lights initially to light the stairwell and cockpit. I'll have to see how it all works before I do much further.

I had hoped to go under the bus this weekend - since it's a 4-day weekend - but it's been too perishing cold. The brakelines get put off again.

I did relocate the old Harbor Freight LED light. That thing had never been up to much. It is one of the worst examples of LED lighting and the batteries are almost always dead in it so there has to be parasitic power drain.

With the current Covid strain named Omicron running wild in the USA, I might have more time to work on the bus. The big boss where I work said no closures but also that people should be prepared. Meanwhile other similar organisations in the area have split 50/50 with some closing and some not yet making that announcement. Thus my 4 day weekend might get longer or it might not. The longer it is, the more I can get done on the bus.


Friday, January 14, 2022

Fancies are expensive!

Going in and out of the bus at night I had fastened a Harbor Freight LED light that ran off a paid of AA batteries. Well, that light had a horrible attachment and kept falling down. The velcro never worked. The magnets fell off the light so it was more often than not on the ground. Thus, since I have several LED marker lights that are of no earthly use to me I decided to replace the flimsy Harbor Freight thing that seems to have fallen off yet again and this time vanished with LED marker lights. 

Cue a decision - whether to run them off the solar door lock circuit or from the AA door lock circuit. Running them off the latter would run the risk of flattening the door lock batteries so the idea was to upgrade from AA to D cells, particularly since the AA cells struggle in cold weather. That led to another question of how to stop the light from shining if I forgot and left it running. For that I looked on eBay and found something called a time delay relay. That sounded promising so I forked out $10 and bought one. 

The relay arrived with no instructions so I had to work it out. It seems that after placing it on its little pedestal that on one end there are 4 contacts. The set at the front were two pairs. One pair was to operate the relay and the timer. The other pair supplied power. On the back were 4 contacts - the bottom pair fed through from the relay when the relay was not activated. The other pair fed through when it was activated. A dial on the top set the time delay though the time delay seemed a bit off.

I connected the relay to a pushbutton switch that I had not realised was a latching pushbutton switch. That's actually useful to have! I connected an amber marker light to one pair of relay outputs and a red to the other.
In this picture, the button has been pushed but the relay has not yet tripped so the amer light is lit.
In this picture the relay has tripped so the amber went out and the red light came out. That all looks fine and dandy but brings me no closer to having my light turn out after a moment or so. While the relay does trip to switch the amber it, it leaves the relay powered and burning up electricity. What therefore would be needed is an extra relay to cut power. That's when it all begins to burn up yet more money and get far more complicated than just putting in an ordinary flippy switch and remembering to turn the light off!

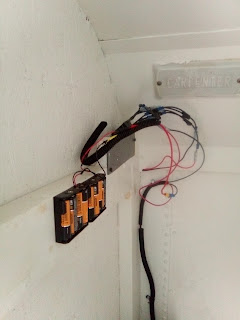
The D cell battery holders I have will work just fine. The only issue with them is that the batteries need to be held in or vehicle motion might jog them free. This does not happen with the smaller lighter AA batteries. As I have AA batteries in situ I might as well add D cell holders and run the door lock of D cells and the LED lighting off AA cells. That, to me, would make far more sense. Due to limited real-estate behind the wall and due to the thinness of the OSB I might have to put a 3/4 plywood panel up that's attached to the OSB that just holds the batteries. This needs some thought. 

Meanwhile I angled my solar-collecting water heater and set it all going. I'll have to see if after a few hours the water is warmer. I suspect it won't be but who knows. There is a warming ray of sunshine out there. In the sun it's not bad. Out of the sun it's a little chilly. The temperature is 54F outside now. Maybe if I can find my infrared thermometer I can tell whether the water is warmer than ambient temperature or not.

In other news, I have been hunting in vain for another cheap CD-R unit. I bought the pair I have on eBay a few years ago and could not find another unit. Fortunately I still have the packet it came it. Sometimes it pays to be untidy and not to throw out packaging.

Looking up SKU S1169EU found ONE listing from somewhere called KKMoon that led to a non-existent Amazon webpage. That wasn't very helpful!
The back of the package shows how good this device is. Sure the video quality might be a little rough and ready but for recording traffic incidents it's absolutely perfect. I don't need to read number plates. Even if a car screams through a real school bus stop sign and the plate number is recorded and reported by the driver, nothing ever happens. In the event of an accident the police still don't give a hoot so there's still no point in recording number plates. They only take a mild interest if there's a fatality. However for shaming drivers by publishing their bad driving on YouTube, the quality is just fine.
There's the bar code. Again, the bar code got me precisely nowhere. All I can assume is somebody in a grass hut in the middle of Peking knocked a few of these out with their soldering iron, sold enough of them to be able to afford a supply of opium and then quit making them.
They are handy and they were cheap. All I needed was to add a video camera like this and the quality of the video was sufficient. 

So, I shall quaff more tea and maybe scarf some cake. Then I will head back outside and look again at installing a D cell battery holder screwed to some plywood that I can then fasten a gate to, to stop the batteries just falling out. That will allow me to put the D cells to power the door and the AAs to power the light. It is far more likely that I'll forget to turn my light off than for the door lock to wear the batteries out. Given the time a set of AAs lasts, a set of D cells should last a year.


Sunday, January 9, 2022

Hydrogen experiment

Back at the beginning of August I set up an experiment to generate hydrogen gas using a 15W solar panel, two stainless steel electrodes, some old plastic bottles, wire and water. Over the months I was baffled as to why it was not producing hydrogen and why the water had turned orange. At one point I had added salt to the water in case 15W was not sufficient with well water to produce a reaction. That had the downside of also producing chlorine gas but I figured - it's outside about 20 feet from anybody and the chlorine would dissipate to meaningless quantities if indeed any quantity worth worrying about was produced.

Nothing happened so today I dismantled the hydrogen generator and retasked the solar panel to work with my solar water heater. In the case of the solar water heater, I suspect I need to do a redesign but that's what experimentation is all about. Experimentation is more fun than anything else.

The way I had it working was two dollar store stainless steel knives with ring connectors crimped onto the wires and the wires screwed to the knives using stainless steel self-drilling bolts. I had the anode inside a small water bottle with the cap on and holes in the bottom. That was inside the bottom of a 2-liter pop bottle with the top of another wedged on to to prevent evaporation of the water. The cathode was slipped outside the water bottle but inside the pop bottle. 

The rust colour had completely baffled me when it appeared. Having dismantled the setup, the bottles were thickly coated in rust and the stainless steel knives were covered in rust too.
The stainless knives look to be actual stainless steel. Where that huge quantity of rust came from is the wire ring connectors. As can be seen, the one from the anode is completely rusted away. The one to the cathode is barely hanging on.

So, the problem seems to have been an unforeseen electrochemical reaction that transformed some of the equipment from steel to iron oxide. That is an interesting situation as I'd been building the system cheaply and simply with my only expenditure being one dollar for the stainless steel knives. I dislike spending money on experiments, preferring to use what I have.

The solution would be a total redesign. The reason I have the anode and cathode separated is so that the hydrogen can be collected separately from the oxygen. I wanted the hydrogen for other experiments and other fun. For cooking I recall seeing somebody doing a similar thing using an old propane tank full of water. They were producing Brown's gas though which is quite hazardous. Brown's gas is oxygen and hydrogen gas together. It only becomes water when the hydrogen is burned in the presence of oxygen.

One of my thoughts had been that if hydrogen could be generated and collected in large enough quantities then aside from experiements, it could be used for cooking and water heating.

The solar water heater is another experiment that's more fun than practical. While they do work exceptionally well, done right, all I'm aiming for is proof of concept. To be "right" it would need black tubing, a black heat reflective backing and glass over the front to convert shortwave light to longwave light. In other words to make it hot inside the unit. The piping from the heating unit to the reservoir would need to be lagged. The reservoir needs also to be lagged. The alternative would be an immersion element and bigger solar panels. 

Going further, if the solar water heater was done well, the water heating would need no pump as the heating could be acieved by convective circulation. That is something well worth doing but which would really only be doable with a domestic installation.


Saturday, January 8, 2022

Results...

I just looked up when I bought my 5ah battery. I pulled it out of the storage box and it was reading zero volts.  It seems to be around April 2016. Given that such batteries really don't last that long, I'm not surprised it's dead.

The other battery I've tried to charge and it did reach 13v earlier in the day but after dark and when there was no solar power coming in, it dropped to 12.4v. That battery I seem to have bought in around July of 2017. Again, no great surprise that it's almost dead.

At 0v for the one and 12.4v for the other. I can say the small one is definitely dead. The larger one suprisingly still has 80% capacity but 80% capacity of a 7ah battery really isn't worth very much. That would be 5.6AH or around the capacity of two sets of 18650 batteres.
I had the solar water heater running today. The pump was certainly pushing the water through at a good rate. It didn't heat the water but there are probably 4 reasons for this:
  1. The sun was not out for long and it was a bitterly cold day anyway.
  2. I had a lot of tubing just laid out on the ground where heat would be lost.
  3. The lid of the cooler in which I kept the water reservoir was not tight enough around the tubes so heat was probably lost that way too.
  4. The heat exchanger design is not very efficient.
I'm thinking that the biggest issue is probably the air gap around the tubing. I have two small coolers. I'm not really sure I want to sacrifice one to just an experiment - even though they were dirt cheap. This is an experiment I want to return to but I want to go at it full tilt. I want to put black painted copper tubing and a lot of it - as the heat collector inside probably a Rubbermaid low-profile tub that's lined with some kind of insulator on the sides and bottom.  The tubing needs to be lagged between the heat exchanger and the water reservoir and the water reservoir needs to be fully closed so no heat can be lost from the reservoir. Having got that working, I then want to see what the difference between using the heat exchanger and using a straight sheet of glass over an insulated bucket of water. 

Meanwhile, today I had hoped to go under the bus to work on brake lines but the high point was 41F so a bit too cold to lie on cold ground. Tomorrow will be 71 but as I have to work on Monday and usually get a day's worth of tummy bugs from going under the bus, it'll have to wait til my 4 day weekend. Pretty much the same for working on the brake calipers.


Saturday, January 1, 2022

Aw no.... Wrong hose and connectors

Yesterday I went shopping! They say when the going gets tough, the tough go shopping so it must have got incredibly tough yesterday. I had said I would not go anywhere until the 3rd and I regret to say I was not true to my word.

So, one of the things I picked up was a selection of colour swatches. I'm trying to match the blue-green intereor paint of the bus. Misty Sea is almost the same as the Carpenter paint. It's shade darker and a shade too green. I will have to see what other swatches there are. 

The plastic nut holding on the switch at the bottom of the galley console broke which led to the switch flopping about. Yesterday I bought a new switch from Lowes (hiss, spit) and installed it. Now the 12v acessory socket works again. That's welcome as I use that particular socket quite a bit.
Also while I was out I bought some more plastic tubing and some plastic tubing connectors. They were supposed to connect to my existing tubing but it seems the tubing is the next size down and the connectors are too. Nevertheless, as the new tubing fits snugly inside the old tubing it might not be a loss. I put most of the solar water heater together. I just need to plug the pump in and connect that to solar to see how well I can heat water held in a cooler using just the sun and a solar pump to circulate the water. Needless to say as soon as I'd got that far, the sun went in and I ended up not being able to test it.
This little Radio Shack 5AH battery was what used to power the bus. I used it solely for extraction fans when I was using CPU fans for extraction fans and for lighting when I used 2w LED lights. I had another project that came up and I wanted to use the battery. After 3 days of solar charging off a 15w panel with a $10 PWM charge controller there was still no change in the voltage. I'm thinking that battery might be dead. I might be able to revive it by connecting it directly to about 100W of solar power in full sun but I doubt it. It's worth a shot anyway but that's a task for another day.
Underneath my cheap PWM controller is a 10AH battery. This read 12.2v when I connected it and after a short while it read 12.4v This battery might be salvable. I will leave it connected and keep checking the voltage. What annoys me is I bought the big one a year before Radio Shack went bust and paid silly money. The other one I got for a reasonable sum in their bankruptcy sale. Mind that's where I also got the plastic switches that broke! 
This is an old ammunition box. For the longest time it was a power box that held both of the gel batteries. I'm going to rebuild it and decided to change the colour from green to yellow. I didn't have any yellow paint and there was none in the store yesterday. Thus I had to choose between red, green, purple, black and white. I chose black because that paint is the colour I'm least likely to need for anything. The white I'll use later to put a nice skull and crossbones on the box for fun.

The plan now is to put a charging port into the box, a voltmeter if I have one spare, a charge controller and the 10AH battery. I'll also include a couple of 12v outputs. If I need USB power I can put that in or use a 12v car accessory socket adaptor. It'll be my equivalent of a "Jackary" and will be just fine for the things I want to do. Instead of costing out the wazoo, it'll cost me $0.00 as I already have the bits.

Oh yes... and the NAPA bucket - total trash. I bought that, put it in the bus with nothing in it. I came back to it 6 months later and the bottom has split. I don't recommend NAPA buckets.