It seemed like problem after problem today. I did get to roughly where I wanted by the end of the day though. I'd taken yesterday off due to not sleeping and feeling pretty icky anyway. It turned out that my exertions are a bit much in such a hot climate and I'd done what I usually manage to do and got dehydrated. It doesn't take much in South Carolina.
So, at the start of the day I was where I was when I left off two days ago. The welding was mostly ground smooth with the exception being at the top. The eagle eyed among will notice that slightly below and to the left of the door handle are four rivets. A new cutout in the steel sheet had to be made to accommodate the rivets. I wanted the steel sheet to lay flat if possible.
Grinding the outside of the welds freed some parts of the steel sheet I'd welded in. To speed things up, I cut the center of the steel out and worked on the rest. Some of the welds were holding so poorly that merely flexing the steel broke it loose. That's the problem with welding the garbage steel that domestic appliances is made from.
There was a little rust and a lot of slag in the valley on the door side of the glass retaining ridge. I didn't check the other side. That's a job for another day. I did go all the way along the valley with a sand blaster and got rid of a lot of junk. I had a nice sand shower in the process so sweat and sand combined to provide me with an interesting little paste all over my body. I have to say sand in the hair is about as bad as sand in other places.
So, having sand blasted it was time to slap rust killing primer on. This is the same brown primer that I use for painting the panels. That really didn't take long to dry.

The tools used today were mainly air tools. I have my little air drill which works really well but eats air like there was no tomorrow. It's nice but I think electric beats air in this instance. The angle grinder works well but was getting so much use that I'm afraid it won't last too long. The sand blaster hopper from Harbor Freight is pretty good. I'm around 2//3rds of the way through my box of Harbor Freight sand. The Harbor Freight air riveter - it works better than my Harbor Freight hand riveter or my Harbor Freight long arm riveter. It does jam though. I am so glad it's an easy tool to dismantle and reassemble. About 10% of the time it broke the end off the rivet mandrel rather than break it at the rivet. One rivet, it managed to pull the rivet a bit then push the mandrel in so that it wasn't possible to do anything other than cut it with an angle grinder.

That was the try-in for the panel. I'd supported it on a nail placed on the hinge so that I wasn't pressed up against the hinge. I didn't get it quite straight but there's only about 1/32 in it.
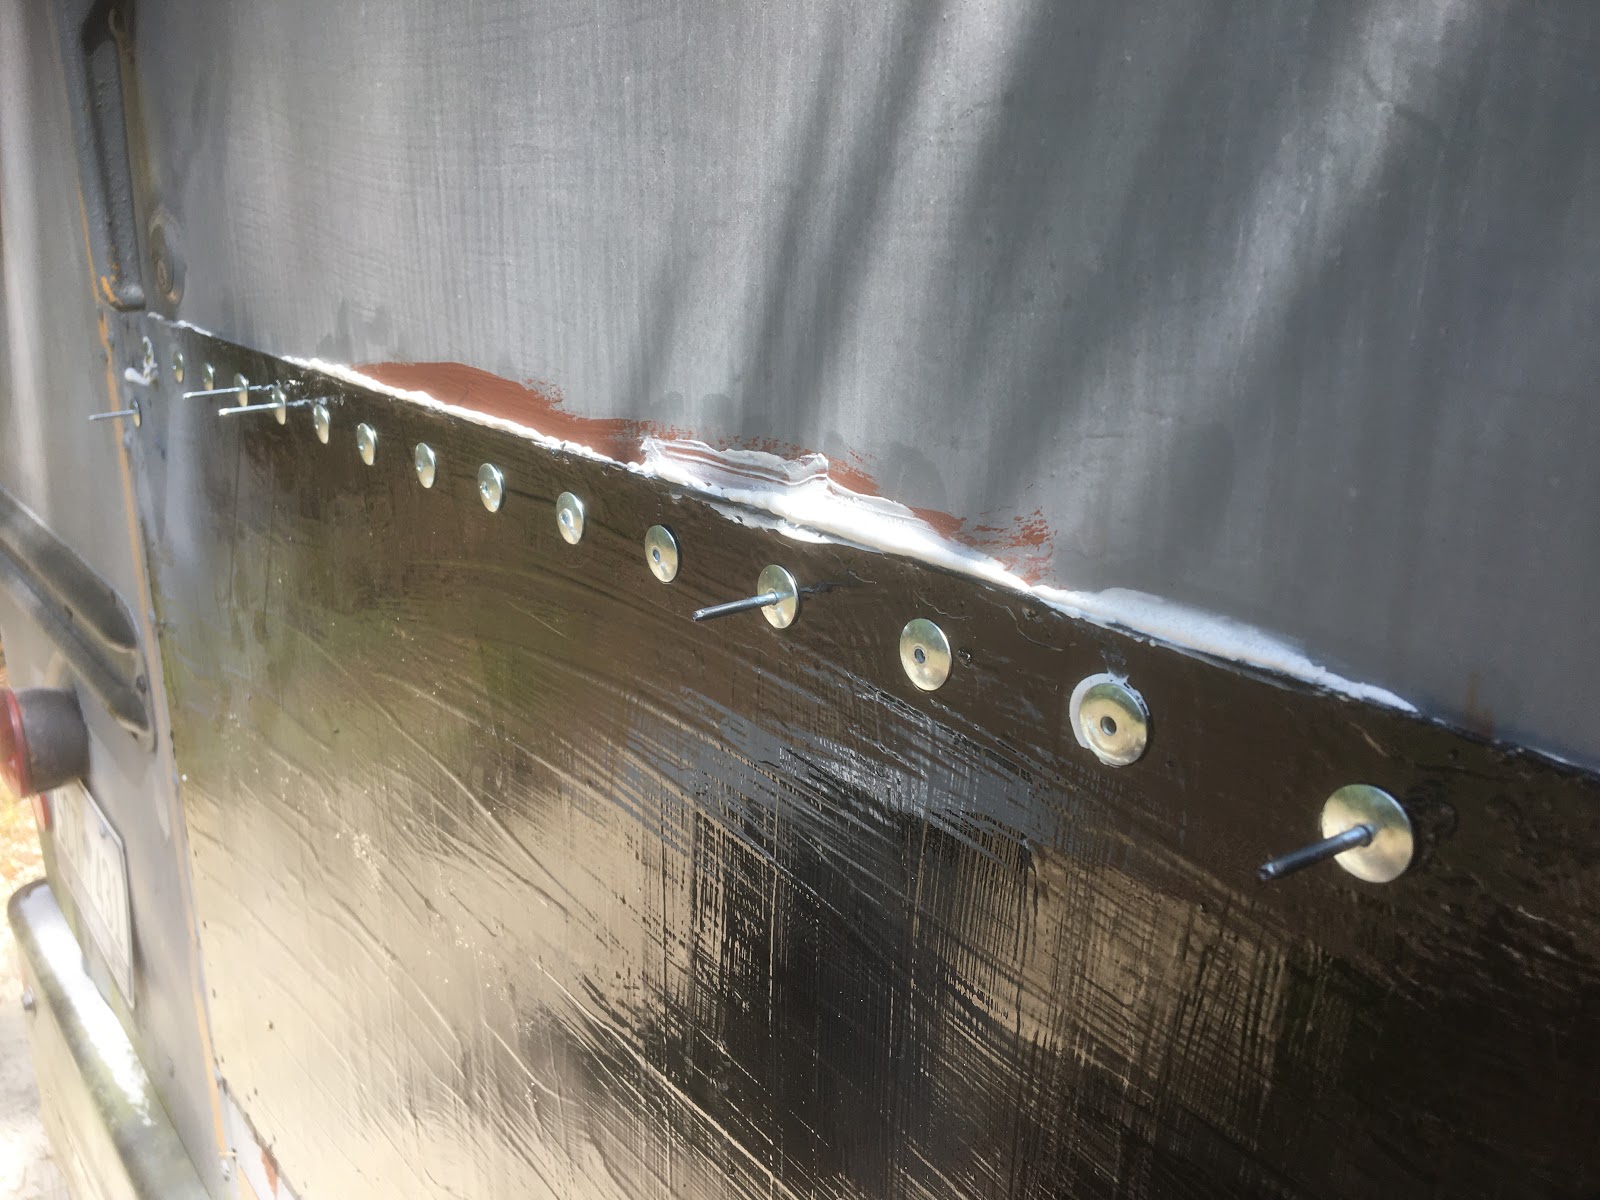
There you see the rivets that the air riveter didn't break off properly. I'm wondering whether it just needs more air pressure. Perhaps the 10 gallon tank is a bit to small? The rivets down the right hand side all had to go in at an angle. Inside the door there's a steel bar on the right. If my holes had been 1/32 to the left then it would all have been fine. I'll have to seal under the canted rivets.
Another issue was that like all my other riveters, it wouldn't release a mandrel. I had to dismantle the riveter several times. Don't get me wrong - it does a fantastic job but not all the time. The failures are probably why the Harbor Freight riveter is $100 cheaper than most other air riveters. Given that I don't need to do more than a hundred or two rivets, there's no point in spending more.
Finally, the panel was on and looks pretty good. I'd been all around it with caulk to try to keep it sealed but I needed to run extra caulk around the edges. Needless to say, I ran out. I'll probably need at least another three or maybe four of these tubes of caulk.
The bonus with this caulk is that it is apparently paintable. The next task with that back panel aside from caulking the edges is to replace the one rivet that I had to cut off half way in, half way out. Then there are two rivet holes that I tried to make which have massively thick steel behind them that I didn't end up penetrating. I'll have to finish those drill holes and put the rivets in place. Finally, I'll have to paint the door grey. That black paint gets scorchingly hot! The grey seen on the panel are grey primer sprayed on where I' scraped the steel as I worked on it.
And finally, these two sheets of steel are for the windows each side of the door. Compared to what I just went though on the bottom of the door, this will be a piece of cake!
As I'm out of caulk, I need to do a shopping run so I might as well pick up a few other things as well. I need the caulk but I should also probably pick up another can of primer. Topcoat can wait a bit. I do have some in grey. I have a lot more in black that will do for the moment. Perhaps some more thinner might help, given the temperature.
I have been threatening to get some 2x3 timber to make myself a frame to stretch a tarp. That would keep the sun off me. I'm not sure I want to spend the money on a luxury or the time building it either.


No comments:
Post a Comment