My next piece of steel will be the one that goes over the last remaining door window. While I was working today I thought of my plan to replace the upper window on the door. Then I realised I don't need to remove the window - I can just leave it there since it doesn't protrude unlike the two I replaced today. That set me thinking. I have leftover steel from the first time around when we discovered I can't measure and include a big enough margin. That steel could be trimmed down to cover the outside of the unused windows on the bus.
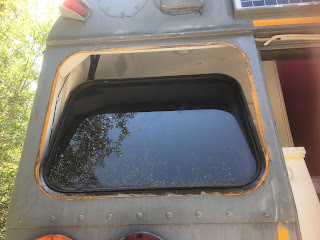
Getting the side window out was easy enough. There's a central spline that pushes two lips on the window rubber apart in order to hold the glass in place. Many people just smash the glass but I prefer to do things neatly and without shards of broken glass. Once I'd peeled the spline out, I lifted the edge of the rubber and held it open by working a drywall screw between the rubber and the steel. Then I worked along with more drywall screws and gently pushed on one corner of the glass, pushing rubber and glass inside. Once one corner was in, the other corner went in too and it was then just a case of lifting it out of the frame from inside.

And that's exactly what it looks like on the inside - nothing special. Having done that it was a case of holding the steel in place with one hand while perched precariously on a step ladder. Then, with the other hand, drilling one rivet hole, using the holes in the steel as a template. Having done that, it was a case of pushing a rivet into the hole, lifting the other side of the steel and holding it then drilling another hole.
Having drilled the two holes and suspended the panel in place, it was possible to draw around it with a sharpie then after removing the panel, I laid a few silicone caulk beads all the way around .
The next stage was to rivet the panel using the original rivet holes, sandwiching the silicone caulk between the bus body and the panel. Then it was a case of working all the way around with the drill and the riveter.
I don't remember when I started but think it must have been somewhere about 1pm. By about 3pm I'd got the left hand panel riveted into place. Even though I have an air riveter, it still takes plenty time - especially when the riveter needs to be dismantled and cleared about every 4 rivets.
Once the first panel was in place, I painted the bottom panel and the new panel so it's all the same color as the bus. I have yet to put my internal baffle over the new steel. I want to wait for a good rainy day to see if there are any leaks that need attention first.
By about 7pm I'd done the panel the other side of the door and found the trick with the air riveter is to point it straight up and if the rivet mandrel is loose then pull it out by hand. If it's not then work the trigger a couple of times and hope it falls out the back. Otherwise it's a case of dismantling the riveter again to clear it. Interestingly, doing that leads to far fewer mandrels left sticking out of rivets that then need the attention of my angle grinder.
I'm pretty happy with the way the back of the bus looks now. It certainly doesn't look like easy prey for a bandit. Thinking about the side windows, a simple sheet of flat steel would do. I can trim the surplus steel from the mistake purchase. I had been thinking of putting bars over all the side windows but doing this, I have fewer windows that need bars. That's a bonus!
The next step will likely be to measure the windows for the spare steel sheet. I'll probably cut some foam board as a template just to see how it looks. Meanwhile, aside from the panel over the top window of the back door, there's the roof vent to replace.
I have to say that after spending most of the day in 90+F and high humidity, going up and down a stepladder, I'm plain tuckered. Tomorrow will be a day I'll take really easy!


No comments:
Post a Comment