Today I went shopping. I seem to be having Fridays off, these days since the school year has ended and I'm now working the maintenance program. I'm usually working 6:30am til 4pm Monday through Thursday and that's been interesting. Sometimes I've been driving a huge truck with a low geared manual transmission and sometimes hefting boxes. It's all good clean fun.
On my shopping excursion I spent plenty money though I didn't seem to get much for it. There was the usual trip to Harbor Freight followed by a trip to Walmart where I browsed filters, thinking about my new fan. After that it was a quick trip to Lowes (hiss, spit) where I hunted to find something akin to a junction box but it seems the USA isn't advanced enough with electrical parts to have junction boxes. In the end, it works out cheaper just to totally rewire the faulty socket with fresh wire straight to the distribution panel. Wacky!
Looking at filters, I was thinking of going back to my original idea of having the fan connected to a filter unit which is then connected to an air intake. I liked the look of the big circular filters that the shop vac has. I also like very much the flat filters that cars use. I'm quite tempted to use the same filter that my Xterra uses as the engine air filter. That's flat and fairly big. The shop vac filter has throughput as the big advantage though.
Arriving home, my fan had arrived. The first thing I did was to connect it to my battery pack whereupon it blew a powerful blast of air. By my new calculation, the 130 cubic feet per minute fan should replace the entire volume of air in the bus in just 7 minutes. Needless to say the 2.7 amp draw of the fan blew my 2 amp fuse fairly swiftly. Then one of my connectors disintegrated on my battery pack.
Today has been one of those days. Dark, heavy clouds, thunder and lightning and a headache that has lasted all day. I'm so lucky to be living here though. Where I came from originally such weather, headaches and the melancholia induced would last for weeks without respite.
The new plan is to fund a suitably universal filter that can stand a years worth of use then to build some kind of housing for it with a door that permits easy filter changes. A flat filter would give the least challenging set of problems and a rectangular case would be easier to fabricate. If the air were sucked down through the filter and the filter horizontal there would be little to no need to secure it in place as both gravity and suction would work.
As far as an air inlet goes, I still like my sink outlet idea but I believe I may have a better idea with a tube coming straight up with a strainer on top. They sell those! It's just a bigger air inlet.
No photos today. It was just too dark, wet and depressing.
Friday, June 30, 2017
Wednesday, June 28, 2017
In the wake...
In the wake of the failure of my CPU fan based air injector to inject enough air to make a difference, I looked online and found a marine bilge fan that purportedly blows 135 cubic meters of air a minute. It has a very high power usage at 2.5A but if it really does shift that much air then there are two solutions.
The first is to replace both of my existing extraction fans with the new more powerful fans. This might involve relocating the battery pack to the back of the bus and reallocating the cable that runs the length of the bus to connecting the three solar panels in parallel. That should allow for fairly powerful air extraction.
The second is to leave the extraction fans as they are but to add an air injection system using force injected, filtered air powered solely from the front solar panel.
The problems as I see it is with extraction only, the roof vent at the front might drag wet air into the bus and pollens could be sucked in. With air injection, the noise level could be high. There's also a chance of moisture injection.
I definitely have to try to do something about the temperature inside the bus though. Anything higher than outside temperatures is unacceptable. Whatever I do though has to be powered from 35W of solar panels. There will be no additional solar capacity added.
Another option could be just to replace a single extraction fan with a more powerful alternative and see what happens. The aim is to remove hot air and replace it with cooler outside air.
Meanwhile, somebody asked me why I don't do Facebook. The answer is that I just don't find Facebook to be a pleasant and engaging experience. Rather the opposite in fact. I found my naively innocent responses seemed to result in angry and ugly words aimed in my direction. Then I'd find my feed would be swamped with generic reposts from accounts not in my friends list that would never be in my friends list either. Thus, since all Facebook did was raise my blood pressure, I deleted it. I've deleted Facebook several times in the past after other users rudeness and arrogance became too much to bear.
I can't honestly say I miss Facebook. Sure, there were a few people I knew on it but largely they didn't post either. The problem comes from the fact that in order to sell advertising space, Facebook has to have as wide a user base as possible. That means that the lowest common denominator has to be accepted and that includes those that have not yet learned to wear shoes, bathe and to not make messes in the house.
 As I didn't want to become an alcoholic, dealing with the cruel things people commented on my Facebook postings, instead of buying ever more booze, I deleted the Facebook app. I've been happily Facebook free for ages.
The first is to replace both of my existing extraction fans with the new more powerful fans. This might involve relocating the battery pack to the back of the bus and reallocating the cable that runs the length of the bus to connecting the three solar panels in parallel. That should allow for fairly powerful air extraction.
The second is to leave the extraction fans as they are but to add an air injection system using force injected, filtered air powered solely from the front solar panel.
The problems as I see it is with extraction only, the roof vent at the front might drag wet air into the bus and pollens could be sucked in. With air injection, the noise level could be high. There's also a chance of moisture injection.
I definitely have to try to do something about the temperature inside the bus though. Anything higher than outside temperatures is unacceptable. Whatever I do though has to be powered from 35W of solar panels. There will be no additional solar capacity added.
Another option could be just to replace a single extraction fan with a more powerful alternative and see what happens. The aim is to remove hot air and replace it with cooler outside air.
Meanwhile, somebody asked me why I don't do Facebook. The answer is that I just don't find Facebook to be a pleasant and engaging experience. Rather the opposite in fact. I found my naively innocent responses seemed to result in angry and ugly words aimed in my direction. Then I'd find my feed would be swamped with generic reposts from accounts not in my friends list that would never be in my friends list either. Thus, since all Facebook did was raise my blood pressure, I deleted it. I've deleted Facebook several times in the past after other users rudeness and arrogance became too much to bear.
I can't honestly say I miss Facebook. Sure, there were a few people I knew on it but largely they didn't post either. The problem comes from the fact that in order to sell advertising space, Facebook has to have as wide a user base as possible. That means that the lowest common denominator has to be accepted and that includes those that have not yet learned to wear shoes, bathe and to not make messes in the house.

Sunday, June 25, 2017
Temperature differential
Its cloudy and midday. The temperature outside is 78.8 but inside the bus it's 86. That's a small difference though I'm sure it gets more on hotter days. At least it's not the 140 that I recorded two years ago inside.
I've rethought my ventilation unit. While I could patch what I have by increasing the tubing size or adding a second fan, what I've opted for is a radical redesign. This time I'll use a 130CFM marine bilge blower. That's a bit more powerful than my existing CPU fan. At least it's a dedicated fan!
Thinking more along those lines, because the fan I ordered is 3 inch (I should have gone for 4), I can still use my sink tailpipe as an inlet though I might want instead of using just one which is 1.25 inches in diameter, to use two. The surface area of one tailpipe is 3.927 square inches while the surface area of a 3 inch tube is 9.425 square inches. Having said that, since the whole of the tailpipe is not open, it could be worth using three or even four. That would allow me to spread my ventilation around the cabin and even into the cockpit. Alternatively I could just cut a square hole in the floor and after treating the bare edges, put a square vent with a vent cover.
The new fan which should arrive on the 30th is much more powerful at 2.5A. It might be all my front solar panel can handle. At a maximum 15W or more likely 10W, it would take about three times as long as the fan runs to charge the battery. As I found with my rear extraction fans, the best way of doing that is to use a small battery and thus increase the cycling. When the weather gets colder and the bugs have gone, I'll be able to get underneath the bus to install everything, including extra underbody cabling. I will probably connect the solar panels in order that the power can be better utilized.
As far as filtering is concerned, an increase in filter size is definitely in order. I'd been thinking solely about vehicle engine filters. Now I'm wondering whether Hepa air cleaning filters might be a better route since they're bigger and designed for faster airflow. Having said that, they do allow more garbage through and they're not as resilient. It's a toss up, to be honest. Rather than building a brand new filter holder from scratch, I'm tempted to return to my old idea of using an ammunition box to hold the filter. It wouldn't take much to cut some sheet steel, tack weld it into place and seal with silicone sealant. Nor would it take much to build a little trap to hold it in place. Suction from the fan would pull it more firmly into place. I'm tempted to make it accessible solely by going under the bus and changing it in the winter only. That way I can just have a straightforward ducted vent on the skirt with nothing heavy involved. Even the commonly available vent tubing is light weight.
Many people ask why I don't just put an air conditioning unit on and have done. Sure - I could do that. I don't want to though. I'd rather do it this way so I can avoid adding too many solar panels and or batteries. I do have a 120V plugin and I really don't want to put an AC unit in. They're big and bulky and I'm not too sure how good my structural welding is.
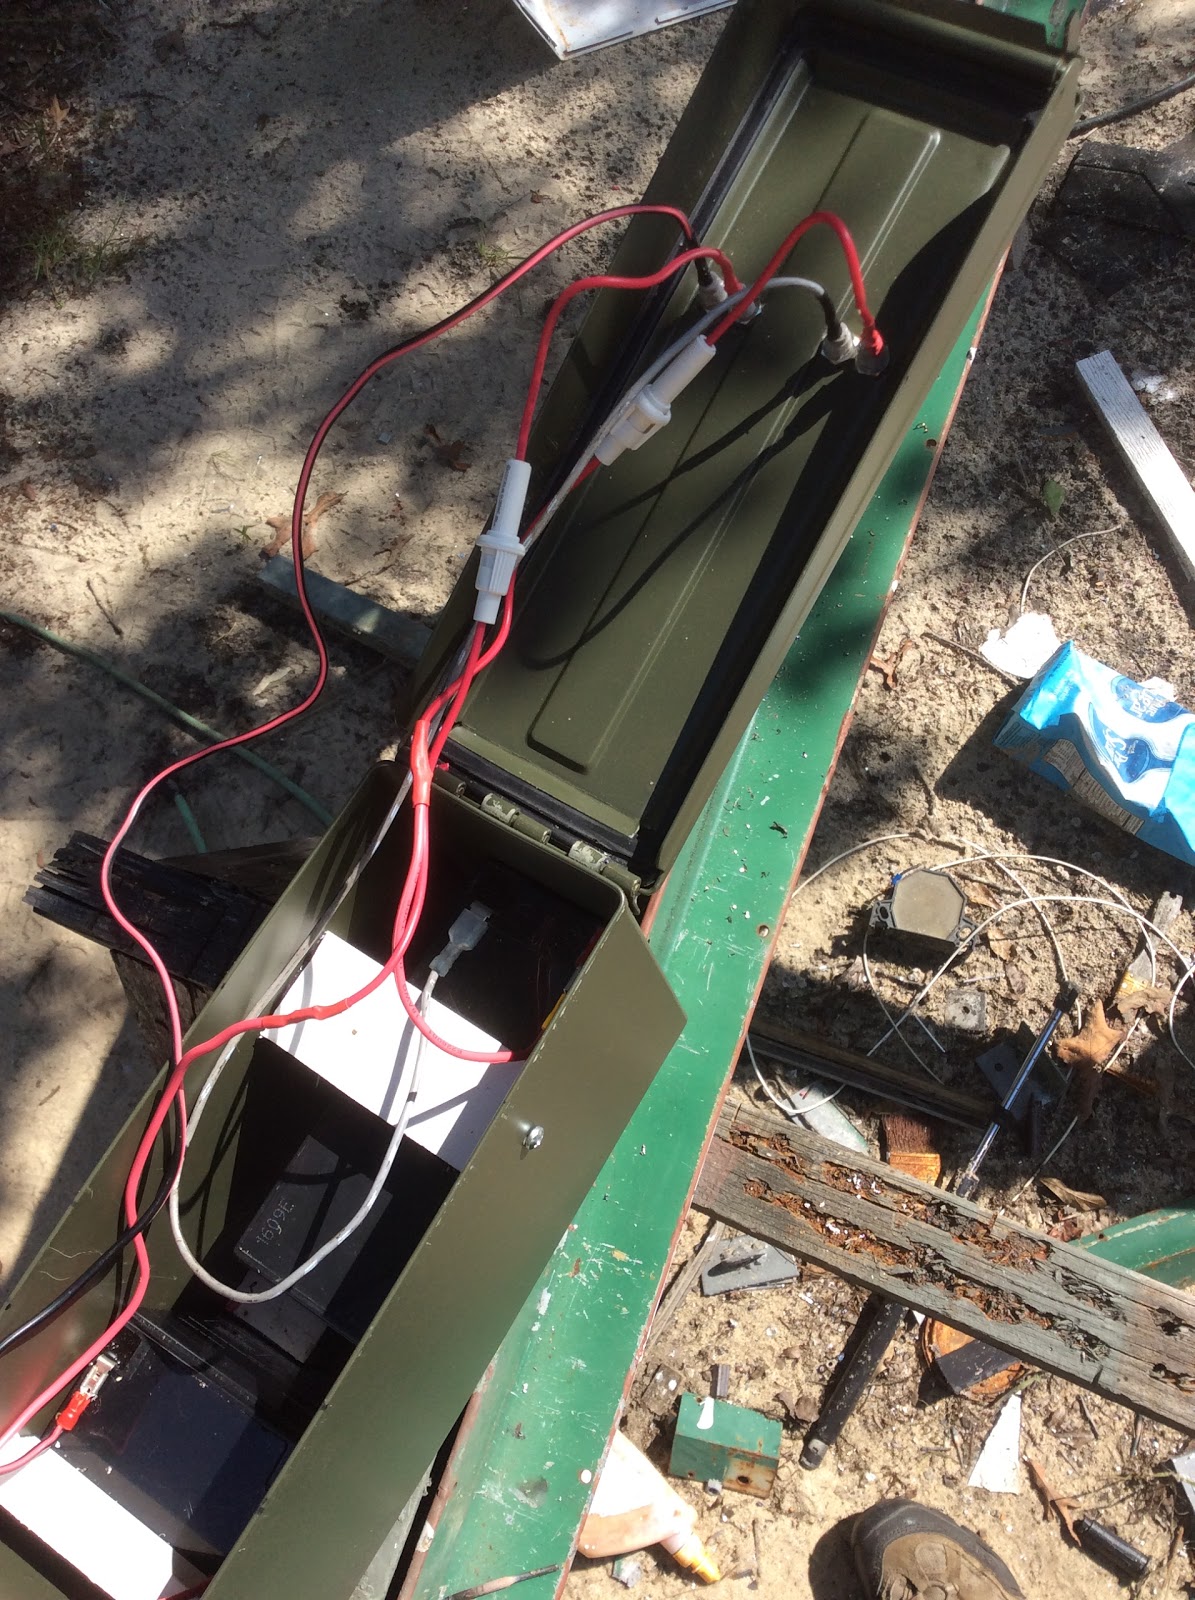
Speaking of welding, I started on my power supply unit today. The plan was to use an ammunition box as the base. As usual I started with complicated ideas first. The intent was to put an XLR socket plus a panel mount fuse for each of two batteries plus a switch. I was going to weld some holders to keep the batteries from slopping about in the box too. As usual though, reality sets in.
The first thing I did was to haul out my welder and weld a holder. Needless to say, the first weld was very strong but in completely the wrong place. My carefully inked line moved all by itself and the bar I'd welded was half an inch out from where it should have been. Disillusioned, I put my welder away and went with another solution.
I'd had plenty leftover plastic planking from doing the bathroom floor. They'd been lying in the yard for two years but that makes little to no difference as they don't decay or get attacked by bugs. A few minutes with my marker (this time I watched my line carefully in order that it didn't getup and move. These pesky lines are awkward like that) and then a few minutes with a hand saw and my pieces of plastic were cut.
Finding panel head screws was challenging but since I organized my screws and bolts better, it was significantly less challenging than before. If only I could say that about my tools! So, the next thing was to drill holes through the case and into my plastic pieces. That actually worked quite well.
 The next stage was to connect wires, fuse holders and terminals to the batteries and the ammunition box. That actually went along quite quickly and I remembered my heat shrink sleeving. I'd never used it before but it worked remarkably well. I'm a convert! I'm not sure where I'll find heat shrink sleeving now that Radio Shack has gone under.
 The fuse holders and in fact most of my useful electronics came from Radio Shacks going out of business sale. I spent $20 and got probably $50 worth of stuff though at Radio Shacks normal prices they'd probably have been $250 or thereabouts.
I've used banana plug terminals that also accept spade connectors. It's completed as it is but there are always add one that can be included. The main reason I didn't use my XLR connector was I needed to drill a one inch diameter hole and my biggest drill bit is 1/2 inch. My step drill bit committed suicide a while ago and I've not replaced it.
My next task will be to put the correct connectors onto leads from my charge controllers in order to use my new battery compartment. I've chosen an ammunition box because it's sealed with an airtight seal and is non flammable. My batteries are all sealed so they shouldn't leak or anything but a steel box should ensure safety. Any fire should rapidly smother itself. The ideal would be to install these batteries under the bus for safety, which I might do in due course.
The battery box is not currently in use but will be next weekend or even perhaps on Tuesday. Tuesday is not a normal bus day. In fact, it should be a work day but I've had to take the day off to go and visit the IRS. It seems my employer went and lost all their payroll information and thus false claims have been filed and I have to go and prove who I am. So, after that, I'll probably come home and do some bus work.
There are two batteries in the box. One is a 10ah battery that'll run my induction fan. The other is a 5ah battery that normally runs my extraction fans. Currently I've got one of my two 7ah batteries doing the job until I can put the right connectors together to connect the battery box to my charge controller.
I've rethought my ventilation unit. While I could patch what I have by increasing the tubing size or adding a second fan, what I've opted for is a radical redesign. This time I'll use a 130CFM marine bilge blower. That's a bit more powerful than my existing CPU fan. At least it's a dedicated fan!
Thinking more along those lines, because the fan I ordered is 3 inch (I should have gone for 4), I can still use my sink tailpipe as an inlet though I might want instead of using just one which is 1.25 inches in diameter, to use two. The surface area of one tailpipe is 3.927 square inches while the surface area of a 3 inch tube is 9.425 square inches. Having said that, since the whole of the tailpipe is not open, it could be worth using three or even four. That would allow me to spread my ventilation around the cabin and even into the cockpit. Alternatively I could just cut a square hole in the floor and after treating the bare edges, put a square vent with a vent cover.
The new fan which should arrive on the 30th is much more powerful at 2.5A. It might be all my front solar panel can handle. At a maximum 15W or more likely 10W, it would take about three times as long as the fan runs to charge the battery. As I found with my rear extraction fans, the best way of doing that is to use a small battery and thus increase the cycling. When the weather gets colder and the bugs have gone, I'll be able to get underneath the bus to install everything, including extra underbody cabling. I will probably connect the solar panels in order that the power can be better utilized.
As far as filtering is concerned, an increase in filter size is definitely in order. I'd been thinking solely about vehicle engine filters. Now I'm wondering whether Hepa air cleaning filters might be a better route since they're bigger and designed for faster airflow. Having said that, they do allow more garbage through and they're not as resilient. It's a toss up, to be honest. Rather than building a brand new filter holder from scratch, I'm tempted to return to my old idea of using an ammunition box to hold the filter. It wouldn't take much to cut some sheet steel, tack weld it into place and seal with silicone sealant. Nor would it take much to build a little trap to hold it in place. Suction from the fan would pull it more firmly into place. I'm tempted to make it accessible solely by going under the bus and changing it in the winter only. That way I can just have a straightforward ducted vent on the skirt with nothing heavy involved. Even the commonly available vent tubing is light weight.
Many people ask why I don't just put an air conditioning unit on and have done. Sure - I could do that. I don't want to though. I'd rather do it this way so I can avoid adding too many solar panels and or batteries. I do have a 120V plugin and I really don't want to put an AC unit in. They're big and bulky and I'm not too sure how good my structural welding is.
Speaking of welding, I started on my power supply unit today. The plan was to use an ammunition box as the base. As usual I started with complicated ideas first. The intent was to put an XLR socket plus a panel mount fuse for each of two batteries plus a switch. I was going to weld some holders to keep the batteries from slopping about in the box too. As usual though, reality sets in.
The first thing I did was to haul out my welder and weld a holder. Needless to say, the first weld was very strong but in completely the wrong place. My carefully inked line moved all by itself and the bar I'd welded was half an inch out from where it should have been. Disillusioned, I put my welder away and went with another solution.
I'd had plenty leftover plastic planking from doing the bathroom floor. They'd been lying in the yard for two years but that makes little to no difference as they don't decay or get attacked by bugs. A few minutes with my marker (this time I watched my line carefully in order that it didn't getup and move. These pesky lines are awkward like that) and then a few minutes with a hand saw and my pieces of plastic were cut.
Finding panel head screws was challenging but since I organized my screws and bolts better, it was significantly less challenging than before. If only I could say that about my tools! So, the next thing was to drill holes through the case and into my plastic pieces. That actually worked quite well.

I've used banana plug terminals that also accept spade connectors. It's completed as it is but there are always add one that can be included. The main reason I didn't use my XLR connector was I needed to drill a one inch diameter hole and my biggest drill bit is 1/2 inch. My step drill bit committed suicide a while ago and I've not replaced it.
My next task will be to put the correct connectors onto leads from my charge controllers in order to use my new battery compartment. I've chosen an ammunition box because it's sealed with an airtight seal and is non flammable. My batteries are all sealed so they shouldn't leak or anything but a steel box should ensure safety. Any fire should rapidly smother itself. The ideal would be to install these batteries under the bus for safety, which I might do in due course.
The battery box is not currently in use but will be next weekend or even perhaps on Tuesday. Tuesday is not a normal bus day. In fact, it should be a work day but I've had to take the day off to go and visit the IRS. It seems my employer went and lost all their payroll information and thus false claims have been filed and I have to go and prove who I am. So, after that, I'll probably come home and do some bus work.
There are two batteries in the box. One is a 10ah battery that'll run my induction fan. The other is a 5ah battery that normally runs my extraction fans. Currently I've got one of my two 7ah batteries doing the job until I can put the right connectors together to connect the battery box to my charge controller.
Saturday, June 24, 2017
Well, bugger!
Today I gave my ventilation unit a thorough test. I connected it to a 12v battery and put the unit on a box outside then set it going, with a ventilation tube running into the bus.
 It seems that I need to pump more outside air into the bus than that is capable of. The beauty of my design is that everything was filtered and it didn't take up a window unlike my previous design. That design worked but definitely could have stood some redesign and improvement. I'd still like an underfloor design and I still want to avoid air conditioning.
 I think the problem with my system (built strongly and over a couple of months) is threefold.

So, where now? Let's look at the list of options.
I had been thinking of making filter changes easy by having filter access on the side of the vehicle. That, however, comes with other issues, the main one being the weight of the unit. Moving on from there, it should be possible given the steel just lying around nearby to build a big filter box or to obtain something similar from a scrap merchant. What I need is a 12v turbo fan to power it all.


- The Honda lawnmower engine filter just isn't big enough. Even with a CPU fan, it restricts the airflow.
- The 1.5 inch tubing used is not big enough (shown).
- The CPU fan though blowing gallantly cannot override the other two issues.
After putting the newly built system away, I pulled out my old window based unit that I'd built from cheap battery fans and plywood. Although it's funky about which windows it'll fit into, it brought the temperature down from 95F to 91F fairly quickly.

It's not a unit I much care for but it does actually work. It's just two O2 cool fans from Walmart that I bought on sale a year or two back. The batteries had festered (Dollar General brand) but with some fresh Harbor Freight batteries it was up and running.
So, where now? Let's look at the list of options.
- I don't want to use massive batteries, solar arrays or a generator.
- I don't want an air conditioner of any variety.
- I want filtered air blown in from underneath.
- I need air flow rather than cooling.
- I have two solar setups to draw from totaling 35W.
- I did mentally design a ventilation system using a separate blower and filter unit.
Sitting here by my window unit I feel far cooler than I was before despite the temperature being only two degrees lower. The humidity has plummeted from 67% to 55% just in a few minutes. Clearly I need to push greater volumes of air through.
I had been thinking of making filter changes easy by having filter access on the side of the vehicle. That, however, comes with other issues, the main one being the weight of the unit. Moving on from there, it should be possible given the steel just lying around nearby to build a big filter box or to obtain something similar from a scrap merchant. What I need is a 12v turbo fan to power it all.
Friday, June 23, 2017
Phwarrr! Watta scorcher!
I'm almost sad I didn't have to go to work today. At least work is air conditioned! I spent the whole day building the door or rather, building the skeleton of the door for my ventilation unit.
After a couple of false starts where things went awry with my first weld and I had to cut the two pieces apart and start again, things went well. It's not going to sound impressive but what took all day was welding 4 pieces of steel angle into a rectangle and then adding 4 pieces of flat steel as a flange.
 The welding didn't take many minutes. What took the time was waiting for the previous welding to cool down to a point at which I could safely handle it and of course the fact I weld both sides. I had to fill in a couple of areas where I'd undercut my steel but that's easy enough. A few swishes of the welding rod is all it takes to fill a hole.
I tested my ventilation unit today. I simply placed the fan inside, powered it up and a reassuring roar of air came through. That roar was quite reduced when the filter was put in place but it still came though as a good breeze. I didn't measure how many seconds it took to fill a Walmart bag but probably it would not have been many.
It was ludicrously hot today. Inside the bus it was a scorching 104F. If it were not for my white roof and heat extraction fans, it could well have been much warmer.
 I'm hoping that my air induction fan will lower temperatures inside to somewhere approaching outside temperatures.

After a couple of false starts where things went awry with my first weld and I had to cut the two pieces apart and start again, things went well. It's not going to sound impressive but what took all day was welding 4 pieces of steel angle into a rectangle and then adding 4 pieces of flat steel as a flange.

I tested my ventilation unit today. I simply placed the fan inside, powered it up and a reassuring roar of air came through. That roar was quite reduced when the filter was put in place but it still came though as a good breeze. I didn't measure how many seconds it took to fill a Walmart bag but probably it would not have been many.
It was ludicrously hot today. Inside the bus it was a scorching 104F. If it were not for my white roof and heat extraction fans, it could well have been much warmer.

While I tested my ventilation unit, I also tried it with some corrugated dryer tubing. The air whizzed merrily out of a 5 foot coil. I'm probably going to use dryer tubing to connect the ventilation unit to the floor vent (which is a sink drain tube with a stainless steel strainer top from Lowes -hiss, spit). I'm not anticipating huge amounts of air being injected but with air being blown in and air being blown out, there should be much more airflow.
One thing I neglected to do was to add a back support for my ventilation unit. It's way too heavy to have it hanging off the skirt. In fact, it might be better just to hang the whole thing from the ribs and have the whole weight supported that way while it's bolted to the skirt for the inlet and filter access.
Another (simpler) design would have been to have the filter and fan units separated and the inlet just being a louvered pipe coming out of the skirt. As it is, I have a ten pound monster that would probably survive an atomic blast.
My welding is 100% better now that I can see what I'm doing. My auto darkening helmet has made an impressive difference. Though I wait for my welds to cool I also play safe these days (after more than a couple of burns) and use a non contact thermometer.

This model tops out at around boiling point. I could have paid more to have one that measured up to 2,000 degrees but honestly I don't need to know that. Anything over 90F is untouchably hot anyway.
As I knocked off for the day, I had the most ferocious hand cramp. I'm guessing this has something to do with not enough fluids and a ludicrously hot day. Tomorrow, if I have time (it's supposed to rain) I might add supports to my ventilation unit and make a start on putting a hinge on the door and putting a louvered vent cover on.
Sunday, June 18, 2017
Destination: Idiotville. All aboard!
I've been swanning around forums, trying not to hurt myself by laughing too much at the idiots using them. Seriously, some of their ideas are outrageous. In fact, I'd say so outrageous that it's unlikely that any of the posters actually own the busses they claim to be converting.
Forums are usually fairly decent places to get pointers for products worth looking at. I've been idly looking at instant water heaters. Needless to say when I mention low amperage water heaters, I get cries of can't be done and pointers toward solutions I don't want and to expensive solutions. Seriously - if I said I wanted a good black tee shirt, I'd get every color except black being offered and every size other than the one I wanted. It's as though people half read the question then come up with their idea of how things should be done.
It's like a fantasy land out there. People greatly overestimate what their bus conversions are worth. They're very often not worth any more than the cost of the actual bus itself. People seem to think it's worth throwing ten thousand dollars or more into a conversion. It's nuts. If one has that kind of money then one buys a real motorhome.
I'm working on powered ventilation for my motorhome conversion in order that I don't have to blow money on an expensive, bulky air conditioner. The first summer, the interior temperature was 140F. By painting the roof white and putting heat extraction fans, I brought the temperature down to 104F. When I have my cool air induction unit installed, the temperature will drop again. My aim is to match outside in the shade air temperatures.
Today I installed my Harbor Freight solar panel. I'd thought of all kinds of fancy and labor intensive ways of installing it but in the end used 4 M5 rivnuts and M5 countersunk bolts. I passed the cable through a hole made behind the panel that I sealed with silicone sealant. Working outside in the heat was pretty exhausting!
 As I'm sure you'll agree, it looks very anonymous, like a destination board. I had concerns about it cracking when I tightened it because the panel was warped. I don't know yet whether I'm in the clear or nit but it's looking good right now.
I won't be able to use the panel immediately because I still need to complete my ventilation unit (which will use its power) and because my extra charge controllers have yet to arrive. I do already have a mystery charge controller but it's nowhere near as informative as those I ordered (I should have ordered 3).
Several people aboard the idiot train were busily telling me how I'm completely wrong in the way I've installed my panel. Not one asked why I installed it vertically. It's never possible to underestimate the intelligence of those that use forums. When I last checked, that panel was producing plenty power. People don't seem to comprehend that my solar panels are there to provide power for my ventilation system with leftover power being used to charge phone, tablet and MiFi pad if necessary. Lighting is run exclusively from D cells which I can buy from a dollar store for 50c each. Given their 200 hour performance in an led lantern that's on for very short periods, running lighting from solar would be stupidly expensive. It would still be possible to use my solar D cell charger to charge lighting batteries though.
Not feeling too much like welding in the heat, my attention turned to the already completed portion of my ventilation unit. I pulled out the compressor and gave the unit a thorough blasting with sugar as the media. It worked quite well though as can be seen has provided ample food for the next week or two for the myriad of ants that live in the area.
 As I still have some welding to do, I merely sprayed primer on my construction. I'll add a supplementary support to the back of the unit when I next weld. That will probably take the form of a U shaped bracket that I can rivet to the ribs to provide extra support as it's way too heavy to have this hanging off just the bus skirt. At my next welding, I expect some of the primer to catch fire and burn off. Then I can reprise those areas and paint a topcoat. As it is, it will prevent rust.
One of the other tasks was that I fed the wire from the panel along the side of the bus, inside, securing it with tape while applying silicone sealant to fasten it properly. That wire now feeds down to my mystery charge controller. Though it goes no further, that controller could well be used to run my induction fan, when I complete it.
Once the fan is completed and the wiring for the power unit completed, that'll be pretty much it aside from completing the re-wiring of the one socket. I'll have to get the brake pedal adjusted, the kingpins checked and then a good steam and grease. Eventually I'll want to put a water inlet, external 12v input (if I decide to put solar panels outside) and a few other equally oddball things. I'm hoping to get my bus retitled sooner rather than later.
Forums are usually fairly decent places to get pointers for products worth looking at. I've been idly looking at instant water heaters. Needless to say when I mention low amperage water heaters, I get cries of can't be done and pointers toward solutions I don't want and to expensive solutions. Seriously - if I said I wanted a good black tee shirt, I'd get every color except black being offered and every size other than the one I wanted. It's as though people half read the question then come up with their idea of how things should be done.
It's like a fantasy land out there. People greatly overestimate what their bus conversions are worth. They're very often not worth any more than the cost of the actual bus itself. People seem to think it's worth throwing ten thousand dollars or more into a conversion. It's nuts. If one has that kind of money then one buys a real motorhome.
I'm working on powered ventilation for my motorhome conversion in order that I don't have to blow money on an expensive, bulky air conditioner. The first summer, the interior temperature was 140F. By painting the roof white and putting heat extraction fans, I brought the temperature down to 104F. When I have my cool air induction unit installed, the temperature will drop again. My aim is to match outside in the shade air temperatures.
Today I installed my Harbor Freight solar panel. I'd thought of all kinds of fancy and labor intensive ways of installing it but in the end used 4 M5 rivnuts and M5 countersunk bolts. I passed the cable through a hole made behind the panel that I sealed with silicone sealant. Working outside in the heat was pretty exhausting!

I won't be able to use the panel immediately because I still need to complete my ventilation unit (which will use its power) and because my extra charge controllers have yet to arrive. I do already have a mystery charge controller but it's nowhere near as informative as those I ordered (I should have ordered 3).
Several people aboard the idiot train were busily telling me how I'm completely wrong in the way I've installed my panel. Not one asked why I installed it vertically. It's never possible to underestimate the intelligence of those that use forums. When I last checked, that panel was producing plenty power. People don't seem to comprehend that my solar panels are there to provide power for my ventilation system with leftover power being used to charge phone, tablet and MiFi pad if necessary. Lighting is run exclusively from D cells which I can buy from a dollar store for 50c each. Given their 200 hour performance in an led lantern that's on for very short periods, running lighting from solar would be stupidly expensive. It would still be possible to use my solar D cell charger to charge lighting batteries though.
Not feeling too much like welding in the heat, my attention turned to the already completed portion of my ventilation unit. I pulled out the compressor and gave the unit a thorough blasting with sugar as the media. It worked quite well though as can be seen has provided ample food for the next week or two for the myriad of ants that live in the area.

One of the other tasks was that I fed the wire from the panel along the side of the bus, inside, securing it with tape while applying silicone sealant to fasten it properly. That wire now feeds down to my mystery charge controller. Though it goes no further, that controller could well be used to run my induction fan, when I complete it.
Once the fan is completed and the wiring for the power unit completed, that'll be pretty much it aside from completing the re-wiring of the one socket. I'll have to get the brake pedal adjusted, the kingpins checked and then a good steam and grease. Eventually I'll want to put a water inlet, external 12v input (if I decide to put solar panels outside) and a few other equally oddball things. I'm hoping to get my bus retitled sooner rather than later.
Saturday, June 17, 2017
The diagnosis has been confirmed
I contacted the seller of the panel and he said it was indeed a used panel. That begs the question as to why it was so expensive but anyway, the situation was amicably resolved and I got my money refunded. I'd buy from him again, since he seems a straight, honest dealer.
Yesterday on my trip to Harbor Freight, I got a couple of things including a 15W solar panel. Now that panel turns out to be much heavier than my faulty panel. Checking the screw holes, they're a bit big for an 8-24 and a bit small for a 1/4-20. I'll have to find something that fits. That's a trip to the hardware store.
As the panel will be supported by solely 4 bolts and the 14 gauge bus skin is quite thin, I need to spread the weight a bit. This means I'll probably end up with two steel strips with bolts welded to them, one for each side of the panel then rivet the strips to the bodywork. I can then fasten the panel with lock nuts.
I posted a photo of the problem areas of the solar panel online. Apparently it looks quite shot. The seller just refunded me and said he didn't want the panel back, that means I now have spare cable and connectors, which is very welcome.
 Today was oppressively hot but I managed to reduce what's in the bus and in my car by two very large, very full bags of garbage. I'll try to reduce yet further in the coming weeks while I complete my conversion. Rain had been forecast so I didn't do any further welding nor any media blasting. Tomorrow may be more forgiving.
Yesterday on my trip to Harbor Freight, I got a couple of things including a 15W solar panel. Now that panel turns out to be much heavier than my faulty panel. Checking the screw holes, they're a bit big for an 8-24 and a bit small for a 1/4-20. I'll have to find something that fits. That's a trip to the hardware store.
As the panel will be supported by solely 4 bolts and the 14 gauge bus skin is quite thin, I need to spread the weight a bit. This means I'll probably end up with two steel strips with bolts welded to them, one for each side of the panel then rivet the strips to the bodywork. I can then fasten the panel with lock nuts.
I posted a photo of the problem areas of the solar panel online. Apparently it looks quite shot. The seller just refunded me and said he didn't want the panel back, that means I now have spare cable and connectors, which is very welcome.

Thursday, June 15, 2017
More solar tomfoolary
Yes, folks, having already been bitterly disappointed by this solar garbage, I blew yet more money on solar garbage. Everybody keeps telling me how good it is but my experience is it's just bloody expensive with little tangible benefit. My existing solar kinda sorta works just not as well as it does on paper.
Having found a pair of 10W panels with the aid of a battery and a charge controller will power a pair of low powered CPU fans I decided a 20W panel might run an induction fan. Siting that panel was a problem, however. As I drive large vehicles for a living, I know how often the roof gets scraped by hanging branches and how often the front top gets struck by branches. Now the cleverdicks who have never driven a big vehicle will all claim to have such miraculous vision that they can instantly see and be able to avoid such hazards (equally miraculously). The truth is rather different and while I strive to avoid branches on my regular route I frequently only know to avoid them after finding where they are by hitting them. Seeing and avoiding a branch is dependent upon light conditions, tiredness, ones own speed in conjunction with the position and direction of other vehicles, background distraction (try looking for a branch on a curve with a road lined by trees), wind and rain.
Looking at my bus, the only available place was between the sites of the former student lights at the front. Using an amorphous solar panel it would be possible to mimic a destination board while having a solar panel hidden in plain sight. Thus, I ordered a 20W amorphous solar panel from a seller on eBay. It wasn't cheap at $55 all told.
 It looks splendid. I was even there to greet the UPS driver when he arrived with it yesterday. In great anticipation, I connected it to a volt meter while standing it in strong, direct sunlight. The voltmeter read... zero. I wiggled connectors and measured again. Again, zero. I pulled out a small fan and connected it. My 5W panel usually makes that fan spin merrily. I looked and... nothing.
As I was tired, I put the panel away to return to it the next day. Thus, today after work, I again tried the panel. This time, I had zero results but noticed flaws in the face of the panel. Quite a lot of flaws in fact and a sticker that declared the panel to be made in China.
 In the middle of that picture is one of the many flaws. I believe this or another flaw has probably cut the connection, causing the panel not to function.
I contacted the seller for advice and had a pleasant email back. I'm rather hoping he just offers to send me a new one. I know the score with stuff from China. The returns are never shipped back - they're trashed because it's just too costly to return them. Resellers buy products from China so cheaply that shipping alone costs more than the content of a 40 foot container which at the last count was $4,000 door to door. A container will hold a lot of panels! If the seller prevaricates then it's easy enough to file against the, with eBay. I want them on my side though as I rather like the way my panel is put together. Only time in the shape of the next few days will tell, however.
Having found a pair of 10W panels with the aid of a battery and a charge controller will power a pair of low powered CPU fans I decided a 20W panel might run an induction fan. Siting that panel was a problem, however. As I drive large vehicles for a living, I know how often the roof gets scraped by hanging branches and how often the front top gets struck by branches. Now the cleverdicks who have never driven a big vehicle will all claim to have such miraculous vision that they can instantly see and be able to avoid such hazards (equally miraculously). The truth is rather different and while I strive to avoid branches on my regular route I frequently only know to avoid them after finding where they are by hitting them. Seeing and avoiding a branch is dependent upon light conditions, tiredness, ones own speed in conjunction with the position and direction of other vehicles, background distraction (try looking for a branch on a curve with a road lined by trees), wind and rain.
Looking at my bus, the only available place was between the sites of the former student lights at the front. Using an amorphous solar panel it would be possible to mimic a destination board while having a solar panel hidden in plain sight. Thus, I ordered a 20W amorphous solar panel from a seller on eBay. It wasn't cheap at $55 all told.

As I was tired, I put the panel away to return to it the next day. Thus, today after work, I again tried the panel. This time, I had zero results but noticed flaws in the face of the panel. Quite a lot of flaws in fact and a sticker that declared the panel to be made in China.

I contacted the seller for advice and had a pleasant email back. I'm rather hoping he just offers to send me a new one. I know the score with stuff from China. The returns are never shipped back - they're trashed because it's just too costly to return them. Resellers buy products from China so cheaply that shipping alone costs more than the content of a 40 foot container which at the last count was $4,000 door to door. A container will hold a lot of panels! If the seller prevaricates then it's easy enough to file against the, with eBay. I want them on my side though as I rather like the way my panel is put together. Only time in the shape of the next few days will tell, however.
Sunday, June 11, 2017
When things go pear shaped...
I generally find when things begin to go pear shaped, it's time to cut and run. That's pretty much what I did today.
My day started with a grueling food shopping marathon. I do live with 4 adults and 4 dogs in a small trailer in the backwoods of South Carolina. It's so backwoods here that the road is a dirt track and the neighbor down the road displays a Confederate flag in his yard. Anyway, the shopping expedition seems to last about 4 or 5 hours, once a month.
Returning to the bus, I was tired and hot. Still, I added a missing piece to the construction shown yesterday and fixed a few welds that weren't air tight. Then I set to and ground flat the welds on the side that will face the bus skirt. Now that's nice and smooth.
Then I started work on the retainer that will hold the filter in place. Immediately, it went wrong. Somehow my carefully clamped angle brackets shifted in relation to each other while I welded. Time to call it a day!
No picture today because quite frankly I've not changed anything enough to merit another photo. Mediocre progress but that's the problem with working in 90F. One other thing of note happened. I'd been thinking how to clean my welded ventilation unit prior to painting and decided sand blasting would work best. As sand contains silica - the major cause of silicosis - I decided to use granulated sugar instead. It's cheap, plentiful, biodegradable and non hazardous. Thus I bought a packet.
The next thing to do is to build the door for the ventilation unit then attach mounting lugs to the unit. After that it's a case of media blasting, painting and mounting.
The pipe I welded on is a little bigger than needed. I'm going to have a challenge fitting to a 1.32 inch tube. I'll sort it out though.
Saturday, June 10, 2017
Whoopsie.... spot the silly mistake!

When it came to putting the outlet tube onto the assembled, I was going to use a stainless tube. My cuts didn't go straight which wasn't conducive to continuing. Then my eye alighted on some steel tube that had been lying in the yard. That, I believe, was something left behind by workmen that installed a disabled ramp. It was very thin so I doubted being able to weld it. I was wrong. As long as the welder was turned down low and I used a 1/16 7014 rod and moved it at a reasonable speed, it welded well. My new welding helmet makes a huge difference!
Cutting the tube was quick and easy with my angle grinder. Welding such thin steel was also pretty painless using my 7014 rods. Of course, I did make an elementary error... I put the tube on the wrong side, given my planned location. I still have a couple of gaps in the welds to patch and the final side to put on the top. Then it's a case of cleaning it up and priming with an anti rust primer. I still have the door to put together too.
Once the unit is completed, it'll be time to test it with a CPU fan in place. If that doesn't shift enough air, I might take the CPU fan out and put a small bilge blower in its place. My tubing is all 1.25 inch while the smallest bilge blower is 2 inches. That'll just accelerate the airflow a little, which is fine.
After a lot of thought, I bought another solar panel. I'd been wary about adding one on the front because I'm trying to maintain a buslike appearance. What I found is a solar panel that measures 3 feet long by 1 foot tall with a totally black appearance. Mounted centrally at the front of the bus, it should look like a blank destination board. It was expensive at $55 and low powered at 20W but it should power my ventilation fan and given a second tap, charge a battery pack designed to charge tablets, phones etc.
I had a look at plumbing bits with the thought of being able to fill my jerry cans inside the bus when I was out. As usual, the threads on things didn't match. I put that idea on the back burner for now. I want to get my ventilation unit sorted out. Then I can complete fixing my 120v system. I decided I'd just buy a length of 20A cable and redo the wire to the problem socket and replace the problem socket too.
Once that's all done and the solar system sorted out, I'll get the pedals fixed and the kingpins etc checked. I always think I'm so close to perfection. I'm wondering what the next issue will be though.
Sunday, June 4, 2017
Have I got a target on my back?
Every mosquito in creation seemed to want to bite me today. I actually got out there to continue my welding today. Needless to say, being both hot and humid, the mosquitoes were out in force. In fact just about every insect was out there today from giant red ants to mosquitoes and large spiders. Feral cats were prowling the area and there were probably plenty other critters aiming their beady eyes on me thinking, tasty.
I welded the flange onto my ventilation unit - a task that took most of the day. I had to cut lengthwise down my steel angle as I needed more of an L shape than an equal angle. Then I tried to do a better job of putting the flange on than I've done of some of the other construction on my ventilation unit. My welding seems to be improving.
 I realized that my ventilation unit is now pretty darned heavy. In fact, it's so heavy that supporting in from the skirt is now a daft idea. Thinking about it, it seems that now I will have to install a support for it. My idea thus is to make a big U bracket welded to the unit and bolted securely to the C section ribs under the bus. In fact I might be able to make use of my spare barrel hanger brackets that I spent so long making. Two of those should provide ample support.
I spent a good long time thinking about how to handle the weight or whether just to start from scratch. In the end I designed a new lighter unit and a unit that made use of what I already had. Then I decided to keep on going with the current plan and just add supports.
 By the time I stopped work for the evening, my ventilation unit looked like this. The flange will support a door with a hinge. The door will prevent water entering and will hold the air filter in place. I'm as yet undecided how to keep the door closed. I have a bolt or I could use a screw.
Building the door should be straightforward as should installing the door. I might mount the flange on the inside of the skirt and just rivet through, once the U brackets are holding the unit in place. The top might be challenging. I have stainless steel to weld and I've never done that before. If you recall, I spent positively ages looking for a rod to weld stainless to mild steel. Now of course I find an ordinary bronze rod would do it. Go figure!
Since my job has now gone from being 05:45-8:30 and 13:30-16:45 through 05:45-16:45 to 06:30-16:30 and now started giving me fridays off, I might get more done. The prospect of a 3 day weekend could herald more work being done.
I welded the flange onto my ventilation unit - a task that took most of the day. I had to cut lengthwise down my steel angle as I needed more of an L shape than an equal angle. Then I tried to do a better job of putting the flange on than I've done of some of the other construction on my ventilation unit. My welding seems to be improving.

I spent a good long time thinking about how to handle the weight or whether just to start from scratch. In the end I designed a new lighter unit and a unit that made use of what I already had. Then I decided to keep on going with the current plan and just add supports.

Building the door should be straightforward as should installing the door. I might mount the flange on the inside of the skirt and just rivet through, once the U brackets are holding the unit in place. The top might be challenging. I have stainless steel to weld and I've never done that before. If you recall, I spent positively ages looking for a rod to weld stainless to mild steel. Now of course I find an ordinary bronze rod would do it. Go figure!
Since my job has now gone from being 05:45-8:30 and 13:30-16:45 through 05:45-16:45 to 06:30-16:30 and now started giving me fridays off, I might get more done. The prospect of a 3 day weekend could herald more work being done.
Saturday, June 3, 2017
Touching hot electrodes
Touching hot electrodes with bare fingers is not to be recommended! After I'd ground the edges of my welded contraption down to be significantly less blobby, I was left with plenty holes in my seams. That meant filling them was in order. Thus my first idea was to dribble molten solder into the holes. Thus I got some high tin solder to use with my butane torch. Well, the first attempt didn't work. The solder went into nice little balls and rolled away.
As an interesting aside, the towers of Tower bridge in London are 40 feet high and are not primarily there for the bridge. They're actually shot towers back from the days when lead was melted and swung around in a big frying pan with holes drilled in the bottom. As the lead went through the holes, it would form a ball as it fell. It would take 40 feet of falling before it would be cool enough to catch in a tank of water below to harvest as ball ammunition for rifles and pistols. Being cast this way meant there would be no mold marks and the balls would be perfect.
The second attempt was a patch. I'd read about somebody filling a space with an oversized welding rod and welding that into place. I tried a compromise of soldering it using solder and my butane torch. Well, that didn't work either and unthinkingly afterwards, I picked the rod up to discard it. Ouch! It was still hot! Thus I burned not just my finger but a very sensitive area of my finger so now my arm feels like it's on fire - even though I immediately pressed a lump of ice on the burn to bring the temperature down. Putting ice and holding it there for at least 5 minutes stops internal burning from continuing and reduces the burn. I still have a painful mark that'll take a while to vanish though!
 After that I went back to welding rods and my old method. This results in very pixelated welds. I drag the rod quickly over the hole repeatedly until enough deposit builds up to fill the hole. Leave the rod for a hair longer results in the surrounding steel burning away in a shower of sparks. Having filled the holes, the next task is to attack the holes from the other side. Now the steel is built up, its possible to let the rod linger a while longer to build up body. Needless to say, today I'm not having too much difficulty in starting and maintains an arc!
I'd finished filling holes from both sides using a 1/16 6011 welding rod when I began to hear spots of rain. By the time I'd packed up and put everything away, it was raining quite well. That was the end of the days work, sadly. Sure, there's other stuff that needs doing, particularly completing redoing the under cabinet wiring. That can wait though until the galley floor is clear enough to lie on.
There are still two pinholes in my welded seams but by the time the whole thing has had antitrust primer and white paint, they'll be filled. Then I'll run some latex seal around all the inside angles. That'll make the whole thing good and airtight. The next stage is though to clean flush, the mounting surface for the as yet to be constructed top of the unit and to extend the mounting flanges I welded on a week or so back. That will allow me to bolt the top on using a pair of 1/4 inch bolts.
Anything thing to be done before putting the top together is to weld wide mounting flanges on the sides of my box. I have angle bracket for that but it'll need to be cut severely. I'll also have to make a door that'll press my air filter nicely into place. I'm still thinking on the design for that one!
As an interesting aside, the towers of Tower bridge in London are 40 feet high and are not primarily there for the bridge. They're actually shot towers back from the days when lead was melted and swung around in a big frying pan with holes drilled in the bottom. As the lead went through the holes, it would form a ball as it fell. It would take 40 feet of falling before it would be cool enough to catch in a tank of water below to harvest as ball ammunition for rifles and pistols. Being cast this way meant there would be no mold marks and the balls would be perfect.
The second attempt was a patch. I'd read about somebody filling a space with an oversized welding rod and welding that into place. I tried a compromise of soldering it using solder and my butane torch. Well, that didn't work either and unthinkingly afterwards, I picked the rod up to discard it. Ouch! It was still hot! Thus I burned not just my finger but a very sensitive area of my finger so now my arm feels like it's on fire - even though I immediately pressed a lump of ice on the burn to bring the temperature down. Putting ice and holding it there for at least 5 minutes stops internal burning from continuing and reduces the burn. I still have a painful mark that'll take a while to vanish though!

I'd finished filling holes from both sides using a 1/16 6011 welding rod when I began to hear spots of rain. By the time I'd packed up and put everything away, it was raining quite well. That was the end of the days work, sadly. Sure, there's other stuff that needs doing, particularly completing redoing the under cabinet wiring. That can wait though until the galley floor is clear enough to lie on.
There are still two pinholes in my welded seams but by the time the whole thing has had antitrust primer and white paint, they'll be filled. Then I'll run some latex seal around all the inside angles. That'll make the whole thing good and airtight. The next stage is though to clean flush, the mounting surface for the as yet to be constructed top of the unit and to extend the mounting flanges I welded on a week or so back. That will allow me to bolt the top on using a pair of 1/4 inch bolts.
Anything thing to be done before putting the top together is to weld wide mounting flanges on the sides of my box. I have angle bracket for that but it'll need to be cut severely. I'll also have to make a door that'll press my air filter nicely into place. I'm still thinking on the design for that one!
Subscribe to:
Posts (Atom)