Friday, February 18, 2022

Yay brakelines.

The day was forecast to be 60% rain so I didn't expect to do much of anything on the bus. I have several other projects on the go including some computer programming, putting some electronics together etc. As it looked decent I did do some work outside. Nothing under the bus however.

This miserable brake line "forming" tool came from Harbor Freight. Thus should be given a great big miss as it doesn't form brake lines. First the 1/4 inch gripper is way too small. Second all it can do is fold brake lines, not bend them.

That was my attempt at a 90 degree bend using the Harbor Freight brake line forming tool. It is a 90 degree bend but the tube is narrowed to the point of it ceasing to have any viable function. I'll go back to the old tube bender that I've used before. That, surprisingly enough, was cheaper and also from Harbor Freight but cruically - it works.
The old brake lines were supposed to be fastened by the bolt on the left. Well, that didn't work so after a lot of issues I did get them fastened separately. The line on the right needed a spacer which was provided by a 1/4" rivnut and fastened by a 1.5" self-drilling metal screw. It took a long time to do this simple thing as I was trying other ideas using materials lying idle. 

That was a frustrating couple of hours as I'd do half of what I'd planned, put a piece of the thing I was working on down and turn round to find it had vanished. Then I'd have to start again and the same thing would happen again and again and again. In the end though, this far simpler approach seems to have prevailed.
I had another go with my solar water heater. I suspect the collector needs to be bigger but as the plexiglass/perspex had come unglued I sprayed the inside black using the last of a can of black spray paint. Then I screwed the plastic back over it. That should work better to trap heat.  Tomorrow I might have another go at setting it going but I'll keep my tubing short this time around. Tomorrow also I need to get under the bus and work on those brake lines. I only have a 4 day work window this time and one day has already been blown.


Sunday, February 13, 2022

Yay and whoops.

Today I took the scrap steel that I'd used to test my wire welder and cut it to make two legs to which I could fasten a cross bar to hold the D cell batteries in place.
The steel was cut with the angle-grinder and then drilled. I tapped two holes to 8-32. That needed an 11/6 drill bit and I know I had one. I just couldn't find it so I used the nearest and tapped them. The tapping worked and the cross bar held in place nicely.

While I was hunting for my drill bits I took a step forward and put all my spanners (wrenches) into a big plastic ammunition box then I took the screwdrivers out of my drill bits box and put them in the now empty box. Now I have separate boxes for drill bits/taps and screwdrivers. Given the bulky nature of screwdrivers, if I buy more, they might end up in a bigger box too.

Having cut the steel, drilled, tapped and spray painted it, I put it in place. 

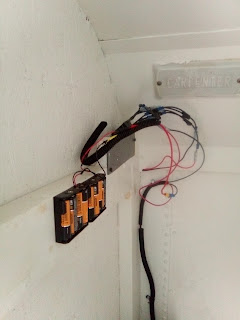
It will definitely hold the batteries in place. I'll need a crosspoint screwdriver to remove the batteries but that's fine. They're the batteries for the door lock and I do not anticipate changing them more than once a year. That part of the system is now very tidy and completed. The cross bar is a piece of brass that I bought for a purpose that I cannot recall and which never got used. I'll just regard that as a successful project that cost no extra money.

I looked at the timer relay and other relay that I had to work out how to wire so that the light would go off after a minute or so and really didn't feel like working it all out. What I had in place - an on-off pushbutton switch works. The relay thing would be a great idea but I just didn't feel like working on it. While I have the relays and spent money on them, I probably will just keep them to one side and proceed on with just the switch. There's a lot to be said for KISS (keep it stupid simple). 

After that I found out again why I rarely work on two projects in a day. I found some wood to cut to make a baffle around the back of the switch. The plan was to glue it around the switch and screw a metal plate over it so the back of the switch is protected from things banging around as they're thrown in the closet. 

My 45 degree cut wasn't quite 45 degrees. That was the first clue that it was time to finish for the day. Still, it could have been used. I sprayed the wood white and the spray just didn't dry like it did on the metal - possibly because the temperature had dropped some. 

While the paint was almost dry, I went inside and put cable wrap over the wire from the battery and light to the switch. Then I clamped a slightly sticky painted block to the bench outside to cut a cable groove, after of course knocking the pair of blocks off the spray cans they were sitting on to cure straight down the stairs onto the ground.

So I cut the cable groove. And cut it in the wrong place. That means the cutting, painting etc was all in vain. I'll start afresh with a new piece of wood next weekend.  
The groove looks great but should have been in the other piece of wood. 

Once I have the little protector installed around the back of the swtch and the wire conduit fastened into place I'll be able to call and end on operations inside the closet. I should be working on brake lines next weekend anyway. I want to get the length from the engine to the differential done and the bit around the differential done too. I still have a couple of things to work on under the hood that I'm not 100% happy with yet.


Saturday, February 12, 2022

Success with the wire welder

A long time ago, not quite before the dawn of man, I bought a Harbor Freight 125A flux-core welder. I never had any luck with it but today I pulled it out to have another go. The results were way better than I had anticipated.

Though I have burned through the thin sheet metal (taken from an old fridge) a few times, the beads have gone on. I really needed to put a faster wire speed. The power is set to low and though I have not made good beads, I have achieved something. As I said, the wire speed needed to be faster. The steel measures at 1mm thick so, quite thin.
Here I've welded some 2mm thick steel bracket to a 3mm thick steel bar. The bracket was found lying in the road after having been run over along with a few others. The brackets looked interesting so I'd picked them up. The 3mm steel was part of an old project on the bus that has been eliminated.

Again the wire speed is too slow but the welds have taken well. I beat that with a hammer and could not make the two come apart. On the whole, this experiment has been extremely successful. I had put the wire welder away because I just couldn't weld with it, sticking to my stick welder. I'd bought it so I could weld thin sheet metal but ended up being unable to and riveted the metal instead. Now I have another tool in my welding armory.
Today also I found my hot glue gun and hot glued the cable loom to the ceiling of the bus so the wire to the light is well supported and out of the way.
Inside the closet the wire has been tidied up with cable loom glued into place with the hot glue gun. Those things are useful! While doing all this, I realised the steel bar I welded can also be used to keep the batteries in place. Tomorrow I might get on and build a battery claping device as well as looking into putting the timer together for the light switch. There is progress, albeit slow.

Next weekend is a 4 day weekend for me and will be 60F or therabouts. Not exactly warm but the best I will get before Easter. I will head underneath to do the brake lines next weekend.


Saturday, February 5, 2022

New door lock controller and entryway light installed


Today two things happened. First the entryway light was installed. That wasn't screwed in but rather was attached with some "super strong" double-sided tape. This was the tape that I was considering using to attach a flexible solar panel to the roof. It didn't seem all that sticky but time will tell. I can always hot glue as was the original plan. The hot glue gun was in hiding though and might take a hunt to locate.

The second was that the door lock controller was replaced. It had been a cleverly wired relay in combination with the switch but it had not really been installed with permanance in mind. This time it's different. It's also a far neater installation.
I still have some cable-wrap to add but that can be done tomorrow. This setup is a lot tidier. I'm also not using crimp connectors as much since I managed to pull some straight off the wire without much difficulty. 

Originally the plan had been to run the doorway light and the door lock off the D cells but since there was power left in the AA cells, there didn't seem to be much point in taking the AAs down. What happens with used batteries is they get put in a drawer for later use then ignored in favour of fresh batteries. Everybody does that so slightly used batteries end up getting left to lose their charge, leak and get tossed out.

A plan was formulated to install a couple of relays - one being a timer relay - to control the light so it could be turned on with a single button push then turned off. That hasn't come to fruition yet. There's time though. The plan was to install it after completing the door controller anyway.
This was the old door lock controller. It looks worse than it is. Wiring always looks a horrible jumble of spaghetti. Occasionally the odd lunatic will say "oh that looks like a fire hazard" because they know nothing about wiring. It worked very well for the last 5 years or so. Tidying it was only a thing when I also wanted to install the doorway light.

As far as the actual light is concerned, it was screwed to a leftover block of vinyl plank (remember I used those on the bathroom floor). The piece of vinyl plank measuring about four inches by one by one was taped to the bus ceiling. The light is still a leftover red LED sidelight. The switch is still an on-off pushbutton. 

You might think that this didn't take very long but when you're trying to work around a lot of wire connections and each one has to be right in order for it all to work, it does take time. Time and plenty testing. I follow a philosophy of do one thing then test it before going on to the next. This takes a lot longer but elminates the frustration of having to take it all apart to start again. Getting it right first time, every time, saves time.

The task tomorrow will be to work with the other relays and try to make the light turn off automatically after a minute. Once that's achived I can switch the pushbutton switch out for a different pushbutton switch. I also have to finish cable-wrapping and fully attaching the switch plate for the pushbutton switch. I have to say what I've done today looks a heck of a lot neater. One thing I might need to do is to add a securing bar over the D cells. I thought I might over the AA cells but it turned out to be unnecessary. Only time will tell there.


Saturday, January 29, 2022

First test


Those are the stairs on my bus - yes, they are a mess - but they are illuminated by the light of a single two LED red marker light. 

Though it can't be seen, the marker light is temporarily held in place by a single neodymium magnet. It's centrally located above the stairwell. I had wondered whether I might need a second LED light but this seems to illuminate the stairs enough to see the stairs and not so much that it's dazzling or announces "Hey there's a light on in that bus". It preserves night vision and gives enough light to see while consuming just 0.2W. There's not much not to like about it!
In the dark with just the marker light for illumination, it does look rather like one of those movie explosions. Having said that, it's pretty darned good. I might add another of these inside the galley since there's no way of seeing one's way in there to hit the first light switch.
The lower battery bank - the AA batteries - are what used to power the door lock until I switched to the D cells above. None of the wiring is in its final configuration. Tomorrow I will probably work on the door lock circuit and tidy that up. Once that's done I'll turn my attention to the lighting.
That's the switch for the lighting circuit right now. That's a straightforward on-off switch. The future switch will be just an ordinary momentary pushbutton switch. That will fire a SPDT automotive relay and that will lock on, firing a DPDT timer relay from eBay and putting power to the light. The timer relay will wait a minute or so before firing at which point it will disconnect the power to the whole circuit, cutting the light out.

Once all that is done and wired tidily, the door lock circuit will be in its final (so far) evolution as will the new stairwell light. The only thing against me tomorrow will be the cold weather.


Saturday, January 22, 2022

Half a job done.

It was cold this morning and it snowed last night. Overnight it dropped to 29F and was still only a degree above freezing by sundown today. It was warmer in the sun but only because there was no wind. Not a day to go under the bus!
Today I didn't complete the task I wanted to complete. I did get the new D cell battery holder into place. That is a huge step forward. I also installed a fuse box at the end of the battery holder. I had wanted to put crimp spade connectors to connect to the fuse box but I couldn't get the first one to grip even with my extra powerful crimper. In the end I simply soldered to the fuse box. The other side can be spade connectors. 
The messy bundle of wires will be tidied up later. I ordered a relay but it has not yet arrived. When that arrives, it will be screwed to the bulkhead on the right and wires of appropriate length installed. What's there now is just a jerry-rigged affair that had worked for the past 5 years. The bigger batteries and the fuses are a great step forward. 
The experimental set up with the time-delay relay probed the time delay was in the wrong direction. It would delay before it activated rather than delaying after activating. That made it a bit nonsensical. I had to get a second relay to put with it in order that I could have it latched on then the other relay could activate a minute later, breaking the connection. It's fiddly wiring but it'll work.
This is the relay. I bought this from Autozone on Thursday. What a nightmare that was. I walked in and browsed the entire store looking for relays and could not find any. Eventually I approached a disinterested sales clerk. He asked what I was looking for and I said "relays". He pointed to the electrical section so I told him I'd looked. He went and looked then to prove me wrong. Seeing that there were no relays, he asked the usual nonsensical question: "What car is it for", I told him I wanted their cheapest relay. He said he had to look it up by car. That was pure nonsense! Clearly the fellow did not know anything about what he was doing. Having said that, the staff in the store was totally different from the last time I was in there.

While the moron was playing with his computer searching through Ford Explorer parts - he'd decided to look up Ford Explorer relays for some unknown reason - I looked up the Autozone website. Up came relays and I sorted them, cheapest first. The fellow as on about a relay for that Ford Explorer that was $20. That was nuts! I showed him the one I had found on the website. Nope - didn't have it in stock. I showed him the next one which was about $6. Yes. That was listed so he trotted off to get it. Then having found it, I bought it. 

Where does Autozone get its staff? The bargain bin at the lunatic asylum?

So, the door lock works though I do need to replace the relay with one that has a base. That relay arrives likely on Monday. To get to South Carolina from New York it seems to have had to wander off into Georgia. That's not a straight line! Having been out in the cold for an hour or so working on installing and wiring the new battery pack, it was time to head back inside. I was frozen. Tomorrow I'll have a go at wiring the time delay relay pair for the stairwell light.
 

Saturday, January 15, 2022

A long hunt

Today I decided to get on with replacing the battery holder for the door lock. Well, perhaps I should back it up a bit. In my spared box I found a 4 D cell holder and a pair of 2 D cell holders. Given that D cells are heavy it's going to be a better idea to mount my batteries flat. The AA cell holders grip the AA cells nicely so I never had to worry. 

That's the old setup. I can tidy those wires up a little though. Behind the aluminium plate is some spare AA cells and a relay. That relay controls the door lock via the keyswitch. The keyswitch is rather bizarre in that instead of being On 1, On 2, Off which would make sense it's On 1, On 1 & 2 and off. That meant I had to do some fancy wiring with a double-pole relay to make the lock open and close.

The old relay works just fine but isn't mounted in any meaningful way. It's just rattling around loose behind the aluminium plate. A new relay has been ordered that has a base. 
After having mounted the battery holders to a suitable piece of plywood and soldered the connections then hot glued the wires into place it was time to populate the holder with batteries and test the wiring. That's when I hit a huge snag - I knew I'd bought batteries at Harbor Freight some weeks ago but could not find them. I couldn't remember what else I'd bought in that shopping trip either so I didn't know what the batteries were likely to be sitting beside. I went to the bank website to try to find how much I'd spent there and when as a clue. The bank website did not cooperate and wouldn't let me in. That old trick it has of refusing a perfectly good password. It'll play that game for weeks on end then suddenly let me in using the password. If I change the password, it'll complain the new password is wrong. I learned long ago that these banking websites go through phases of silliness like that.

Having no idea where the batteries were in order to test the battery holders, that put rather an end to matters for the moment so I sat haranging politicians for their lack of morals via Twitter then suddenly realised I'd bought a big plastic ammunition box in which I should store all my socket tools and wrenches. Then I remembered I'd had the lady serving me at Harbor Freight put everything inside the ammunition box instead of in a plastic bag. Bingo - all I had to do was find the ammunition box. That was a matter of a very few seconds.

So, the battery holder was filled with batteries and tested. It worked fine. Then I realised I needed a relay that had a base that could be screwed down. I ordered one. While I was looking around the bus I even found a 4-fuse holder. The door lock has run without a fuse forever and a day. Time that had a fuse on it. Same for the LED marker lights. Those will run off AA batteries - that way if the LEDs are left on then the door lock won't be dead.
I can see another trip to Harbor Freight in the near future. I might need another 90 degree drill attachment in order to get everything screwed down correctly. I certainly need more angle brackets. I'll probably put up two LED marker lights initially to light the stairwell and cockpit. I'll have to see how it all works before I do much further.

I had hoped to go under the bus this weekend - since it's a 4-day weekend - but it's been too perishing cold. The brakelines get put off again.

I did relocate the old Harbor Freight LED light. That thing had never been up to much. It is one of the worst examples of LED lighting and the batteries are almost always dead in it so there has to be parasitic power drain.

With the current Covid strain named Omicron running wild in the USA, I might have more time to work on the bus. The big boss where I work said no closures but also that people should be prepared. Meanwhile other similar organisations in the area have split 50/50 with some closing and some not yet making that announcement. Thus my 4 day weekend might get longer or it might not. The longer it is, the more I can get done on the bus.