Saturday, November 27, 2021

Testing aluminium welding...

Today, after improving my mold for making my aluminium "welds" I had a go at joining two pieces of 2" aluminium bar. I was hampered by being unable to locate my other G clamp and had to clamp one piece of aluminium down using a brick - which wasn't ideal as I couldn't get it close enough.

The welding wasn't actually "welding" I just melted some Harbor Freight "Aluweld" into the gap between the two pieces of aluminium. I'd cut the pieces and then chamfered one side on both pieces in order to maximise the surface area.
Checking both sides afterwards, the one piece that I couldn't get perfectly flat due to not being able to find my G clamp had allowed some aluminium underneath it. In general though it seems to have worked passably well.

The welds do have faults and there is a lot of spillover on one side. That was because the work wasn't perfectly level and I used too much of the solder. I call it solder because it's really solder, not welding rod. A few minutes with an angle grinder would clean up the spillover on the back if this wasn't just a practice piece. 

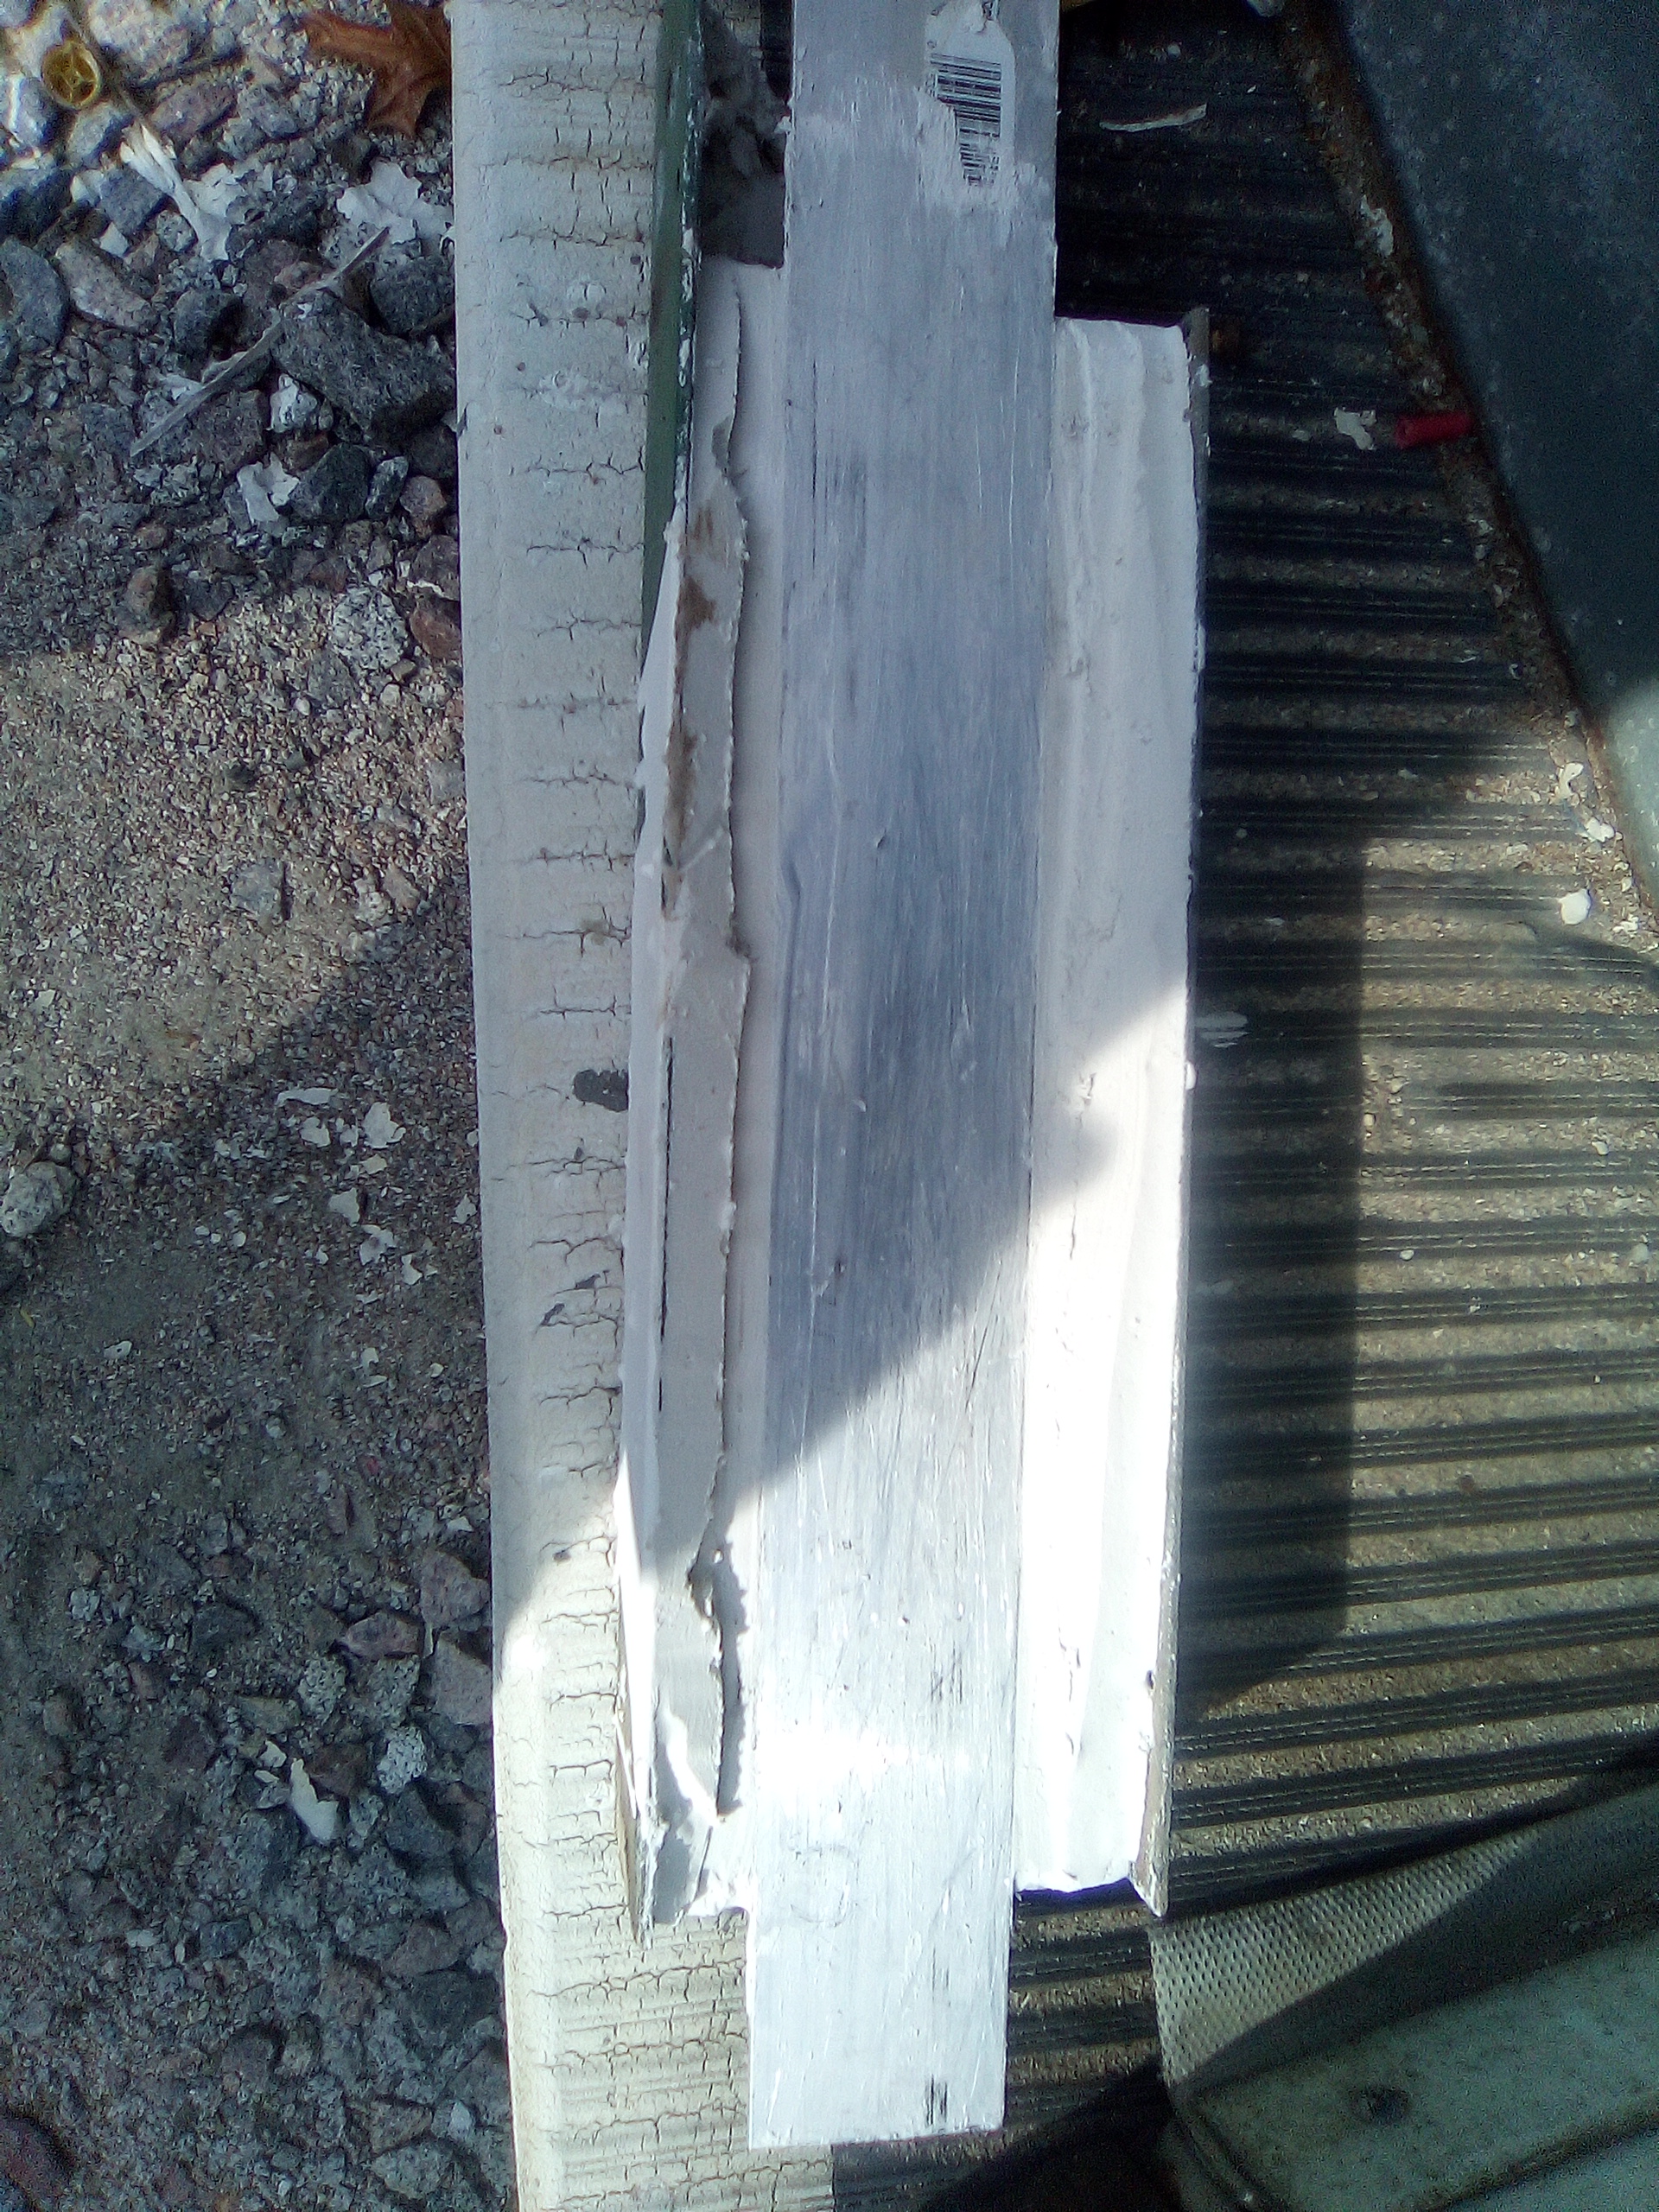
As far as this weld goes, there are gaps because it was fairly rushed and I had never used my mold nor tried butt-welding flat bar stock before. It was hampered by the lack of a second G clamp but on the whole I am very satisfied. The welds seem solid. When I flexed the bar, the welds did not break. The bar does appear to be straight but curiously there's a step with one bar being slightly out of line. Given that one of the sides of the trough on my mold disintegrated prior to welding I'm not surprised. I'll just need to work more on the mold. Perhaps I need a longer mold. That's doable - I have plenty steel angle I can weld into a former and plenty of the mysterious white gypsum-like powder.

At the moment things are looking fairly positive for making 3 welds like this. I would have to attend to the spill on the front of the test weld as there would be a rivet half way along. Two rivets will secure the bar to the bus body - one on each tongue with the weld stabilizing the join. Needless to say there would be other rivets at other points. 

If the metals suppliers would get their acts together and provide 10 foot lengths instead of 8 foot lengths then I wouldn't have to buy two six foot lengths and muck about joining them. I see 10 foot lengths online but the local people won't supply that length. It's a bit like those bargain tyres advertised online. Sure - they're a bargain price but once shipping is paid they're more expensive than buying an ultra-expensive tyre locally.


Sunday, October 31, 2021

Patched a small hole. Very exciting stuff!

Today I did a small project. In the old incarnation of the upper backup camera, the camera cable was quite a way below the camera mount. Thus when I put the new camera in with the cable going through the tube it's mounted on. The mounting plate wasn't big enough to cover both sets of holes. Today I put a plate over the last remaining hole and riveted it in place.

The steel plate was a cutoff from when I put the steel sheet over the outside of the bottom window of the door. That was where I had to make room for the hinge. I had to cut that cutoff in two to get a piece the right size. That, of course, shows you why you store your cutoffs from everything. You never know when it'll come in handy. That steel plate must have been done a year or so back. 

Once the plate was in place - I did put Dynotron caulk behind the plate and underneath each rivet, I sprayed it white to match the bus except there's enough dirt on the bus now that it's more grey than white. Before I go anywhere in it, I'll have to give consideration to washing it. That'll take about an hour by hand with a manual pressure sprayer with 2 gallons of water in the bucket, some soap and a mop.
The Dynotron caulk was at its end. No more would come out when I removed the seal from the nozzle and pulled the trigger. The plunger was right at the end of its travel. I did not have to open a new tube however - cutting the tube open allowed access to more caulk than I really needed for today's project.  A good slathering went over the back side of the steel plate, onto the backs of the rivets and around the edges of the steel plate. Finally I put some over the ends of the rivets just to make sure it's all sealed. 

This time around I used aluminium rivets. Steel seemed a bit of a waste. I'd have had to get the big riveter out and this was just a light hand job. The steel plate will have no pressure on it and four aluminium rivets are strong enough to stand up to holding an ounce of steel plate. I'm not expecting anything to press on that plate either. 

So we end a long dry patch in which I have done little to nothing with the bus. Remaining to be done as far as I can think right now...

  • Brake lines to finish
  • Tyres to replace
  • Right wiper mount to re-rebuild.
  • Some fiddling with the USB socket over the microwave
  • Adding a fuse box inside the front console.
  • Complete the solar charging setup for the driving batteries.

That was all on my old list. I've taken off the list a cable to the driving battery compartment. I am pretty sure that the lithium batteries will not like the cold weather and will simply shut down on cold days. That does not worry me. I might add a second battery connection on the kill switch and have that feed to a socket on the side of the bus that allows me to plug in a lead-acid battery that can sit on the ground outside. I can probably still get some power out of the old lead-acid deep-cycle batteries - enough to power lights etc if not the extraction fans.

The cross-view mirrors I bought seem to have reacted poorly to the plastic bags I had protecting them when I was painting the bus. They seem to have gone white which is strange as it's clearly not paint. They'll need to be replaced. This is probably the 3rd set I'm buying. The first was not curved enough. The second was right but something happened to them. The third is coming as soon as I order them.

The new list adds:

  • Two extra external solar connectors, one at the front and one at the back
  • External connector for extra batteries
  • Replace cross-view mirrors

The list is now down to single digits again. I can confirm that the new vent that I installed seems to be coping with the recent heavy rain. I have a paper towel underneath it supported by a plastic sheet that's held up by very feeble magnets. If water collects, the towel gets heavy and falls. I'll give that a few days of really heavy rain to see what happens.

Sunday, October 3, 2021

Not much of anything

Today was one of those days where more could have got done had I not been exhausted by five 12-hour days plus a busy Saturday.

The first thing that was done was to pour more of the white powder mix into the mold with a sample aluminium plate in place. I did test the white stuff with a blowtorch and while it glowed, it did not change colour. It is definitely soft so I'll have to see what exactly it does with the aluminium when I try to weld.
Having poured the mix over the aluminium in the mold it did cure as stated in about an hour but it was a couple of hours later when I scraped the white stuff back to reveal the aluminium plate. I did try to move the aluminium but the white stuff started to come up too. Perhaps I should have sprayed it with some kind of mold oil? I left the aluminium in place and put the whole lot in the bus. Maybe some heating/cooling cycles will have the desired effect. If not, I can pry the aluminium out and see how good the mold is.
Next, I pulled out the metal I had painted last time and cut it to size to fit over the cable hole above the current camera mount. I'll have to drill rivet holes later as I still need to fit it more precisely.
Finally, above the bed, in the bedroom, I caulked the edges of the board inserted where I did have accessible windows and removed the four roller blind mounts. That'll make a big difference. When I slept in the bus last time I was in danger of clonking my head on those things. Being pointy, metal and sharp there was a risk of hitting an eye on one of those. Definitely not safe. Now they're gone.

I'll have to slap some pink paint on the edges - and a couple of places where the paint isn't so good and then I'll say that area is completed.

As far as the metal cover over the cable hole is concerned, that will be done another day. It's not a big job but I just didn't feel like hefting the stepladder nor climbing it today. As for the aluminium, I'll probably get to that next weekend. I need to do a test weld first. This is all experimental so far. If the test weld turns out OK then I'll buy some longer pieces of aluminium that I can join for real and see how that works out. The aim, as ever, is to cover all of the windows with three wide aluminium bars painted white. That way the bus will look ever more like a prison bus.


Sunday, September 26, 2021

Two steps forward

Today I welded ends on the mold I made for the plaster that will form the basis for my aluminium casting/welding. That went OK but I did have the amperage up a little high for the 1/16th rods I'd pulled out. This resulted in one turning into a sparkler. I turned the amperage down from 70 to about 45. That worked and I completed welding the two ends on.

Following the welding, when everything had cooled, I mixed some plaster-like stuff that I bough a bag of in Lowes. I have no idea what exactly it is. It seems somewhat soft so it could be gypsum. Needless to say there was just a brand name I'd never heard of before on the sack and no description of the contents. It was a white powder so it could be plaster. On the other hand it could be a lot of things but somehow I doubt I have a sack of Heroin. 

After the "plaster" had seemingly set, I scraped it level pretty easily using a piece of metal. That was a huge clue that it wasn't really plaster. I'll have to see how it goes when I play a blow torch on it next weekend. For the moment I shall put it in my car so it can bake dry in the heat.
After the debacle of the Chromebook, I went and bought a cheap laptop. This actually works and I've now installed Linux Mint. Windows never got a look in. As soon as I switched on, I pressed F2 and got the bootloader. 

I really wanted to load Raspbian but it didn't seem to want to run on my new Asus. Instead I put Linux Mint which will do pretty much what I need. The wifi driver didn't like the built-in wifi board so I had to use an external wifi dongle but that was fine. There won't be wifi where I'm going to be using it.

Meanwhile I had a response from HP that indicated that they didn't think an awful lot of their Chromebooks. In fact one representative pretty well called it a cheap android tablet with a keyboard. Well, if HP thinks it's trash then it must be.

As for the Chromebook, HP said they'd escalated to a higher level of help and they'd be in touch in a few days. I told them the Chromebook was waiting to go to the shooting range as a target. Interestingly a friend from Britain tried a Chromebook and called it a false economy. They couldn't do anything worthwhile with it either. I at least tried to put Linux on it.

Wednesday, September 15, 2021

A product warning!

A few weeks ago I was researching cheaper laptops that would charge off USB or 12v. Well, I found a Chromebook. It ticked all the right boxes. It charged off a 120v USB 3 charger that could likely be replaced by a 12v to USB 3 charger. It was $140 from Best Buy and even better there were instructions online how to delete the God-Awful ChromeOS and install Linux.

So, I bought the Chromebook and it arrived. That was where the problems started...

The instructions for installing Linux and running it never worked. Somehow on the initial startup I did get Linux to run but only from USB and it never ran again.
Since that I have been scouring every website and every set of instructions available to get the blessed thing to work with Linux. Everything has been a miserable failure. At this point I should just quietly have returned it but I found a YouTube video where a guy took the back off and unscrewed one screw that was apparently a physical firmware lock. Then he could run Linux.

I duly undid the screws and pried up the edges of the plastic insert. There was something holding it fast in the center that was clearly not a screw. Looking further, it did not look remotely like the circuit-board shown on YouTube. I quietly clipped it all back together and checked whether it all still worked. 

As I don't really want to spend weeks trying this twiddle and that twiddle in order to try to make it work with Linux, I'll just have to throw it in the closet. I suspect in about 6 months I'll pull it out of the closet, find it's still not possible to get Linux to run on it and end up throwing it on the back of the pickup for a one-way trip to the dump with the rest of the household refuse.

Do yourselves a favor - don't buy a Chromebook aka Junkbook. It's just a prison that keeps you locked into a Google system and restricts what you can do. Judging from the fact the only apps available are Android, there's be no working software for it either. It really is a totally unusable piece of junk and to cap that off, it can't even be used offline.

My aims are...
  • A laptop.
  • Runs off USB/12v
  • Takes Linux
  • Can be used offline
Well, the HP Chromebook, according to online data checks all of those boxes. The reality is though that it does not take Linux and hence cannot be used offline.

As I have now got pry marks around the insert, I can't return it. It appears I was gravely misled by the lying buffoons online. Sometimes online information is good, sometimes it is bad. There's no knowing until something is tried.

As for the cost, it just annoys me that I have to write off a $140 mistake. There's nobody to blame but myself for believing online technical information. My existing laptop is an Asus that came with Windows 10 but which now runs Linux. The new laptop was intended for a specific project and something cheap I could leave in the car while I am at work. Something I could have all the non-personal information - something that I would never use for email, web browsing etc, where no passwords would ever be stored.


Sunday, September 12, 2021

No cement yet but two projects were worked on.

Project one for work today was to go over the windshields with a paint scraper. I have to say that they're probably cleaner on the outside than they are inside now. The first thing was to spray lightly with paint remover just to soften the paint then it was a case of scraping followed by wiping down with paper towels. 

The end result is that the windows look better but there's probably another session to be done. It won't be long before that glass is up for renewal anyway. There are chips galore and the edges are clearly delaminating.

As I was up on the roof, I peeled the tape off the newly installed roof vent. Then I emptied a watering can down it and made a right old mess inside. Fortunately it's hot so it all dried in a couple of hours. 
I had been expecting seepage since the water was flooding out of the weep holes in the vent. My thought is that the weep holes might be too small. I'll have to wait and see. Wednesday, Thursday and Friday are supposed to be rainy days. I'll put a funnel under the vent inside the bus and a length of tube from that to a 2 liter bottle. If it rains heavily and water accumulates in the bottle then I'll know I need to put a roof over the vent or perhaps change the vent out.
Meanwhile the two high-dome convex mirrors I bought have not fared well. It's not spray paint on them. It's some kind of reaction with the grey Walmart bags that I had covering them for a few weeks while I was painting the bus. This is rather disappointing to be honest.

In other news I did discover an actual computer that will charge off the power from a USB socket. It has to be a 3A USB3 socket but it will charge. The only problem is that the computers concerned are Chromebooks. They're great if all you want to do is send email, browse the web etc but for anything else, they're horrible. Great for couch surfers but not practical in the real world. I'm currently investigating how to remove ChromeOS from them and replace it with a standard Linux operating system. They have possibilities.


Monday, September 6, 2021

Nothing exciting here, move along now!

Yesterday I quickly made up a pair of cables with jumper connectors on them and put them in the battery compartment. The aim there is to connect to the second solar controller with the eventual aim of keeping the driving batteries topped up via a small solar panel hung in the windshield. That really does not need a huge panel as all it'll be doing is stopping self-discharge.

Today I welded together two pieces of steel angle. The next step will be to fill that with concrete. After the concrete has set it'll be smoothed with cement and a piece of aluminium bar pressed into the cement to act as a mold for when I weld aluminium bars to go over the windows on the one side of the bus. That way there will be limited aluminium runoff, the two bars will be lined correctly and heat will be concentrated rather than wasted.

The intent had been to go under the bus to do the brake lines, to connect the solar connection I made up and to switch out the connectors on the batteries. None of that happened largely because Saturday and Sunday I was unwell. Definitely not Covid. Today I was just exhausted.