Tuesday, December 31, 2019

Completed the welding!

Today I worked more on the welding for the door panel. That was such a nightmare that I'm telling y'all now: If I ever say I'm going to weld bodywork panels again, book me into the nut farm as I've clearly lost my marbles.

I went around the outside of the panel with my welder and filled in all the gaps, holes and spaces. Then I looked from the inside and saw a lot of daylight. I fixed all that by welding from the inside. Then I went back to the outside and ground some of the welds flat. 

Grinding those welds flat wasn't as good an idea as it sounds. It seems that the welds had bridged the steel but not filled in the gap. That meant I had a whole load of new gaps to fill. I filled them, turning the amperage right down to 20A on my welder and using 1/16th rods. 

Realising I wasn't going to get much better than I have from the welding I decided to try to pretty the welds by going over them with 3/32 rod. That worked so far then suddenly I found I'd burnt a hole in the actual door with the welding rod. That wasn't welcome so I switched to low amperage and the 1/16th rods and slowly repaired the hole. Then I remembered I had a pot of Bondo in one of my storage totes. There was the solution - to apply Bondo all around and make the weld into a hidden feature.

Of course, when I got to the tote with the Bondo in it, the tote was open and half full of water. That was very strange. The tote is under a tarp in the yard. The tarp was over the tote so it looks like somebody might have browsed the totes when I wasn't looking. There's nothing of value in them so I'm a bit baffled. Still, now there's a storage shed, they can go in there.

Mixing the Bondo was easy enough. A spare Lowes (hiss, spit) spatula worked a treat. I slapped the Bondo on and then had to make a second batch since I'd not made enough. I didn't have anything really good to form the Bondo with so I ended up with a pair of disposable rubber gloves. That worked though there are gaps in the bondo that I want to deal with tomorrow. I'll also have to sand the Bondo tomorrow to get it to look half decent.
By this time the light had failed. I waited half an hour longer than the recommended 30 minute curing time, noting that it was warm enough for the Bondo to cure. Then, as there was bare steel visible, I sprayed it all with grey paint.
And that's the best night photo I could get from my iPhone. Tomorrow I'll sand the Bondo down to a reasonable looking mound and fill any gaps before repainting. The next step will be to sand blast inside, fill the gap immediately behind the edges of the panel and then paint the inside. After that I'll rivet the panel that's been screwed to the back of the door for years, to the back of the door.

This is what I'd call a bodged job. I'm not proud of it. I want to do way better than that but it seems the steel I cut from an old fridge just isn't thick enough to weld successfully. I would probably have been better off cutting it to fit the inside lip of the window aperture then riveting to that lip then putting Bondo.

They say Mig welders are better for thin stuff. I bought a stick welder and I have to say it's a ton better than my old stick welder in that I can actually use thicker rods now. I'll go with what I have now. I'll stick with the bottom glass replaced like that. I won't proceed immediately with replacing the upper glass. For that, I think I might want to get some thicker steel.

Monday, December 30, 2019

Ouch! Shopping is deadly.

I went to pick up the groceries yesterday. They had been ordered online and all I had to do was to drive to Walmart to pick them up or rather supervise the minimum wage meth-heads that Walmart employs to carry stuff from the store to the car. With the amount of stuff that goes missing from the orders, minimum wage is way too high for those people! Yesterday was a bit of a surprise - only the bread was missing from the order. Interestingly the meth-heads weren't as slow as last month when I waited 90 minutes.

So, having got the groceries loaded, I headed home. I was fortunate in not seeing the meth-heads smile with their wonderful demonstration of meth-mouth. I'm sure a no-questions, low-fee denture clinic will be Walmart's next offering. In fact the local joke is about Walmart opening a dental clinic with a speedy checkout for those with 12 teeth or less.

At home is where disaster struck. It wasn't so much that I dropped anything. I'd carried all the heavy stuff into the house and was bringing in a lighter weight bag. I bent to put it on the floor and felt something above my left hip go rigid then felt a searing pain. I didn't realise that I could curse in 15 different languages before then! So, the frozen and chilled stuff being already put away, the rest stayed where it was.

Fast forward to today. Most of the pain has gone though putting shoes on etc was somewhat of a painful challenge as was getting out of bed to pee in the night. Thus since I'm still in recovery mode although the weather is gorgeous with a blue sky, I could not continue with the welding. Instead I picked up the mail and found the battery holder I'd ordered for use with my 12v screen had arrived. Then I did get to the bus to do stuff.
Before I got hurt I'd seen some grey paint that was peeling up. I pulled on it and great big sheets of Rustoleum flaked off. 
That's ridiculous but was helpful today when I wanted to remove the house number I'd stuck onto the back of the bus. I've decided to go simpler and have the house number printed on paper and left inside the windshield. None of the delivery people could see the back number and were blind to the number I had stuck to the front bumper that I had tried to remove the other day but had ended up painting over. If they're not going to see it, what's the point?
The other day I'd painted one of the rub rails black. I like the new look so I decided to paint all the rub rails black again. This entailed going up and down the bus with my battery drill and a paint-removing bristle brush. That worked really well on the loose flakes of the paint on the rub rails. I also went over the areas where the grey had flaked off revealing yellow.

From yesterday it seemed easier to spray black then touch up the grey which is what I had a go at today. I had one super-sized spray can of black paint and rapidly used it up. It did two rub rails only. With that in mind I'll probably get a pot of paint to do the rest as that works out way cheaper than spray and will also mean I won't have the overspray and touchup I do with spray paint.
For fun I sprayed the steel panel I'm welding in, grey like the bus. It looks really good. I'll have to finish the welding, of course. With luck my back might let me grab the air tank and the welder tomorrow since tomorrow is forecast to be good weather. Indeed, if I can get the outside welding done then I should be able to zip around the inside of the panel with very few welding rods, securing the panel fully. Then I can grind the outside welds to turn them from blobby Farmer Joe to professional welder style welds. As a friend once said - "The difference between an amateur welder and a professional welder is an angle grinder".

Once the panel is completely welded, I will probably after sand-blasting the inside faces of the welds and spraying them with rust-killing paint, fill in all around with Bondo then rivet the original security panel back inside the door. I can't imagine too many people wanting to climb up to the back windows to try to get in. Having said that, the three remaining back windows are destined for replacement. I won't be welding flush though unless I can find an easier way of doing it!

Saturday, December 28, 2019

Mr Blobby has been here.

No - not this Mr Blobby. I'm talking about my blobby welds. The new welder has been absolutely ace. I've been able to weld at amperages as low as the welder can provide. I've also been able to weld with 3/32 rods and my old AC welder really didn't like them.
This is what the welding looked like after I'd sandblasted the work and worked my way along the top a little. When I broke off I'd welded along the top and most of both sides and a bit of the bottom. As the welds are very blobby I'll have to get my angle grinder out to tidy them up but that's a job for another day.
Speaking of sand blasting I had bought a new hopper blaster from Harbor Freight yesterday. In fact I bought my welder and some welding rods yesterday too. I didn't get out of Harbor Freight for much  less than $250. The hopper didn't come with a funnel but the instruction book (why in tarnation does this actually merit an instruction book) came in very handy combined with a little piece of duct tape as a funnel.

I bought some glass media for my blasting and it has done an excellent job. It removed all my Rustoleum Smoke Grey paint and with effort the yellow paint from the bus. I'm not so sure about the galvanizing though. It looked like that had gone too but I'm not certain. I bought a big box of media and probably have enough for this and more.
That's the DC welder. I bought an AC welder when I started because I really didn't know how well I'd get on with welding. Thus I bought a cheap one. I've clearly outgrown it! The DC welder is lighter, smaller and much better for what I'm doing. Having said that, even at low amperages the fridge steel I'm welding had a tendency to combust and turn into a sparkler. That's where the blobby welds come in...

I had a little practice with some 6011 and 6013 rods on my workbench, attaching an old breaker box to my workbench as a handy storage cupboard. It turned out that DCEN (DC Electrode Negative) seemed to work better than anything else. I gather it should have been DCEP (DC Electrode Positive) but I'm into making it work rather than turning theory into practice.
The method of welding given the spontaneous combustion issue was to work the electrode quickly back and fro over about 5 inches of the work. That way steel got deposited without the fridge door burning up too badly. I had the amparage as low as possible. I think I was on 30 amps with 3/32 6013 welding rod.  
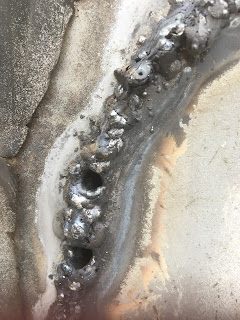
As you can see the welds aren't smooth and perfect. The holes I can fill in easily enough with the welding rod. That was as far as I got today though. Today is my 2nd day of welding. The first day, my AC welder was just burning up the work without attaching it. It looks well attached. The sheet of steel I've been putting in has warped and not gone in as perfectly as I would have liked but it's going to work. I'm planning on going to the back of the panel when the outside has been welded and adding more filler behind in order to try to fill any spaces. Then I'll angle grind the front to be as smooth as possible
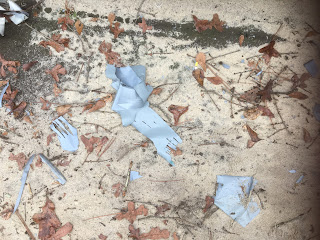
The old tape from yesterday landed on the ground. You can also see some evidence of my sandblasting. The reason for this picture is that you can see the tape is on fire. This is because the very end of some welding rods landed on the discarded tape. Being still hot, the tape caught fire. This is exactly why I like to weld over sand rather than grass or leaves.
After stopping welding for the day I sprayed everything with the first can of spray paint I could lay my hands on.  The sky had turned grey and it looked awfully like rain was going to head my way. Thus, rather than continuing on to complete the welding I stopped, in order to prepare the work for rain.
Fairly quickly the paint was dry so I slapped some duct tape on. Now the whole thing is protected against the weather. There's enough weld completed to make the back secure against break-ins. Mind, having said that, the interior steel panel will stop intruders.

If there's one thing I can take away from this, that is that the steel sheet from fridges is not at all easy to work with. I've used it before but never welded it before. Perhaps there are some tips and tricks that I need to discover.
Having pulled out the spray paint I taped off one of the rub rails and sprayed it black in order to see what it will look like. I think it looks really smart. Some of the grey came off when I removed the masking tape and I had to respray with grey but using some junkmail that had just arrived as a spray shield. I'll spray all the rub rails black because the grey seems to come off them the worst. Thus, if they're black and the black comes off, it'll take the grey with it, revealing the original black. 
That's the electrical box I have been working on attaching to my workbench. Eventually I'll put hinges on it so that it'll open like a real cupboard. I have no idea what I'll use it for. I just fancied the idea of having that box as a cupboard which is why I kept it.
Finally (almost but not quite yet), that's my workbench. I built that using my AC welder and angle iron that came from the hillbilly bus conversion. They'd built bunk beds from that stuff. Talk about heavy and over strong!
And finally, this is the overcast grey sky that drove me to clear up just in case of rain. In the last hour or two since I packed up for the day it has stayed it has not rained. The weather lied to me! Still, if it does then the work is better painted and protected.

Boy does the ground glass from media blasting get everywhere. I had safety glasses and a breathing mask but it's all in my hair. I need to get goggles too as the safety glasses don't stop everything.

In general, today has been an extreme success. I know various people were saying that I should have gone for a mig welder but honestly this little DC welder uses my existing rods. I have quite a stack of existing rods. I also gather spool type welders are not immune from their own issues such as kinked wire. With the amount of welding I do, I just don't see the need for a mig.

Friday, December 27, 2019

Where the Harbor Freight 70A AC arc welder failed

Though I've had a sheet of metal screwed to the inside of the bottom window of the back door for as long as I can remember, it was always the plan to replace the window with sheet metal. Thus yesterday I made a start. The weather forecast was for several days of dry weather.
The rubber gasket around the window had a cord pressed into a groove that kept the gasket and the window in place. Locating and levering up the end was pretty straightforward and it peeled out quite nicely.
The next stage was to remove the window and gasket. That was achieved by lifting the edge of the gasket all the way around then inserting drywall screws as wedges to keep the outer flap down. Once I'd worked all the way around the top of the window I could work on the tops of the sides.
After that it was a case of staring on one corner. I chose the top left and pressing gently while moving slowly to the top right and then going back and forth until the window finally began to push inward. I did have to go inside and lever the gasket on the inside a bit because time and paint are great adhesives.
Slowly I worked on it before finally the window and gasket came out all in one piece. Many people would have smashed the glass for speed of disassembly but then spent longer picking up shards of glass.
With the glass removed I'm able to put it back if everything goes belly up. I can also use the glass for something else.
Inside the window frame there was a trace of rust but nothing worth mentioning. There were some pencil marks from whoever installed the window. 
Next I put my carefully cut and shaped sheet of steel into the window frame. The plan is to make the bottom of the door just flat as though there was no window ever there. I did have reservations about that, thinking I could get moisture trapped. Then I realised that once the steel is welded in place I can just paint inside thickly with rust killing primer then fill with fibreglass body filler.
Unfortunately my only welder yesterday was a 70A Harbor Freight stick welder. That's AC and really did not get on well with the thin sheet metal from a fridge that I was using to fill the void. Sure - it's tacked into place but the welds are blobby and ugly. I'll have to grind that lot flat - that's of course where the welder hadn't burnt the fridge steel away.

Cue a modicum of research. It seems that DC welders not only weld aluminium but also put down steel as opposed to burning it off. They're better suited to thin steel. Thus today as I had to go to a dental appointment, I called into Harbor Freight and picked up some 6013 welding rod in both 1/16th and 3/32 sizes. While I was at it, I picked up a fresh air blasting head for the air compressor and some glass blasting medium. Sugar really did work well as a blasting medium but left the blasting head sticky. No matter how much rinsing I do, it remains sticky. Thus I needed a new head.

So today's haul was 4 packs of welding rods, one DC welder, some breathing masks, a blasting head and a box of media. I didn't get much change from $250! I did consider the wire welder but as I already have a ton of welding rods it made more sense to stay with stick.

As the weatherman clearly must have been born on the wrong side of the tracks, the weather is 100% different from the weather promised. Perhaps we should take out a contract on the weatherman. Maybe even tell him that if he doesn't send me sunshine I'll have his head impaled on the gatepost.  So yes, today it is indeed raining. Tomorrow the weatherman promises sunshine.  Thus my new toy will be unplayed with until tomorrow.

Looking at the blasting media in Harbor Freight, they has walnut media. I'm wondering if that would remove the paint from the rubber on the bus. That would be well worthwhile.

Meanwhile, more on the LCD backup screen saga. The screen I use works just fine. I've been trying to get another that I can move about and use to test other cameras etc. I ordered one from eBay and it was dead on arrival. It did not work. I secured a refund and ordered a different one from Walmart. That arrived dead. Today I used Walmart's return label to send that one back. In the time between sending it and initiating the return, Walmart sent me a replacement. That too does not work. That's three screens that are dead on arrival with two different models.

I have been getting a lot of DOA electronics lately. Different suppliers and different brands. It must just be the time of year. Speaking of electronics, I looked at the bus electrics yesterday. Internally the bus will be fine with a 30A supply. There really isn't much to run anyway. There's a fridge, a microwave and whatever else. There are just 3 sockets. Lighting, ventilation etc all run off 12v.

Both the master breaker and the breaker box will work fine with 50 or 100A. At the moment the inlet is a Nema 6-30I. That takes a 30A cable to the master breaker. Thus the maximum there would be a 30A supply. Given the things I run from my 3 sockets there just didn't seem to be much point in having a 30A breaker or a 30A outdoor cable so I have a 20A main breaker and a 20A outdoor cable.

When I was welding yesterday I had to switch the socket from a Nema 6-30R to a standard 5-20 socket in order to be able to use my welder closer to the bus. That set me thinking as the main breaker is currently a 20A breaker and I'd looked for a 6-30R plug in Lowes but not found one. Online such plugs were $10. Thus I asked the question why not replace the 6-30I with a standard 5-20 inlet. That would mean just about any extension cable from any hardware store would be able to supply power - as long as it could carry 20A.  Thus today I ordered one. I'll have to see when it arrives. It just doesn't make much sense having to have a short converter cord. Also the current inlet has a Hubble style locking plug. That means that if I drive off having forgotten to disconnect I could quite literally rip the inlet out of the bus. With a standard household cord, the cord would just unplug itself. The worst I'd get would be bent pins on the inlet.

More paint seems to be peeling from the rub rails on the bus. My lovely grey paint is continually peeling there. Thus I have decided that I'm going to scrape all the loose paint off all the rub rails and paint them black. That way if the black paint peels and takes the grey with it, I'm back to the original black. The yellow is going to stay grey though. This just makes my work easier.

Wednesday, December 25, 2019

Giving up on eBay

I used to use eBay for just about everything. Recently though it all seems to have gone to pot. The same can be said for Walmart online ordering. I have no idea why that should be but let me walk you through my latest online purchases.

Walmart

  • 2 different screen protectors for a tablet. Both were supposed to fit. Neither did.
  • A backup camera monitor. This arrived but was defective. Now I'm waiting for the replacement. I expect that will also be defective. I'll have to send the original back and fully expect to have to send both back.
  • A batch of USB connectors - the first package was "lost" by Fedex. They claimed to have delivered but never came down the driveway.

eBay

  • A plug for my bus power cable. Supposedly coming from "USA" with no indication as to where. I placed the order and it didn't go through. I immediately got a call from the bank asking if I'd ordered from Hong Kong. Well the answer to that was no. The price was the same but the origin was wrong. I flagged that as fraud.
  • Two battery holders - these have yet to arrive - assuming they do. They've been "in the post" for a month. If they don't turn up soon I'll have to flag them as fraud.
  • A backup camera monitor. This arrived but took a month and was defective. I did get a refund.
  • A WiFi camera that I was going to use as a security camera. It arrived but the wireless is so weak in it that it can't talk to my router unless it's really close.
  • A wireless receiving module that I could connect a standard webcam to in order to have a wireless security camera. This was partially functional - it would not connect to the camera.
  • 4 x 18650 batteries that were supposed to have protection circuitry built in. They did not. Totally unsafe and unusable as was the charger that came with them.

Now I did have a few things from eBay that actually worked.

  • A batch of micro USB connectors
  • A batch of RCA connectors
  • SAE quick connect mounts.
  • A cover for my phone 
  • A cover for my tablet

I didn't buy anything else from Walmart online. I think we can all agree that my online shopping experience has been mostly pretty miserable of late. I've not bought anything out of the ordinary either. Nothing particularly exotic.

It's not possible just to condemn eBay and Walmart without mentioning Amazon. The last time I purchased anything from Amazon I had a problem with them trying to shove Prime down my throat. I cancelled the order because of that. The time before I ordered a switch amongst other things and it took forever to arrive. It came from China and there I was thinking Amazon was an American company selling goods they actually had rather than drop shipping goods they don't actually have.

Given that the various assorted states have recently decided tax must be paid on all online purchases the advantage of eBay and Amazon has largely vanished.

Out of curiosity I pulled the screen apart that came from eBay. No chance at all of returning that. Postage to China would be more expensive than the actual item.
It pulled apart easily with no need for tools. That pretty much says it all - built very cheaply out of very cheap components. The "quality control" sticker must have been some kind of joke as this thing had never been tested.
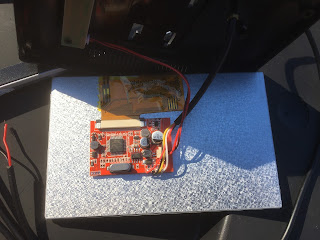
Looking at the back of the LCD screen I saw the driving circuit. An electronics guru could probably tell you more about what's going on there but frankly it doesn't look as if it's all that well built or designed. It looks like something that's been designed by prison labor and built by prison labor. I was surprised not to find a note in it begging for help from a political dissident whose "crime" had been to burp as he passed by a portrait of Chairman Mao.

I've mentioned this before. It really does not matter where electronics are purchased. They are all made in China - from the computer/tablet/phone you're using to read this to the components that go into that device. Indeed I see the same things I can get for a few dollars on eBay in some of the stores for very much higher prices. That price difference since the origin is the same must be to cover the store actually testing the products before packaging for sale. They must have something like an 80% rejection rate.

Fortunately I don't need much in the way of electronics now. I need that monitor so I can test my camera recorder system. Aside from that I'm pretty good - assuming the two C-DVRs actually work. I have my doubts about one of them.

Yesterday I cut some more steel for the lower window on the back door, just in case. I had a thought that the way I was going to put the steel in, there would be a hollow in which water could collect. Silly me - I forgot about filling it with foam or fibreglass body filler.

In order to weld on the back door I have to move the bus. The existing cable for the welder is too short to reach. The alternative would be to use both my cables though the problem there is the wrong kind of connector on one cable. That was why I was on eBay looking for a quick delivery connector.

The cable I have is rated at 20A. The welder is 20A but the bus is set up for 30A. The 120v breaker in the bus is currently 20A but I do have a 30A breaker. What I might be best doing is to take the 30A connector off the 20A cable and put a 20A connector on so I can connect both cables together to enable welding then to buy a 30A cable and put a TT30 connector on one end and my existing 30A connector on the other end. I'll have to see.

Friday, December 20, 2019

Well bugger!

A few weeks ago I ordered a backup monitor screen from eBay. Needless to say, when it arrived it did not work. In desperation, suspecting it might be the plug-in cable I cut the cable off and replaced it with a known-working wire and wired it straight to a battery. It still didn't work. Needless to say, after a certain argy-bargy I did get a refund off the seller.

Still wanting a backup monitor screen I ordered the above from Walmart figuring they wouldn't be selling trash and I made sure it was an order, ordered from walmart dot com rather than from some fly-by-night that peddles their trash via the walmart website.

Well, I connected the monitor power cable to a 12v battery and nothing happened. I checked the cable for connectivity with my handy-dandy meter and it checked out fine. Then I put the meter across the positive/negative on the monitor and read the resistance as infinite. That means there's a broken connection inside the monitor.

Walmart was very good and offered a replacement. I'm waiting for that now. How long has it been since I first ordered a screen? Checking eBay it seems I ordered it on November 24th. That was DOA so I ordered one from Walmart (different brand) and that also arrived DOA. I am really not feeling very encouraged right now.

All the screen is for is so I can complete testing the camera system I installed in October/November. Once that's done I can get on with turning the road traffic recording system into a security system. That was prompted by some wanton vandalism. An individual walked around the bus, flipped down both kick steps, tried to pry the battery door open by pulling hard on the latch - so hard that it was jammed and I had to unlock the battery door to unjam it. There was also damage to a solar panel.

Meanwhile I find Harbor Freight has quit selling 1/16th welding rods and that they're now fairly hard to obtain economically. I cannot now get 7014 rods in 1/16th and I think 3/32 is just too thick for my 70A welder. I can have a go though.

Over the process of a few weeks I cut a sheet of steel to fit exactly the recess in the back door where the window is. Yesterday I was hit with the sudden realization that if I welded a sheet of steel flush with the outside of the door rather than flush with the window aperture then I would have a substantial place where water could gather and promote rust. That's not welcome so the plan now is to cut another piece of steel vaguely the right size that I can trim to size after removing the glass then weld into the actual window aperture. That welding will be a lot easier as I won't have to worry about burning through the thin steel of the door as the steel where the glass is mounted is thicker.

I'm still getting water ingress in the cockpit and I still believe the roof vent is to blame. I have a new roof vent. It just means I'll have to get up there, remove the old vent, put in a seal and then tighten the new vent down - assuming all the rivet holes are the same.

Since the solar panel itself isn't damaged but the plastic it's built into is badly cracked I can probably recycle the panel into a new mount. Should that not be possible then there's a possibility of doing away with the front panel. The back panel is 20W which should be sufficient for powering just the digital door lock. In theory I could put up a fun destination sign board up in front.  In reality though I'd rather just put a new 15W mono solar panel up. That seems much easier!

At the moment it seems like one step forward, five backward.

Saturday, October 19, 2019

Wot? No post in a month?

Truth be told I've been working like a dog from before dawn. I'm back to driving school busses for work and am on the road from 5:30am til 8:15am then after a long 5 minute break I'm back on the road from 8:20 til 9:05. I get a bit of a break then as my next run starts at 10:45 and ends at 12:15. Then I get to have lunch and I'm back out again from 1:45 til 4:45. Add in the hour allotted for bus cleaning, paperwork etc and I'm working for 9 hours a day.

Then my weekends seem to be fully occupied by other things. All of those things were put off this weekend by rain - lots of rain. Today I did manage to get to the bus where I sat and considered the things that need doing. That's when the drumming of the rain on the roof started to make me sleepy.

Last week or the week before I finished cutting the panel to go over the bottom window of the back door. That took a while because it had to fit loosely enough to allow for expansion when welding yet well enough that it can be welded in easily. The curves on the corners took most of my time. The plan is now to put sheet steel over all the windows at the very back of the bus then to put steel strips along the sides of the bus over the windows, making it look more secure and more like a prison bus.

When I was trying the steel sheet for the lower window (the only sheet I have cut to shape) I dropped it on my rearview camera - the one mounted over the bumper. It took exception to that and the mount gave way. Thus I had to order another which is coming from China. That was not welcome but wasn't the end of the world.

I still have to replace the roof vent with my new vent and the roof could definitely do with an extra coat or two of elastometric roof paint. I noticed some cracking when I was up there a while back.

Other than that, I still need to install my 3rd battery with the wiring and to finish building the battery carrier and of course put my wiring in so that I can keep the driving batteries charged from solar power.

Sunday, September 29, 2019

How to drive a schoolbus conversion

As a school bus driver in my normal role, it horrifies me that so many people drive school bus conversions without the foggiest idea of what they are doing. Worse than that, most think and believe they know what they are doing despite never having driven a bus before in their entire lives.

I'll start with mirrors. There should be three mirrors per side - minimum. I have seen and driven busses with fewer but it does increase blind spots. These are the mirrors I have on my own personal bus conversion. The top mirror shows me what's in the lane next to the lane beside me and anything coming. This helps avoid accidents from two vehicles trying to merge into the same lane at the same time. It also helps when joining onto a road via a Y junction when approaching traffic is behind and to the left (or right).

The middle mirror is there to show clearly what's in the lane behind the bus, bearing in mind the mirrors will not show what's directly behind you. There is a cone of invisibility that reaches about 200 feet in which cars, trucks and motorbikes can't be seen. A rearview camera supplements mirrors but does not and cannot replace them. Electronics are zero percent reliable in critical situations. 

The bottom mirror shows you what's beside the bus and should show the back wheel and everything up to the driver's window. Seeing the back wheel is very important for cornering. More on that later.

The crossview mirror is there to show primarily anything directly in front of the bus or the bus wheels. It also helps with lane placement. As a professional of 4 years standing, I do use the crossview mirror to check my lane positioning, particularly when I'm passing another big vehicle on the other side of the road. Mirrors colliding produce debris and damage with possible fatal consequences. This is a half mirror. A full elpitical mirror will show the roof line which may be helpful when trying to get under lower bridges.

Heated mirrors are preferable to unheated. My bus was designed without heated mirrors and though I could put a mirror heater timer switch in, it's not something that I will be doing. Motorized mirrors are in my opinion a waste of time unless you have an issue with leaping out of the bus to adjust the mirrors and back in to check them. It's how I adjusted these and it did take some time. For multiple drivers using the same bus, it's essential.

I won't go on about the driver's seat suffice to say air seats are very nice. My work bus has one and I can adjust it in a trice. My own has a manually adjustable seat which took quite some adjusting. In fact I had to use a wrench to lower it to the correct height, proving that for the entire time that bus had been in use, the seat had always been set too high.

The ideal position for a seat and steering wheel is with the legs as straight as possible without straining to touch the top of the steering wheel with your hands. Prolonged driving with poor seat positioning results in sore knees and potential loss of control.

Before going on a trip there's a lot of checking that must be done. I don't mean should be done, out to be done. I do mean must be done. This is not just because these busses are old and things can and do fail at the drop of a hat but for safety sake. It's illegal to drive with defective tires or lights. Simply looking at a tire won't tell you if it's bad.

The first think to do is to get all the lights on and walk around to make sure they're all working. Stop and replace bulbs or fuses for the lights that are not working. Next, check the tires. These can be checked with a billy club or a pressure gauge. The inside tire on the back duals needs to be checked too. If it's flat it will look fine but when you put your hand on it and give it a push, it will feel loose.

Next, check the glass is clean and clear - free of stickers or anything that impedes vision. Check the mirrors for being clean and correctly angled. None of the lights, glass or mirrors must be cracked, broken, missing, chipped or the wrong color.

Check the front hub seals and back axle seals for leaks. Check all the lug nuts for tightness. Loose lug nuts will show shiny metal or will have a rust band.

Before moving the bus, keep the parking brake on, put the bus in gear and depress the accelerator slightly. The bus should not move. If it does, stop as there's a problem with the brakes.

Check underneath for drips of oil, drips of fuel, drips of coolant. Dip the oil, transmission fluid and check the power steering fluid and radiator coolant. Check all belts and hoses for cracks, fraying (leaks on the hoses) and their presence. If you have DEF, check that too.

Roll underneath and check brake lines. Check the steering linkages and the brakes. You might have air brakes or hydraulic brakes. Know which you have a check accordingly. Check the steering - there should be less than an inch of slop in the wheel.

Remember you are driving a 16 ton missile that can kill dozens of people, not just a whoopsie that dents another car and puts you in debt to the insurance company. A bus will ride up on top of a car and crush it underneath. This is why you need to make sure everything is as perfect as possible. You need to be able to prove you did your bit responsibly in order to diminish liability.

For driving, be aware of four things. Weight, height, width and length. Many bridges might have a height or weight limit. If your bus is close to the height limit, be careful as that height limit might not have been remeasured after the road was last resurfaced. Weight limits need no explanation - an overweight vehicle could collapse through the road surface even if it passed over a hundred times before. Remember your vehicle is wide and you need to allow clearance on many roads when approaching other big vehicles. The key is to move over to the curb side as much as possible without hitting the curb or any mailboxes. If in doubt, stop. Length might seem daunting but all it is, is a case of waiting to turn the steering wheel until the back wheel is at the corner (not just before or just after). You will need to borrow from the other lane of the road you are turning into. Do not borrow from the lane beside you. Getting close to the line beside you without getting into the other lane can help a lot.

In normal driving, remember you are driving an old school bus. It will not be the fastest vehicle on the road. It is not a Ferrari nor is it a Mercedes. It is not a Lamborghini either. Your normal driving should be in the outside lane so everybody can pass you safely. Remember schoolbusses are designed to spent 90% of their lives on narrow, rural roads, not on interstates. They are designed to traverse dirt tracks rather than interstates.

It may be possible to raise the speed of your bus to greater than 55mph. Please resist the urge to do so. It is not good for the engine or the transmission, despite what somebody else may have written online. When traversing dirt tracks, keep your speed down to 15mph or less - things can vibrate and fall off or break off. It has happened. In fact the battery door latch broke off when I was doing 10mph on one dirt track.

Remember to leave plenty braking distance and to be alert for idiots overtaking or emerging unexpectedly from side roads. One idiot pulled out in front of my work bus a few days ago. The ABS on the work bus failed when I braked (I've never known ABS not to fail when needed) so I left a 20 foot skidmark but avoided hitting him. I was doing the speed limit. Remember if you have a crash that if you have your ducks all lined up by doing what you should be doing then you're unlikely to be spending time as the jail's latest sex slave.

If you have anger issues then driving a schoolbus might not be for you. Remember to check your mirrors at least every 7 seconds. Definitely check both sides if there is traffic on both sides of you.


Sunday, September 22, 2019

Is a bus a full time living solution?

Some people claim it is and that they can do it full time. I'm positive that's what they honestly mean. I'm equally positive that they forget the times when they're sick and have to stay with relatives or friends.

As an example of one time when I was unable to use my bus - I'd pulled a muscle in my leg and couldn't even climb the stairs to get into the bus. It was just far too painful to lift my leg that high. Other times I've been just too sick to want to climb onto my 3' high bed.

A bus bathroom is fine - as long as you can empty the toilet and the waste tanks every few days and as long as you can fill the freshwater tanks every few days. Imagine a debilitating illness like a long bout of the 'flu. That would have you laid up for a week or more with no water in your water tanks, full waste tanks and a fairly unhygeinic bus. With a house that has full time water, electricity and flush toilets as well as a good shower, this is not an issue.

There's the little question of emptying waste tanks, taking on board fresh water, cooking fuel etc. Where exactly do you plan to do all that? I can do this where I'm living because I live on shared land where I can dig a hole to bury the content of my waste tanks.

Where, exactly, do you plan to park that bus of yours overnight or when you're at work? If it's not your own land or land that you've rented then you might come back and find the bus gone - hauled off as abandoned or as trespassing. In a public parking lot it's quite likely that somebody will vandalize it or attempt to break in or even steal your home on wheels.

Busses were only ever built to transport people. Once you start living in them, condensation becomes an issue and condensation causes rust as well as mold. Everything including clothing will hold a degree of moisture as ventilation would have to be extreme in order to keep the interior dry. Every time we exhale, we exhale water vapor.

Back in college a friend rented a tiny little garage. It was dry - no leaks but it was damp from the moisture of cooking and breathing. He bathed outside in order to keep the water vapour outside. Even so, he had to wear all his clothes in turn or they would get moldy.

How do you plan to cope with repairs? You can't carry all the tools you want or need in order to fix every problem. That will lead to the annoying situation where you know how to fix the problem but have to pay somebody else to do a poor job because you can't carry the tools,

What about breakdowns? When you break down, where will you stay while your home is being repaired? Most repairshop yards are not secure and the workers will not keep your bus locked. What happens if you blow a steer tire out in the middle of nowhere? Did you know a single tire can weigh 125lbs? In the unlikely event that you'll have a spare on you, you'll need to jack the bus up and change the tire and put the wheel back on unless you manage to change the tire without taking the wheel off.

It's a big vehicle. What experience do you have of driving big vehicles? How about air brakes? Have you certified in air brake use? Can you diagnose and solve air brake problems? What about an air leak? Can you find and fix it? Do you know how to handle a rear tire blowout? What about a front tire blowout? Can you use the mirrors effectively?

Can you maintain a safe braking distance? Do you know what a safe braking distance is? Do you know how to reverse and that most accidents are reversing accidents? Do you have a partner to help you reverse safely? Do you know how important your partner is for reversing?

I see plenty people removing mirrors because they don't understand their use. It ends up with people driving almost blind.

What about pets and families? Children and animals have plenty accidents. Neither is particularly known for following directions. Pets need plenty space. Dogs need a lot of walking and exercise. Cats need about the same exercise too. In fact I'd be rather worried about the welfare of pets and animals couped up in small spaces. Let's face it, even a 40 foot bus is really something like 36 feet inside and about 6 feet wide so it's a 216 square foot dwelling. That's less than a single floor on most townhouses. In fact that's about the size of most people's lounges.

If you're single and sick, can you cope? What about if you're not single and have dependents and you're sick? Can you cope? What if you're all sick? Can you cope? Now can you cope without family or friends nearby?

Do you have answers for all these points or have you swallowed the baloney, hook, line and sinker that everybody can live in a bus? The truth is it's not a mainstream solution. Most people with bus lifestyles have secrets they don't tell such as:

  • family in various places
  • parcels of land in various places that they own and can live on
  • storage lockers in various places where they store stuff they might need.
My big gripe is that too many people are getting oversold on the idea. They're selling and throwing away their lives, spending tens of thousands of dollars on an instantly depreciating asset. Basically people are setting themselves up for financial ruin.

Busses are depreciating assets. What you spend on the conversion does not make the bus any more valuable. A $10,000 conversion does not make a $2,000 bus into a $12,000 bus. It makes it into a $2,000 bus that you've spent $10,000 on. A $12,000 motorhome will be worth $10,000 in a year's time. A $2000 bus with a $10,000 conversion will be worth $2,000 and no more.

Sure - you can play games with paper, giving it a fancy title such as "motorhome". You're not fooling anybody though. As soon as the insurance company sees it's a schoolbus that's been converted, poof - any claim goes out the window. In the insurance industry it's generally seen as close to being fraudulent. Just leave the title as it is and insure as commercial. That way nobody can say anything. The plate inside the bus says "schoolbus". That's the important legal identification of the vehicle. It doesn't matter what alternative purpose the bus is being used for but if it says "school bus" then that's what it is for insurance purposes.

There's plenty to gripe about with the overselling of the school bus conversion idea. In fact, close to me there's a couple of bus big second hand vehicle yards. Both have coach conversions and bus conversions for sale. They're covered in muck on the outside and have been there for years. I have driven past one yard for two years and the two busses have been there all that time. The other yard I have passed every day for 5 years and those busses have been there all that time. All look to have been professionally converted, not converted by hillbilly amateur conversion companies.

When it comes time to sell a schoolbus conversion, it's best to part it out as much as possible and sell the rest to the scrapyard. Nobody is going to pay you $12,000 for a $2,000 bus or however much you paid somebody to convert it. Smell the coffee people, bus conversions are for a select few - not for every wannabe.


Sunday, August 4, 2019

Tidying part 2

I started clearing up the detritus in the cockpit, putting electrical bits with electrical bits, hardware with hardware and tools with tools. I still got rid of another sack load of litter.
After a couple of hours I'd reduced the quantity of stuff in the cockpit considerably. It took a good few more hours to get the floor totally clear. The big problem is I'm moving stuff from place to place and it's not reducing any. I'm definitely going to need a bigger box for electrical bits and a bigger box for tools. Tools, like wheels are something you always need.

Actually, the toolbox idea just isn't really working. I do, however, have some plastic drawers. They might be good for the electrical though since they're not really being used for anything much. One of my problems is I like electronic components. I've only got a hazy idea about electronics from high school so I tend to buy stuff and put it together in the hope that it'll work but it rarely does. I can solder decently though.

It'll take me a few days yet to get everything into order in the bus. 
One of the things I thought of was if I weld steel over the two windows on each side of the back door, I'm going to need something to arrest sparks. Thus I went to cut another piece of fridge or freezer door. The disc in the angle-grinder was mostly used but I was able to make the first two cuts well enough. The third went OK though I had to hold the grinder at a strange angle to be able to complete it. The fourth was when the grinding wheel became so small that cutting was not possible.

I had to hunt out the tool to remove the grinding disc. That, needless to say, was at the bottom of the tool box. So, the next thing was to find the cutting discs. That took a positive age by which time I'd misplaced my safety glasses. I took the disc out to the angle grinder hoping I'd left the safety glasses out there but I had not. I left the new disc with the angle grinder and went and hunted all over the bus for the safety glasses. I found those and put them with the disc and the grinder but realised I'd by now misplaced the tool. I went back to the bus and hunted everywhere, even going through the tool box again with no luck. Then I decided to check where I'd found the cutting discs. Steadying myself as I leaned over by placing my hand on the back of the driver's seat, I found the tool - exactly where I'd left it - perched on the back of the driver's seat.

Returning to the fridge, I finished cutting the steel. I didn't have time to clean the insulation off it - that's a job for another day as is trimming it to the right size to use as a spark arrester. What it's going to do is to slip into place inside the bus to be held in place by my Harbor Freight welding magnets while I weld a sheet into place from the outside that fills the window aperture. Honestly I wish I'd known how to weld before I started the bus project. I'm sure things would have been so much faster and easier still, if there is a next time, I'll know for the next time. One thing's for sure - I know how to build a trailer if I ever want one!

This week I hope to get the bus completely tidied. I still have a few things in the cockpit but mostly stuff centered around small projects. I might be able to get the fuse box into the console and the new rectifier into place lickety split now that I can actually sit on the driver's seat!


Saturday, August 3, 2019

Tidying the bus

Today as it was getting harder to get the right tools when I needed them, it was clearly time to start tidying inside the bus. It's looked like a tool volcano had erupted for quite a while. Thus I got down to it.

The first thing to remove was much of the trash. You wouldn't believe how quickly trash builds up from wrappers and boxes and envelopes. Just about everything I buy either comes online in an envelope or box with lots of associated packaging or from a store in a big plastic bubble container. There's absolutely no need for all this plastic packaging. People have sent things from one side of the world to the other, successfully, packed in straw, crumpled paper and cotton for centuries.

After a trashcan full of trash, I got to the tools. A couple that are unlikely to be used again on the bus project I put in the shed. That will likely happen to a few more. When the bus is completed I will only need standard maintenance tools on the bus together with spares such as bulbs and fuses.

Then it was a case of picking up the smaller stuff like sockets and wrenches then dumping them in the tool box. Slowly I'm getting there but it won't be done today. It might be done tomorrow or more likely on my day off on Tuesday.

Looking around I can see all the projects I have on the go:
  • The 3rd battery holder. I built the base yesterday. I have to build the rest of it next. For that I might have enough steel angle or I might not. I'll have to measure very carefully.
  • The new roof vent. I found my tube of epoxy putty and the new roof vent and put them carefully to one side.
  • A fuse box to put in the control console in order to replace the huge array of inline fuses.
  • A solidly built bridge rectifier to replace the rectifier I put together for the front solar panel. No great improvement - it just looks prettier.
  • Sheet metal to go over the back windows. I'd originally put a sheet of metal on the inside of the bottom door window to prevent somebody entering after kicking out the glass. Now I think it'd be an excellent idea to have sheet metal in place of the window. For that matter I should do all of the back windows. I have no need for windows at the back of the bus! Two are covered by wooden panels and one has a steel panel over it. The fourth window isn't really needed either.
The sheets of metal for the back windows went to the back of the bus. That's a project that is not urgent and unlikely to be completed soon. The current project is the battery holder. That will need more welding. The roof vent again is not a project that's going to be completed soon. That also got stored at the back. As for the fuse box and the bridge rectifier - those are jobs that will take but a few minutes. The reason they have been left is because of the massive tool volcano that had subsumed the driver's seat. Needless to say I'd have to sit on the driver's seat to complete those projects.
During my sorting I found this. It's an old Hyperdrive HD80. It's from my days when I'd had a photography "business". I say "business" because there is no actual business in photography. At best it's a hand to mouth existence that has been largely killed off by digital imaging and cellphone cameras. Anyway, an abusive individual in my past had not actually persuaded me to start this business but more bullied me into it. Needless to say, there never was any actual income - more outgoings on gear. Most of that was lost money. This is one of the last remnants of that nightmare period. So having found that I've put it up for sale on Craigslist. eBay is just not worth the auction fees. Like as not I'll get no takers and will end up tossing it into the trash despite the fact that new it  cost $270. That misadventure cost me about $8,000 and after selling as much as I could of it (some just had no takers and had to be thrown in the trash) I think I got maybe $1,200 back.


Friday, August 2, 2019

A step toward a battery holder

What? Another battery holder? Well, yes. The two house batteries I have are doing an excellent job but in order to run the extraction fans decently I do need to add a 3rd battery. I'd decided this months ago and had tried running the fans directly from solar which had worked very well. I wanted more of an inclusive battery system though, hence the addition of the new battery mount.

I started by doing the usual measuring of a standard U1 battery and then added half an inch to the length and width. As this battery will be mounted in the battery compartment with my driving batteries, I decided to do a slightly different mount from that used in my two battery hangers. I couldn't have the tie down sticking out the side - I needed a piece of flat steel on each side just to protect the batteries next to it.
So, I cut the main pieces. This is a fraction longer than the group 31 batteries used for starting the bus but that's no problem - the battery bay is massive. It's possible to see where the U1 battery is going to go!
Having cut the basics of the battery holder, I added the sides and the anchors for the battery tie down. That was all pretty straightforward. It used up most of my 72 inch piece of steel angle.
By the end of the cutting all I had left was a 3 inch piece. I'd used 69 inches of steel angle. Of course, during construction, one of my tie down anchors needed modification so I modified it. Then the modified anchor fell into the leaves and I couldn't find it even with a magnet! There was only one thing to do - cut another. That took a minute or so with the angle grinder (who on earth uses a saw to cut steel). Then several minutes drilling the anchor hole with a 5/16 drill bit in a Harbor Freight mains power drill set on low speed. In order to save the drill bit from burning out, I used low speed and lubricated the drill site with WD40, reapplying WD40 every minute or so.
Eventually, welding time arrived. I started by using 3/32 6011 rods but they were slow going. Then I found my 7014 1/16 rods and went quite a way with those before deciding to try my 5/64 6013 rods. Well, I laid my best bead ever with the 5/64 rods. The only problem was it didn't adhere properly. That steel is anything but clean! I chipped the 6013 off and went back to my 7014 rods and completed the task thus far.

The next stage will be to put an upright close to the far end on which I can attach a sheet of flat steel through which I can mount the battery kill switch that I've been using for the driving batteries. To that upright I will also add a couple of threaded sleeves. That way in order to get it secured tightly to the battery compartment all I have to do is to tighten the bolts against the existing battery retaining strap. This also allows the next set of group 31 batteries to be a slightly different size. Batteries in the same group are only nominally the same size. I found that out with my U1 batteries.

With luck and a fair wind I should be able to complete this tomorrow!

Tuesday, July 30, 2019

More steel

Today I got on with cutting more steel. The actual cutting was pretty fast and straightforward. Everything has been cut over-sized. There will be a lot of trimming needed before I can actually use any of the steel I cut. The point was though to grab the steel I need before it all vanishes.
Last night I'd been thinking about the upper window of the back door. It's not really needed, to be honest. In fact I could easily install a much smaller window. That, like the two windows each side of the door, is not an immediate priority. The bottom back window is more of a priority but even that is not as much of a priority as installing the 3rd battery.
So, having cut my two pieces of steel, I set to and removed the chunks of insulation that were on them. As yesterday I vanished in a cloud of insulation dust and my clothes and my drill were covered in white dust. I was glad of my googles though a respirator would have been nice. One day I might get one.
After cutting and cleaning the steel came the painting. The cold galvanizing compound spray gave up spraying before the can was actually empty. This is why largely I prefer paint pots and a paint brush. The second sheet (shown) I started on the left with cold galvanizing compound but that ran out after about 6 inches of spraying. I switched to bumper spray and did another foot or so before that ran out. Then I moved on to white which ran out after a few seconds. Then I pulled out some silver spray that I'd bought in error and used that. That just about did the last foot or so before that finally ran out too. At least I got to use my odd ends of paint. All it has to do is to prevent rust.

The cold galvanizing spray won't burn when I weld so I don't have to worry about it. The white enamel paint on a fridge (the other side) won't burn when I weld either. All other paints seem to burn and catch fire when I weld. That's not great.

I would have cut steel to make the battery holder today but what with taking a truckload of trash to the dump, cutting the steel, cleaning and painting it and making a two piece sheet of aluminium to block a rat hole in the house, I just ran out of day. Mind, cutting and cleaning the steel was pretty exhausting work and my arms are sore from that.

Monday, July 29, 2019

Getting steel

One of my projects is to replace the windows on each side of the back door and the lower window of the back door of the bus with steel. This is purely because they are not actually used for anything. They already have internal panels over them.

As my friend was throwing out an old cooker, I asked if I could have some of the steel sheet that it was made from. As I was given the OK, I cut one of the sides off and found that it was very rusty. That precluded my using it for anything whatsoever since I don't want to have to clean up rust if I don't have to.
Now that cooker has a very interesting history. It was purchased secondhand from a local secondhand appliance dealer. The cooktop was used a little over the year it had been owned by my friend but the oven was used only once because that's when the cooker would give electric shocks to the chef. As the secondhand dealer had a policy of repairing defective appliances only if they are brought into the store, that meant she had a duff cooker that was to all intents and purposes unreturnable and a complete waste of the $100 she spent on it.

Taking the side off revealed a lot of pine straw inside and a lot of rust, heavy at the bottom and lighter at the top. This would lead me to believe it had been left outside with a tarp over it and that it had been outside for quite some time before the secondhand dealer happened across it. I believe I went through two complete Harbor Freight discs cutting that side off! As it was, the steel was unusable.

The cooker door should not have had rust inside it but it did. Thus, it is my theory that cooker had been made of bits of old cookers, was definitely not safe when it was sold and was in fact quite the lemon. It would not surprise me for the "dealer" to have a long and illustrious criminal record.
I am very fortunate in that my friend bought several appliances from that rascal. Some are fridges and because the insulation is glued to the inside of the metal surfaces of a fridge, there was little likelihood of there being any serious rust involved.  I thus decided to use the top freezer door from an upright fridge-freezer as an experiment.

From previous experience, the foam insulation has to be scraped away slowly. Previous experience also showed that cutting thin steel really eats up Harbor Freight cutting disks. So, I started work and cut the steel from the front of the door. Interestingly, I used a Walmart cutting disk and it didn't eat away the disk at all quickly. It seems thus that Walmart cutting disks are better value - pretty much like Walmart angle grinders.

Having cut the steel out, I had to lever it up slowly. It was well stuck to the insulation. Eventually The steel came free but with a very thin film of insulation adhering to it. That took quite a few minutes to remove using an abrasive disk in my battery pistol drill. It also took the complete charge of one Harbor Freight pistol drill battery.
Having cut and cleaned the portion of the freezer door that I need for one of the back windows, it was bare, bright steel. Thus I whipped out a can of Rustoleum cold galvanizing spray and sprayed all the bare steel.
There is more steel available, obviously. I just didn't feel like working on it today. Once I have it cut and painted then I shall have a steel sheets that can be put over both sides and the bottom window. Having said that, I'm wondering whether a smaller back window would be more appropriate. That's easily doable using the steel available.

Monday, June 24, 2019

The problem with solar charge controllers.

Well, more accurately, the problem with every solar charge controller - regardless of whether it is PWM or MPPT or even direct charging is that they just don't work well.

Picture this scenario: Loads of sunlight, full batteries and the charge controller is doing what it should be - trickle-charging the battery. That's fine. Then say you want to run something like a pair of electric fans that demand a hefty current. That's where the charge controllers all go belly up.

What seems to happen is that they keep trickle-charging the battery while the fans draw current from the battery at a higher rate.  Picture this - fans drawing 4A from the battery and 7A of solar panels in full, glorious sunlight. What you'd imagine would be happening is that the charge controller would be saying "hey, we have plenty sunlight so we can run these fan things directly from the panel power, supplementing that as needed from the battery. That would be the sane, sensible thing to do.

Um, no. That kind of thinking is far too advanced for makers of solar charge controllers. What actually happens (it doesn't matter if it's MPPT or PWM or any other flavor) is that the charge controller keeps putting that trickle charge in until the voltage of the battery drops low enough to merit drawing more power from the panels. So the net effect is the solar panel power is just being wasted and the battery used instead. It's akin to having a free lunch offered to you but opting to go to a restaurant and paying instead.

As far as I can see, most of the solar charge controller engineers need to be lined up against a wall and used for ballistic testing by the ammunition companies. That's all they're worth. What a cockamamie way of building charge controllers!