Showing posts with label handbasin. Show all posts

Sunday, May 8, 2016

Plumbing completed

There's not much to say. I crawled under the bus and completed my plumbing under the washbasin in the bathroom. It was just like the plumbing for the shower albein with narrower tubing. I still need to seal a few things underneath but not an awful lot and it won't leak if I don't.

I cut the steel strip for my back lower window cover. My new thinking is just to screw a sheet of steel over the window with a shim to allow for the window gasket. It's easier and faster.

In other news I carefully stripped my tablet down to look inside. It is the USB socket that has failed. That's microsoldered into place. Microsoldering is a little beyond my skills and equipment. I hadn't really hoped for anything. I guess the tablet is trash. Still, it'll make a nice video!

Sunday, May 1, 2016

104F and I'm sick as a dog

I work with kids who're very generous with their germs. I'm really unwell today but against my own advice I worked on the bus. I didn't do the underbus plumbing as the ground was wet. I certainly don't need to be wet as well as ill!
As can be seen, the plumbing inside the bus is complete. A handyman looked in and made derogatory comments but what the heck. I don't care if my plumbing isn't to whatever code might exist. All I care is that it works and is easy to maintain.

At this point, having done little other than a small amount of plumbing, I called it a day. What with the 104F inside the bus plus the humidity, the stormy weather and the virus I have, I was just about ready to hurl.

As I told my dad - between the heat, humidity, mosquitoes, illnesses and work, I just don't get much time to work on the bus. My aim had been April of 2015. It's now May of 2016.

Remaining to be done - ventilation, some power source, finishing the grey water plumbing. Those are first priorities. Next are welding a panel over the back door lower window, fitting a door unlatching system and then finally fixing the hillbilly wiring.

In other news, I found the bus title. That means I can now send off again to get it retitled as a motorhome. I really need to finish the sink plumbing and put in some ventilation!

Saturday, April 2, 2016

Is it a urinal or is it a sink?

After helping m'lady to tidy the front yard a little, I looked at the bus. It seems the front top flashers unscrew fairly readily though each is 7 inches in diameter and much larger than the sheet of aluminum I have. Either I'm going to have to fill the screw holes with rivets or something or I'm going to have to make some big plates to cover the whole lot. On the whole, filling the screw holes with rivets and putting small plates over the cable holes seems more logical. This time though I might use the correct sealant. Silicone sealant isn't really up to much. I've used a lot of it too!

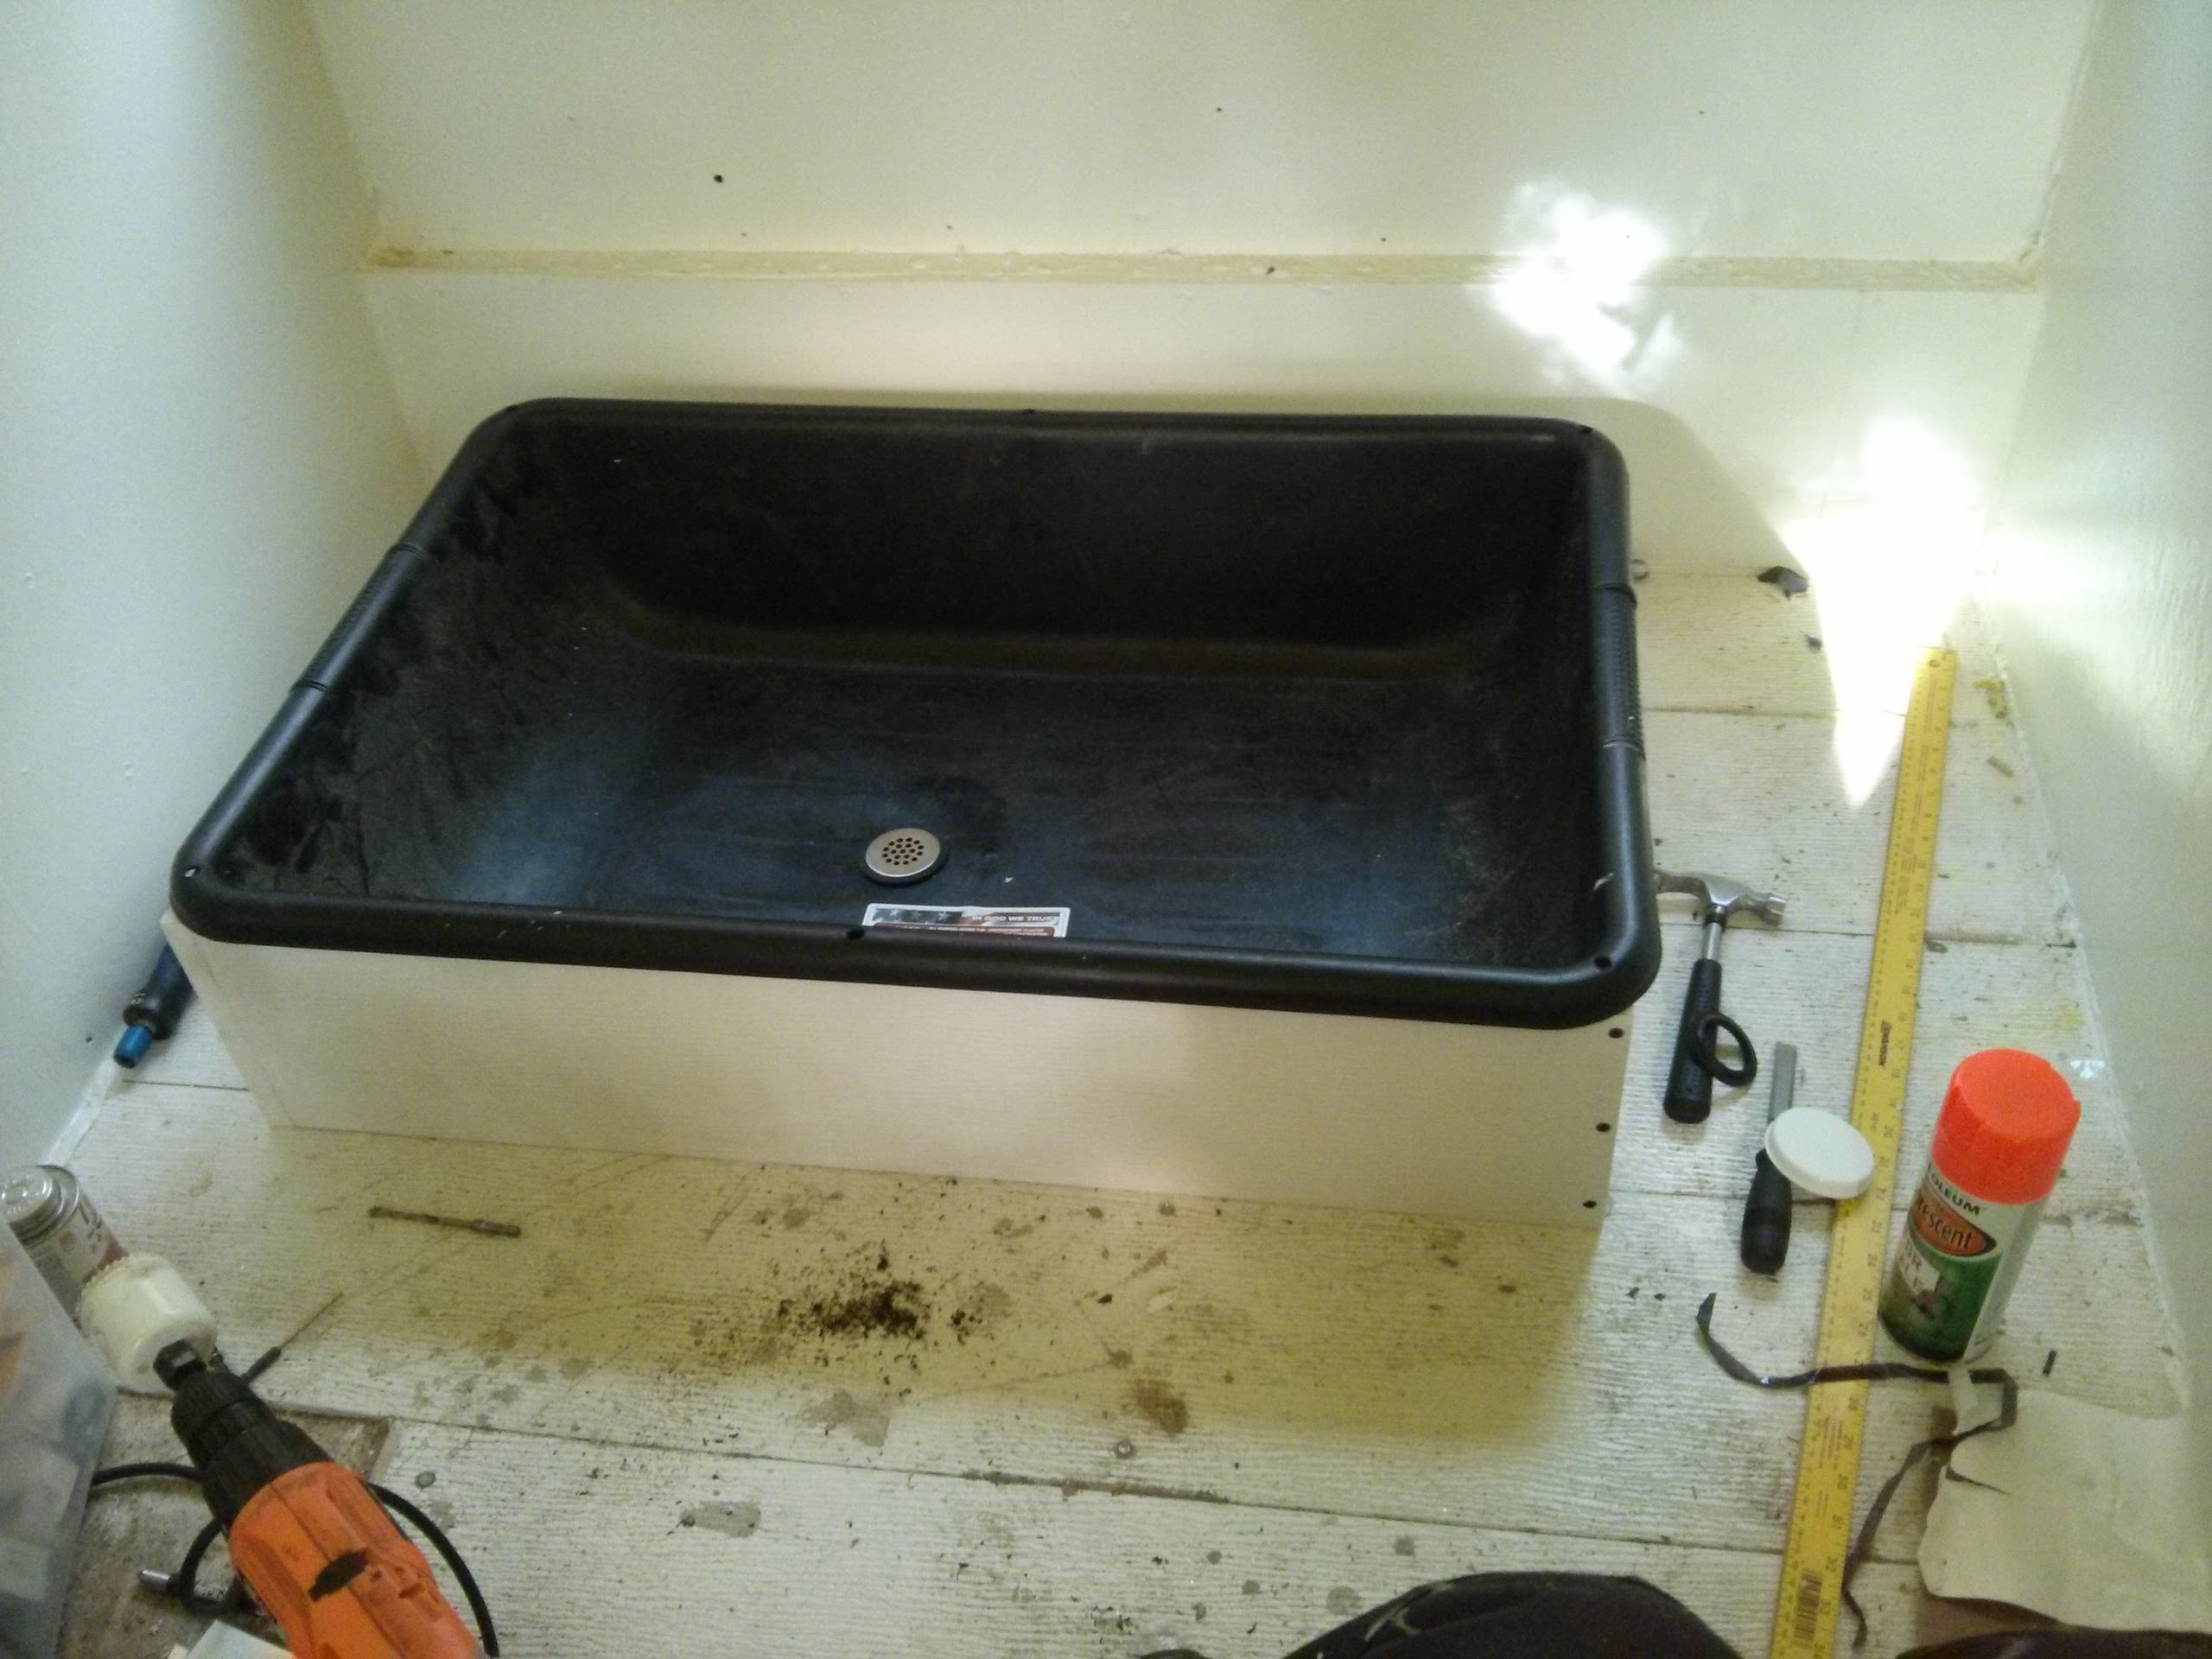
The handbasin came to mind. It struck me the other day that the toilet might get smelly if I pee in it as well as poo. It might be a better idea to dispose of urine separately. Thus the handbasin made a return. That thing has been a real yo-yo. I toss it out then reinstall it then toss it out then reinstall it. Today I reinstalled it for probably the final time. Tomorrow I will put a waste tank under the bus dedicated to that handbasin. The plumbing can be done at a later stage.

In order to install it properly, it needed something called sink clamps and of course I had none. I did have some 10-24 bolts, some washers and an angle grinder though. Looking at the tracks on the edges of the handasin, it was obvious that a ground down bolt head would slide nicely into the grooves and the neck on the grooves would retain the bolt head. Thus I set to work turning some overlong 10-24 bolts (remember these are the bolts supposed to hold 1200lbs but which broke under light pressure) into sink clamps.

Eventually it was done and I bolted the sink to the woodwork that I'd cut for it in January of 2015. It fitted very nicely. The handbasin needs a darned good scrub having been lying in a chicken coop for the past 8 months. I did hose it off though and the back looked clean but the usable bit needs work.

This is what it looks like, installed. I need to put a U bend or S bend or whatever you like to call it plus a downpipe that goes through the floor and into the waste barrel. That could be interesting as I need to go from a big tube to a much smaller tube. Plumbing is not hard. The hard part is that there are so many parts that don't quite fit.

I was going to pick up some blanks to fill the 1.5 inch diameter holes where the faucets fit yesterday but the silly fellow in Lowes (hiss, spit) that wouldn't stop talking ensured I didn't. I am rarely bugged out of a store by an annoying customer but that was one such occasion. Somewhere I have a strainer for that sink. I'll have to find it. I couldn't find my 3/8 deep socket either. That'll be there somewhere.

Meanwhile, I had a look on the roof of the bus and noticed that the paint I put on has definitely faded. The Rustoleum seems not to be that great of a paint to be honest. There was a patch I had covered for a few months and I had removed the patch. That area is definitely darker.

Tomorrow's goal is to put the waste barrel under the bus. I precut the cable based on the fittings for the other tank so with luck this should go on a lot faster and a lot easier. I know how it all works and what the problems were and what the solutions are now. Indeed, it might be worth returning to the other barrel at some point to check that the nuts are tight or at least add some secondary non-slip nuts.

Remaining to be done (notice how the list is getting shorter)...
1. Finish the plumbing.
2. Remove the flashers.
3. Install the cargo tie downs.
4. Install some kind of fan for the kitchen and one for the bedroom - to extract the hot, steamy air (yes, really).
5. Figure out some way of unlocking the front door from the outside.
6. Consider some kind of electrical system.

That's it - just six items after the next drum has been installed. I did think about an underbody water tank but to be honest, I think jerry cans are just fine.

And of course... No news from the DMV about retitling! No contant - nothing. It's as though my letter vanished into thin air. It's all well and good though as I can get it ever nearer completion prior to their inspection.

Monday, March 14, 2016

In the post

Today I did it - I posted the application to retitle my bus as a motorhome. As far as I know, that should get to the DMV in a few days. I'll doubtless have to reinsure my bus as a bus before they look at it and change the title since the insurance is up in about a week. The insurance company has been reminding me for the past six weeks to renew my insurance. They just don't realise that I don't ever give anybody free use of my money when it can stay in my own account earning interest until I really have to spend it. Thus, I normally get my insurance on the day before it's really due.

The socket cover I painted yesterday looks really good and matches the rest of the bus rather nicely. I meant to try scraping the paint to see if it comes off as I have little confidence in paint thinner making anything stick to my bus. It seems to reject just about every attempt to prepare the surface for fresh paint. Even stripping down to bare metal could be challenging as the steel is zinc plated. I did get brake fluid just for this but had forgotten about it until now.

In other news, the hour advanced on Sunday night leaving me now with over an hour after I return home before sundown. Had I not been so tired today, I would have worked on my bus. 

I am giving thought to alternatives to power and to attaching my barrels. It strikes me that U bolts could be used to tighten chains and coincidentally would be a load cheaper than using turnbuckles. If I'm right, it could be possible to attach the barrels without needing to do any welding whatsoever underneath the bus.

As far as the house battery is concerned, I suspect plugging into the cigarette lighter socket when I'm driving could well work best unless I can tap into the alternator circuit. Combining that with a charge controller would be an interesting approach. Indeed, looking at the LIon batteries I have been looking at online, I could probably fit them into a small ammunition box. I'm a big fan of small ammunition boxes as I can pack charge controlers, battery meters, cables and USB sockets etc into them as well as the batteries. In other words, a complete and portable power source that can be carried inside the bus. Truth be told though, I'd really prefer to use a supercapacitor

One of the things I'm a fan of is simplicity. Why go to the trouble of slinging things under the bus if it's not essential? The extraction fan for the bedroom can be solar powered on the basis that it's there to remove heat, not ventillate as the bus has plenty ventillation anyway.

With the LIon house battery in a portable case, it could be charged on 120v just about anywhere. The beauty of a standard solution is it can be put together like Lego blocks. Supercaps aren't mainstream which means it'd be a build-it-myself solution and even following published plans, those things don't always work. I really like the idea of building my own electronics but 75% of the time they don't work even when made from a kit and checked scrupulously. Mind, that's petty much my experience of ready-made electronics anyway.

So, the upshot is, tasks remaining to complete:
1. Replacing self-adhesive blinds with roller blinds.
2. Installing waste water tanks.
3. Developing a house-battery solution.
4. Installing a set of bungie cord anchors for the back closet.
5. Replacing or blocking the back door lower window.
6. Replacing or blocking the two back windows.
7. Developing and installing a front door unlocking system.
8. Blanking the school bus flashers.
9. Replacing the arrow indicator lenses with amber flasher lenses.
After all that, I'd say the bus is probably about as ready as it'll ever be. I would kinda like to put some kind of handbasin in the bathroom but a bowl will do quite well.

One of the interesting things that has come to my attention is urine disposal. I hear that peeing in a composting toilet makes the whole thing stink. I'm not quite sure how it will be affected by the fact my toilet is modelled after a cat litter tray. The deposits are simply covered with cat lit. The other day, there was an article in which one bus conversion owner complained she and her girlfriend discovered they had to go and pee in the forest rather than their composting toilet. The upshot was that in the end they replaced their composting toilet with a flush toilet though the domestic toilet they used would use about 10 gallons in a single flush. That's fine for campsites but otherwise, not so great. I would not be too surprised if in the end I decide to install a black tank and a camper toilet. Now the water from that could be pumped from the shower grey tank or if the handbasin empties into a 5 gallon bucket then that could be a source of flush water.

Well, in a few days I should hear more about reclassifiying my bus as a motorhome. I think there's enough there for it to work.

Saturday, February 27, 2016

Unexpected achievements and a bad Kahr.

Today was, I had thought, going to be a day of zero progress on the bus. How wrong I was. I did most of the things I intended to do for tomorrow!

Work, which was scheduled for today, was to have been a full day of training but that was truncated at 1pm when two of the trainers were indisposed. Thus, being sent home early, I popped into Lowes (hiss, spit) for some plumbing pieces (of which more at a later date) and headed home.

Arriving home at 3pm, there were 3 good hours of daylight left so they got put to use. Last night I had been thinking about a handbasin for the bus. I considered the end of a small gas cylinder. I'd noticed there was such a cylinder on the junk pile. Thus, out of an abundance of caution, I placed it on the ground, ready to ensure it was empty. The cylinder said "helium" on it but it could well have been refilled with propane. Labels don't always mean what they say!

Not wanting to cut into a cylinder that might have propane in it, I decided on remote ventillation so I grabbed my (somewhat disappointing Kahr PM9) and fired a single shot from about 25 yards away. The shot did not immediately appear to have hit the cylinder to I aimed for another shot whereupon I discovered the blasted thing had jammed. Racking the slide, I found it kept jamming. In the end I put it away. That Kahr PM9 has been nothing but trouble since I bought it. I wish to Heavens I'd gone for a revolver rather than that stupid thing. Revolvers never jam! I would hate to be surprised by a bad guy when carying a PM9. I am pretty sure the PM9 would be more effective simply hurled at the bad guy. In terms of penetration the PM9 managed to get through one side of the (very thin) steel then totally failed to make an exit hole. I can hear the bullet rattling around inside. I'm going out on a limb and going to say that I just don't think the PM9 would penetrate a bad guy's shirt!

Putting the cylinder out of the way for the moment - the plan is to cut the top off to turn it into a handbasin - I proceeded onto today's work. I'll have to see if I can weld something this thin. That might present a significant challenge!

Today the plan was to complete welding the patch over the hole in the side of the bus cut by the hillbillies. That took me all of the remaining daylight. It was just a laborious process of building up steel and filling gaps until eventually the result was pretty good. It looked rough from the outside but it'll do.

I put the power socket cover over the area where it'll be fitted and sprayed with orange paint. Then I pulled out my angle grinder but instead of a cutting disk, I put a grinding disk. This worked surprisingly quickly and ground the excess welds flat to the point the socket cover fitted without rocking. It did reveal two small holes in the welding where the welding has not really filled the gap. These holes are minimal. I had thought 6011 rods would penetrate and fill holes but oh well. 

Next, the whole lot got cleaned up with a wire brush then painted with brown undercoat. This bus does not have to look perfect - it just has to work well. The undercoat went on well enough. Tomorrow I'll put undercoat on the back of the plate then paint the front with grey paint. But before I do that, I'll make the holes for the socket cover. With any luck - if the paint inside is dry in time, I might put a second coat inside and then install the remains of the underbody electrics. The main breaker inside will be installed at a later date. Some have asked why I'm putting a main breaker box. The answer is simple - the main breaker is there to protect the cable from overloading. Currently I have a 20A cable but I'll also make up a 30A cable and might get a 10A cable too. The reason for this is twofold. Firstly different sites offer different facilities and secondly, the heavier rated cables cost more per foot. If I can park close to a power point I can use my heavier cables and get more power. There is another thing in that the heavy cables being more expensive are more prone to theft.

Sunday, September 20, 2015

It's been a long time


That was how my bus looked in November from the inside.

That was how my bus looked in November from the outside.

Wow! What massive changes have been effected since then. The inside has been gutted and rebuilt to be more home like. The outside looks far less like a school bus.

Reading around, several sites suggest that a Navy shower is the way to go with a motorhome. That's a case of wetting down in the shower, applying soap then rinsing off, turning the water off between wetting down and rinsing off. The same sites suggest that it can all be done with a single gallon of water. I know it can be done with a bucket of water and a flannel washcloth.

At Lowe's today I hunted for plumbing parts and found that just about everything is non standard. I suppose that's the main reason why plumber's putty exists! So, I have parts I can put together. I had a look at dish racks but found only one. It looks very much as though building my own dish rack into my drawers is going to be the sole solution. That'll take some more plywood and some wooden dowel plus time. It's not hard.

After returning from Lowe's, I measured the bathroom between the body ribs in order to drill a hole for my piping. Lo and behold, I got my measurements almost spot on and the pilot hole went into an area well away from body ribs. That makes me very happy.

Before I did that, I finished putting the shower base support together. One end must have been a shade longer because it's definitely some form of trapezoid. With the shower pan in place though, it won't notice and to be honest, won't make any difference!

The next thing was to drill the hole for the shower waste pipe. That was pretty easy. The time consuming bit was hollowing out a pan around the hole for the nut and flange. By the time I'd finished, the mosquitoes had bitten me pretty thoroughly but the shower base now looks pretty good.

After that I investigated water pumps. It seems the marine galley pump I was advised to consider which is foot operated is actually available locally at West Marine. The hand pump that I'd like so much seems to have a rubber diaphragm which turns me off. Old fashioned hand pumps never used diaphragms so that was an expensive look alike. That killed my interest right away!
Using a water pump means I don't need a faucet on the bathroom sink. I removed the faucet. I was going to empty the water down the shower but the outflow from the shower is a shade higher than the shower base. Water will collect so its probably best not to do that but to cut a new hole for the handbasin outflow. That shouldn't take long at all!

I haven't decided where to put the water pump yet. I don't have it and thus don't know where it would work best. I have a feeling the water outlet will be flexible - some kind of hose maybe with a nozzle.

For water inlet and outlet I'll definitely have to have a drain cock on the grey tank and some kind of input for the white tank. I'm not keen on having the white tank filler accessible to the outside world. There are too many freaks that would slip something in the water for fun. I don't mind them pouring my grey water all over the place though.

I might just have a filler for white water inside and bring water in, in 5 gallon containers or perhaps have a filler cap outside that leads to a faucet above the real filler cap inside. That would allow me to filter the water!

I've started to fill the drawers in the galley. Thus far I found my plates will only just fit in the plate drawer. That was to be expected. This is just the kind of irritating thing that would happen! The drawer will take 9 inch dinner plates. To be honest, I was never keen on the blue & white mainstays plates. I bought them because they were cheap. That was the sole reason. I might just as well sift through my stuff to find the things I actually want in the motorhome and the stuff that can be abandoned. None of it is of high enough value to sell.

The plan for the plates was to put them in a rack, standing edgewise but that plan will have to be abandoned. I really didn't want to have plates lying flat but I suppose bubblewrap would help. Perhaps just having them angled would work through it'd reduce drawer capacity. Its something to think on.