Monday, June 15, 2020

Today's discoveries

Today the weather cleared up briefly so I pulled out my Mig welder to try to weld the fridge steel. I'd tried that before with poor results. With the DC stick welder on 20A with 1/16th electrodes I could weld the fridge steel but had to move quickly or the steel would just melt, leading to very blobby, ugly, gappy welds that had to be filled in with Bondo. 
Using the welder I did manage to weld the fridge steel to a leftover length of steel from the other day. The weld was blobby and ugly as if I'd used my stick welder.
Going further I tried dragging the wire across the steel and managed to do some fairly random and worthless welds. Sometimes I burned right through the steel despite moving swiftly. 
Turning up the wire speed and turning down the amperage didn't help much. I still had blobby welds and sometimes so much wire shot out that I had glowing red wire sprinkled about the place.
After a few more holes blown in the steel I came to the conclusion that the fridge steel is pretty much unweldable. Somebody more versed with welding pointed out the white deposits around the weld and said that was a signature of zinc. How they managed to mix zinc into the steel, I don't know but it seems that fridge steel contains zinc. It was not zinc plated and the flux core wire contained no zinc either.
Yesterday I measured the interior of the window apertures and asked the local steel company for prices of steel sheet. As I stood back and looked at the back of the bus today I had a revelation. Instead of fannying around, trying to trim the steel to fit nicely inside the window aperture, it makes more sense and looks more professional to just slap a sheet of steel over the entire window aperture, squaring it all off and then weld into place. Just to hold it in place, I might just screw it into place with self drilling screws to start with.

Meanwhile the postman arrived. I have multiple small solar panels that don't have connectors on them. Thus I bought a pile of cheap connectors. I can use them to connect to a cable with an SAE connector. I'm not really seeing much point with small, cheap solar panels of putting expensive connectors as the amperage is very low.

So, tomorrow I'll have to get some 32x16 steel sheet in 14 gauge. That should solve the problem with the steel.
Today I asked the steel people, using the measurements I had then. Now I want to try using my new measurements. If I remove the nasty fridge steel and grind the fridge steel welds flat then sandblast to get rid of any rust followed by spraying with rust killing paint, then I screw the new steel to the door in order to keep it nicely in place, I can sand-blast around the edges then weld and paint. I'll use galvanized steel like the rest of the bus. Once the outside steel is welded in place I can rivet the steel panel back on the inside that was screwed on before.

If all that goes just fine and there's no reason on earth why it should not, I can work on the upper door window then the windows on each side of the door. The aim is for a windowless rear to the bus.

But aren't you lucky - two blog entries today!

Shock, Horror - I forgot to blog yesterday

Yesterday I was so tired and busy that I forgot to blog. Anyway just to make up for it, a brief blog entry. The weather looks a trifle inclement today so there's not much likely to be done today. The leaden clouds hanging overhead look likely to dump copious quantities of rain on me. Not good for using electric welders or when handling bare steel.
The first thing done was to complete the cutting for the wooden template for the bottom back window. That looks pretty good now. It's deliberately undersized though it is a bit tight in some places and might need more trimmed off the side. 
Looking inside where I'd welded the fridge steel I can see a little rust. This is exacerbated by the fact I was having severe problems welding thin fridge steel. The solution I came up with is to cut the wooden template then make a steel border onto which I can weld or braise the fridge steel. Then I can weld the border into the aperture and have less difficulty. 

I started by making two parts of the border frame - the long sides, top and bottom. The welds look a lot nicer than they did when I was using an AC welder. I have to say this Harbor Freight DC welder does a very good job. This is the $130 DC Chicago Electric welder on 70A using 6011 rods (hence the splatter). 

I didn't complete building the frame yesterday. I'd been having quite a challenging day. If it was possible to drop something I did drop it. If it wasn't possible, I dropped it anyway. Cables and so on were all tied up in knots that took forever to undo. I really wasn't having a good day.
That's what the frame will look like when completed. The top and bottom are done. I've not yet welded the sides in place. I will have to trim the top and bottom a shade as they seem to have grown to be 1/4 inch wider than the aperture.

The square steel blocks are there to help with the curvature. I'll have to cut curves on the edges to fit the window frame. Only Carpenter would have curved edges to their windows! The welding has been done one-sided only. Two of the blocks are not quite right - they're at a slight angle. Not a huge angle but over the 3 inches there's about a 1/32 - 1/64 difference. It's probably not worth cutting them off to try again though that would help solve the over width problem. I could cut out the 1/4 inch from the welded side and reweld. I think the steel angle I'd clamped the work to might have had a blob of paint on it or something similar so it got welded crooked. Nothing is insoluable.

While I was welding that lot I remembered how much the materials cost me and then remembered what the local metals place had quoted me...
I'd been after very thick steel that time. I'm betting I could get thinner steel - perhaps 12 gauge for a lot less and I'd want to save money by cutting it myself. I could probably even get away with 14 gauge. That I know I can weld with 1/16th rods on 20A. The aluminium was for the now abandoned project to put the solar panel on the front of the bus. That was a daft idea from the start. That was daft when I put the original panel up there. Just putting a pair of 30W panels inside the windshield is perfectly adequate.

Anyway the materials for the frame to which I'd have to weld the fridge steel came to about $40. Had I realized at the time when I was in the store what the alternatives were, I'd have probably instead picked up a sheet of steel. No matter though. I've just made an inquiry about 12 and 14 gauge and about getting a single piece that I can simply cut rather than buying it pre-cut.

I'll proceed on with my frame for the bottom window but might well end up putting 12 or 14 gauge steel instead. The steel I bought will not go to waste though. I now have something I can build a battery compartment from for my forthcoming lithium battery pack. If the cells catch fire inside a 1/8 inch thick steel box, they're not going to do much damage!

Saturday, June 13, 2020

Returning to the back door

Starting the day with a migraine wasn't perhaps the best way of starting a day. Knowing I wanted to get onto the roof of the bus to change the roof vent but getting on with something else was equally odd. I think the migraine, lack of sleep etc has been this Covid stuff going through my mind all the time. It has got to the point where I will go out but won't linger in a store. I'll be in, grab what I want and go.

The medical people all say to wear a mask and avoid social groupings. The states are more concerned with money and trade than with human life. Thus the stay at home orders and restrictions on commerce have been lifted. Meanwhile there have been massive riots and the rioters have publicly threatened to attack the countryside. So, it has been fairly unsettling mentally and even though it's possible to put all that to one side, it still bounces around in the back of the mind.
As some floor laying had been going on next door, there was some rather lightweight plywood type material left over. Out of curiosity I cut one piece to make a template of one corner of the window aperture at the bottom of the back door. The thought is that a template could be made to fit inside the aperture.

Yesterday while out shopping, I visited Tractor Supply and bought three pieces of steel - two long strips and a wide strip. The idea there being that the long strips can go on the flats of the aperture and the wide strip can be cut to a curve to fit the curved part of the aperture. Essentially there will be a flat, welded collar that fits inside the aperture. The next step will be to cut some sheet steel to weld to the face of that collar. Then the collar can be inserted into the aperture with the metal sheet being flush with the outside. The collar can be thoroughly tacked into place where the steel on the door is thickest and then the outside join filled in with a fast-moving light weld. If need be that could even be ground smooth. 
As the material was so thin, cutting was more a case of cutting with a push stroke on the saw then disengaging and pulling the saw back for the next push. That saw, by the way, is bidirectional in that it can cut on both strokes.
So, finally, there's the end result of what was done today. The rectangular panel is a little over sized. That I can sort out tomorrow or whenever. It would be best undersized a shade in order to give some space for the electrode to fill.

If the technique I'm using works then I might be able to do the whole lot of welding using my DC stick welder and use up some of my ridiculously large stockpile of welding rods. I didn't realize I'd built up such a large collection! Following on from that there is also the possibility of doing all the windows on the rear of the bus.

Meanwhile I have thought again about putting a magnetic sign on the side of the bus, declaring it to be "State Prison Transport" or something similar. There are arguments one way and another. Having it anonymous grey makes it look like a prison bus. The only give-away is the grey tank visible via the rear wheel arch and the solar panels and fans mounted on the back wall of the bus.

Wednesday, June 10, 2020

Boiling hot or teaming down

The weather can't make up its mind today. It started really hot and dry then turned to torrential rain. The intention today was to go onto the roof of the bus and switch out the roof vent. That idea didn't last too long because as soon as I put my head outside spots of rain began to fall. No good would come of working on a roof slippery with rain.

Thinking about the problem of my charge controller, I looked online and found a comparison video where a fellow was comparing different charge controllers. I wish I'd seen that before! It seems this Renogy charge controller is a random charge controller produced by death-row convicts, somewhere in China with the Renogy name slapped on it. Zero quality control because it comes from... China.
Anyway, the upshot of the video was they showed the cheapest charge controllers versus a range up to expensive. Then they compared them and found that in each instance the difference between the PWM and MPPT was in the range of 3-5 watts on a 100W panel producing 70W. So, one MPPT controller would produce 72W and another PWM would produce 69. As a quick calculation, that 3 watt difference would be maybe 30watt hours a day or 1,087 watt hours a year. Given a 12v system that would be 90 amp hours a year or enough to power my twin extraction fans for just 22 hours. Yeah... I'm not really seeing the financial advantage in more costly solar charge controllers myself even though I have one.

I looked into putting a relay across the load terminals of my MPPT controller and it would be a battle to find space to put it. Without a relay across the load terminals it never will work properly. I did contact Renogy but was given a case number and a phone number to call. Well, that's no good whatsoever. All that happens with phone numbers is you're put on an indefinite hold while they play unpleasant, screeching jungles at you until you can't stand it any more and hang up.

A few days ago I bought a pile of ammunition boxes. I started to put tools in ammunition boxes because a big tool box is just too much to hunt through to find the right tool. I end up dumping the box out on the counter and working from the counter. With smaller quantities of closely related tools in different boxes, it'll be easier. I started to tidy up a few days ago and thought about it today but what with the intense heat, didn't really feel like it.

Walking outside I looked at the two reversing cameras that need replacing. I have half-installed one but I'll move it to the other location. Both will this time have little rooves over them to stop rain from entering. Rain killed my high level camera by getting inside and fogging the lens.
Today I returned to the solar panels that I was going to put over the front windshield of the bus. The plan now is to rebuild the array of panels into a more compact array. As some of the rivet mandrels had broken off badly I had to cut some of the rivet heads off. The others I could just drill out.
The plan with the new arrangement of panels is to have them in a different configuration that I can put them out in a smaller space of even put them in the windshield of the bus. I have another pair of 10W panels and a pair of 20W panels, all of which could be put into pairs. That would allow me to have the equivalent of larger panels. Putting them with the angle protruding at each end and possibly another piece of angle attached across the ends will mean they'll be able to be attached to something if desired.
The panels take up a lot less space like that! Still more space than a 30W panel but it'll work. Riveted like that they'll be less desirable to thieves as thieves look for something they can sell to a fence in order to buy hookers, booze or drugs. I'm pretty sure they get their food and housing paid for by the state.

I have to say I much prefer the look of the bus without the Harbor Freight solar panel at the front. I wish I'd thought of movable panels before. Maybe I'd have gone for a pair of 50W panels and not put the two 10W panels on the back. That's not how the bus evolved though.


Sunday, June 7, 2020

An excruciatingly hot day

Summer has arrived with a bang! I had to break off doing things quite frequently, driven indoors by the relentless heat. The humidity was choking and the sun was beating down.

The first thing done since the extra wide headed rivets had arrived was to fill in the 4 holes that secured the old front solar panel. Sadly though wide headed rivets had arrived, they were 3/16. That was too narrow. There were some 1/4 inch rivets that had arrived but they were narrow head and overly long. Rooting around in my toolkit I found some 1/4" narrow head short rivets that been supplied with my riveter when I bought that some years ago.

Getting all the tools together I hopped up on the hood of the bus and put a rivet in the first hole. Then the riveter jammed again. Clambering down I grabbed the other riveter and found that it wouldn't take the rivet mandrel as it was too thick. The rotary riveter that arrived a few days ago wouldn't have been of help as my battery drill is too feeble to operate it. Mind, that battery drill is coming to the end of its life. The chuck makes an awful noise now as though there are bearings dying. I'll use it til the end and then consider carefully the next option.

So after a bit more up and down onto and off the hood, I got the four rivnut holes filled with the biggest rivets I could find. That led to filling the unGodly hole made for the solar panel cable. Instead of thinking "yeah, I might have to take this down one day" I'd drilled a hole then expanded it with a file so it would take an SAE plug. Had I just snipped the plug off the cable and resoldered it on when the cable got inside the bus then I could have just had a nice, small, round hole that could have been filled by a single rivet. In the end I took one of the aluminium feet that the hillbillies had put as feet on their God-foresaken bunk beds and cut out a piece of aluminium. That, I riveted over the hole. It looks like a patch, it is a patch but can only be seen up close. Having done all that, I sprayed over everything and it all looks peachy now.
When I put the new wiper pivot in some years ago, I didn't get it quite centered so the wiper is at an angle. Looking through the scrap bucket a few weeks ago I found the old pivot. Today I cut the remains of the pivot off its bracket. With a little ingenuity I'm sure I can punch the center pivot out of the bracket then use this together with my current wiper pivot to reengineer things in order that my wiper is not canted at an angle. The first thing to be done with this as this is not an urgent project is to derust it. I'll probably soak it in vinegar for a couple of weeks then spray it with paint.
The heat and humidity were such that after standing with the angle grinder for 20 minutes, cutting the welded pivot off the bracket I was exhausted again. Carpenter had a really strange way of building their wiper pivots! It made sense from a replacement point of view as they're really easy to replace, if you can get the original Carpenter part. When I wanted to replace it, there was a genuine Carpenter pivot available but it was $150 so I paid $40 for another pivot and made a block to hold it. I got the block slightly wrong. This, if I knock the swiveling core out then I can enlarge the hole to fit the new pivot perfectly.
With the problems I'm facing from the rather poor if not fraudulent Renogy MPPT charge controller, I realised I'm probably going to be better off using a relay to handle the load. Thus, since I have a relay I dug it out from my storage and put it on my watt meter to see just how much power it used. Thus far it seems to use less than a watt. That's pretty good. I have no idea how much power it uses and an online search for a YLD2450A solid state relay yields no information on the power consumption.

The aim is to run the relay off the charge controller then use the relay to control power to the house circuits. That should take care of the charge controller's complaint that my 3.92A load is overloading a 30A charge controller. It'll make a nonsense of the stats the charge controller compiles. On the other hand, the Renogy stats read like strange fiction anyway. I have to say that for something that cost me $80 and which has gone up since then to $125, the Renogy acts like a $9.95 cheap Chinese junk charge controller.

The next step with the bus will be to replace the roof vent. Now I have clear access to the roof vent since there's no no solar panel in the way. Once that's done I can wash the roof and put more elastometric paint on top. That stuff seems to work but has flaked off in a couple of places. It probably needs a thicker coating where it peeled off.

There is some small internal electrical work that needs doing but the internal stuff can wait for a rainy day. I'll concentrate on external work for the moment. That's so far is...

  • Replace the rusty roof vent
  • Replace both backup cameras
  • Seal around the digital keypad (that's been waiting to be done for a long time)
  • Remove the steel I welded over the bottom back window of the rear door and weld steel on in the right place and weld it better, theoretically straightening the bent back door in the process.
Aside from that, there's replacing windows on the rest of the back of the bus with steel sheets. Putting security mesh over the windows along the side of the bus and replacing the crusty old tyres.

In addition to all that, part of what needs to be done to enable that is tidying up and sorting out tools and supplies inside the bus. 

Friday, June 5, 2020

The batteries that weren't


Today was supposed to be the day that I sealed all the remaining rivet holes in the front of the bus. That's not quite what happened though. While I did cut a piece of aluminium with the idea of gluing one piece with a hole drilled in it, ready for a rivet to the inside of the area where I'd made the big hole for the wire from my old solar panel, I didn't get that far. The idea there was to glue the metal on the inside then after the glue had set to fill the space with Bondo and rivet another piece of aluminium to the other but from the outside so that it went aluminium, steel with a bondo filling, aluminium. 

Meanwhile a sign arrived that I'd bought online that said "State Pennitentiary". Yes. I put a spelling mistake in so I can't use that at the front over the windscreen. I'd hoped it would come with relief lettering too as it said on the website but it all came flat. That was pretty damned useless. It didn't cost the earth, thank goodness and I'm sure I can use it elsewhere even if only for the metal.
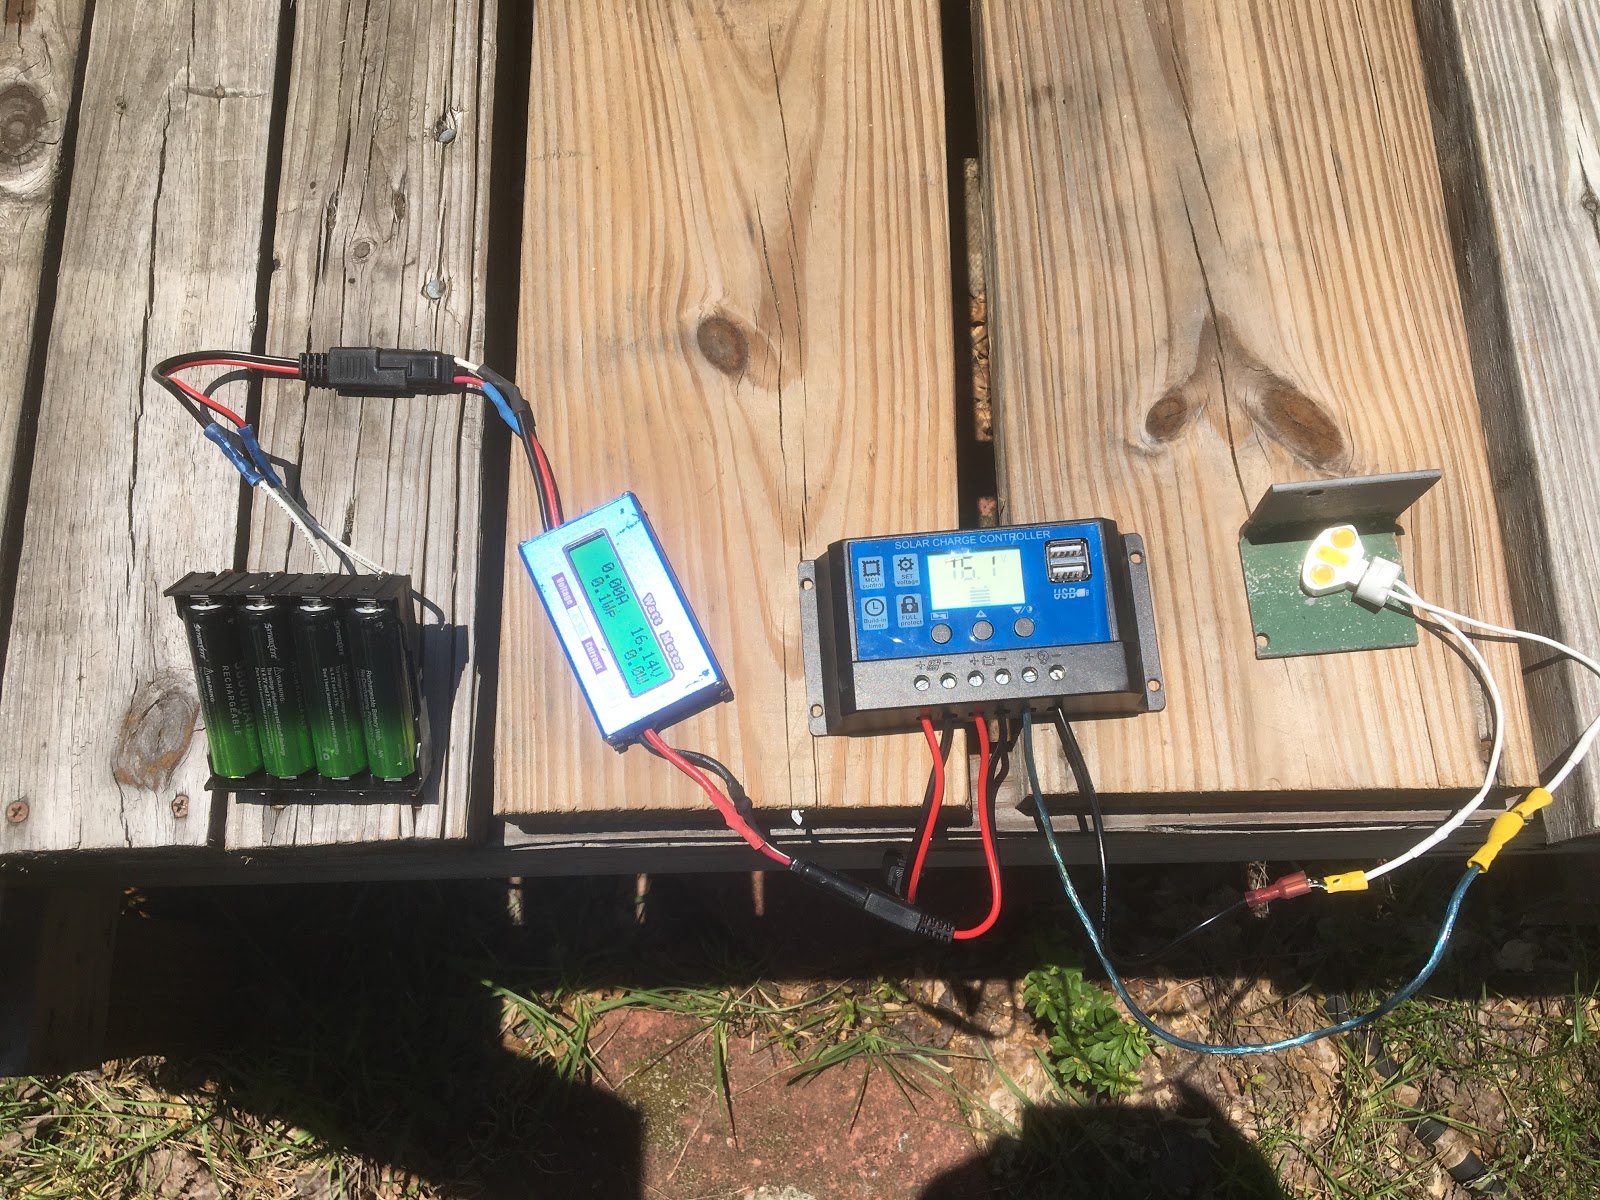
As I went to the bus I noticed the batteries I'd charged a few days ago. They claimed to be 16.18v or about 4.2v each which sounds about right for a fully charged 18650. Thus it was time to test their capacity. Their claim to be 5,600mah was completely unbelievable. Only a fool would believe that capacity, to be honest.
The test setup was very simple. The batteries should not be discharged below 2.75v each so I put a cheap and nasty Chinese charge controller on the battery and a 3 watt LED light as the load. To monitor everything I put my watt meter between the battery and the charge controller. If I'd put it after the charge controller, when the controller switched off, I'd have lost all my records. 
So at 1:30pm I set the whole lot going on the deck outside and waited. It was a pretty hot day but what with having to chase a neighbor's wandering cows away from my veggies, fairly uneventful. 
After about 90 minutes the LED bulb had done what LED bulbs do best - it had begun to fail. The one LED remained lit but the other two flashed on and off. Power consumption went up and down. That 3W LED used 9.7W, which was surprising. It was a new LED bulb in that it had never been used before. I'd bought a pack of 3 and tried one, finding it got surprisingly hot. That was why I had not used it before.
With the broken LED extending discharge time, the LED was replaced with a 10W halogen bulb which used 17.8W. That worked really well. Fairly soon thereafter the battery power level reached the 11v switch off stage and I could check the power usage.
Looking, it seems the 4 batteries (in series) came to 1.173Ah or 1,173mAh. That's quite a way off the claimed 5,600 mah. It's not even quarter of the claimed capacity. Clearly they're not going to be much good as part of a replacement for the twin 35ah lead-acid batteries on the bus. On the other hand they're pretty good for my drone project being both lightweight and having a decentish capacity.

I keep running into the LEDS are worthless problem. Like a smoker addicted to cigarettes or a serial killer obsessed with killing their next victim, I keep on buying the perishing things. The thinking process goes something like... LED light has failed, scratch armpit. Must buy new LED light. Instead I should be going more along the lines of... The LED has failed. LEDs keep failing. This is a dismally ineffective technology that costs a lot of money. Instead of spending $8 on packs of two or three LEDs, why not spend $5 on a pack of 10, ten watt halogen bulbs.

Well, I'm half way there. I have the ten 10 watt halogen bulbs that I bought for $5. What I need to do now is to rebuild my light fixtures to allow more space between them and the walls so I can actually use halogen bulbs throughout. I might also put some reflectors around the halogens.

It does not matter what LEDs I try, they all seem dismal failures. I have seen the LED lights on the work busses fail pretty regularly. It doesn't seem to matter what kind of LED is in use - they all seem to fail. I like the two pin mounts I chose for my lighting though. It's so easy just to put a two pin bulb in place.

In terms of power consumption, 18W isn't that terrible. Using two bulbs at 36W I would get 10 hours non stop light from my battery pack before needing to recharge the batteries. Who uses two lights for that long though? I tend to use a single light most of the time because I have lights in all the places I sit and switch them off when I leave the area.

Well, tomorrow I might get on and finish up the holes left after removing the vandalized solar panel. After that I need to get on with replacing the rusty roof vent.

Saturday, May 30, 2020

The day that wasn't

Looking on eBay at tracking numbers is pretty painful. Watching things creep ever so slowly around the countryside at speeds that could easily be exceeded by a blind snail slithering backwards while towing an anvil can only be described as cruel and unusual punishment.

Yesterday my new rivets arrived in Columbia where they sat all day. They never made it to the local delivery office despite having been sitting for 24 hours. Either the Post Office has had an outbreak of the virus or they've lost them! I'll have to keep waiting. Today though I tried out my new riveter.
This was one of those eBay things that arrived with no instructions whatsoever so it took a few minutes to work out how it all worked, why I had so many wrench sizes etc. Having done that and dismantled the thing because it wouldn't grip a rivet, I tried it...
As I'll be using 3/16 and 1/4 rivets I tried it with a 3/16 rivet and found that the Harbor Freight battery drill was not powerful enough to complete pulling the rivet and also that my damaged right wrist is not capable of holding the drill. Gloves would also help, I'm sure.

So the end result was that this appears to be a very fiddly device that probably works just not on the rivets I wanted to use. Heaven help me when I need to use steel rivets! They're much tougher to pull!

I probably wouldn't have left things there but I heard a noise so I looked up and not six feet from me were two very large, very black cows. That's right - the kind that go "moo" and produce all those lovely milk products like cheese and butter and ice cream. It seemed to take an age to shoo them out of the yard. When they did leave, they didn't leave in the right direction and a neighbor had to shoo them out of his yard a few minutes later. Then they raced down the road at high speed. Clearly that neighbor has more skill than I in shooing cows. A horn or whistle or something louder than me would probably have been advantageous.

Fortunately the cows had not touched my young veggies. If they'd eaten my veggies, I'd have had to eat them! I can see it now - a few days and the guy comes knocking on doors, looking for his cows while we all whistle, look innocent and try to hide the barbecue pit, piles of cow bones and try to refrain from belching.

Today was one of those interesting days. The news was pretty gripping. Not only do we have the Coronavirus raging and 102,000 now dead from it in the USA alone and 367,000 dead worldwide but we had a space rocket launch to the international space station aboard an Elon Musk rocket and nationwide riots. In fact the nationwide riots were pretty close to home. They started peacefully enough but within hours vehicles were vandalized and on fire. In other cities whole housing estates have gone up in flames, shops have been looted and public buildings sacked.
Now perhaps people might appreciate the need for a mobile lifestyle. To get away from the chaos.