I continued my hunt for welding rods but while Northern Tool had 308L and bronze rods, no 309L. It was the same story at Home Depot and Lowes (hiss, spit). In the end I didn't find my 309L rods but I did find some 312 rods at Tractor Supply. They were horribly expensive!
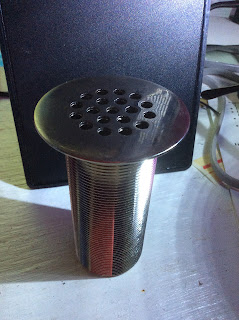
Back on the ranch, I pulled out my stainless tube and found a spare stainless sink tailpipe. The tube screws into the tailpipe. My idea was to weld the tube to my ventilation box. Things are in constant flux though. As I cleaned up my blobby welds I realized there are various alternatives to my plans. Of course, if I'd built the thing from plastic planking, I'd have been done and dusted a while back! I decided to go durable though and that means steel and welding.
Looking at the stainless sink tailpipe, I realized I had found my ventilation inlet. All I need do is to make a 1.5 inch hole and pass a new tailpipe with a nut through the floor. It's straightforward then to put a tube between the two tailpipes. This could even be as simple as a piece of large diameter Pex hose pipe held on with jubilee clips.
The holes for the fan didn't go in the right place, sadly. I decided to drill two holes rather than 4 because it's not a high stress activity. As the nuts for the number 8 bolts are somewhat small, it's not possible to weld them in place. That had me redesign my vent a little. I am designing it so I can replace my fan if required or even remove it and replace it with a small but potent bilge blower. Today aside from the two holes (which I might redo tomorrow), I decided to add a flange to the top of the unit that I can screw a top onto. I prepared all the surfaces and will get onto that tomorrow. The bottom also needs to be removable in order to also facilitate easy fan replacement.
The temperature outside the bus was way cooler than inside. Inside it was 100F while outside it was 80 or 90. When fresh air is coming in, the temperature will be much cooler. The shower tailpipe will be a great ventilation inlet as it can be stood on without issue and can be laid flush with the floor. Indeed, when I next visit the hardware store I might get a larger diameter tailpipe for the bus interior as I feel I might yet end up with a bilge pump.
In my redesign of the top of the ventilation unit, I decided to make the top removable in order to make access to the fan easier. That allows me also to upgrade the pipe at the top of the unit to a larger size by simply making a new top plate. That will allow for an upgrade from 1.5 to 2 inches for a 2 inch bilge blower.
I was beaten today by the heat, humidity and mosquitoes. Thus, after planning my flanges I headed indoors. Tomorrow I shall weld together the rest of my filter box structure, weather permitting, and make a start on the top and bottom. The door is going to be very simple. I'll just solder a nut to the back of the flange
One of the other things I got today was a set of small grinding wheels for the pistol drill. Those will be handy for cleaning blobby weld on the inside of my frames. I'll try to clean those tomorrow too.


No comments:
Post a Comment