
Despite the fact I feel more like the Walking Dead than any semblance of being human, today I took the bits I bought at Lowes (hiss, spit) that I neglected to blog about the other day and put them together. As I currently work with small children I get just about every ailment they so generously give me. It's all airbourne stuff that's hard to defend against so this weekend I have a tummy bug. How nice!
So, the other day somebody gave me some spare 1/2 inch Pex tubing. Thus I got myself a T adaptor for the downpipe from my shower and some other connectors in order to connect the waste barrel via flexible hose. That makes life much easier for times when I might have to take the barrel down to get silt and crud out of it. I'm sure it'll need cleaning at some point!
All that fitted together very nicely though I had a problem at the other end of the Pex tubing because I'd bought the wrong size connector. I'll fix that tomorrow if I'm feeling any better or maybe later this evening. It all depends on how my virus goes.

That's a bigger view of my construction. From left to right we have...
1. A Walmart ball valve for a hosepipe that cost $1.95. That's way cheaper than the cheapest faucet Lowes has!
2. A 3/4 inch angle with a thread on the end pointing down. The other end just happened to fit into my 1.15 inch tubing nicely so I said "what the heck" and glued it in there.
3. A 1.25" T adaptor that will fit onto my 1.25" downpipe.
4. A piece of 1.25" tubing connecting the T adaptor to a 1.25" to 0.75" hosepipe adaptor.
5. A 1.25" hosepipe adaptor.
6. A Hosepipe swivel. That will make removing the barrel so much easier as I can just unscrew the tubing.
7. A 0.75" to 0.5" threaded Pex adaptor.
8. Some 0.5" Pex tubing.
Not shown because I bought a 0.5" to 0.25" threaded Pex adaptor in error is the adaptor on the other end of the tubing that will be connected to the barrel.
I'm pretty sure I could have got a plastic swivel but Lowes (hiss, spit) didn't have one. The dollar store might and I might look into that for the other side of the bus for the handbasin waste pipe. Actually, the handbasin waste piping will be handled totally differently anyway. I will learn from the shower outlet and do the other side differently!
After building (but not installing) the new plumbing bit, I climbed up onto the hood of the bus to use my new Grabbit tool to remove a crosspoint screw that had the cross worn out by a previous attempt to remove it. As I suspected, the Grabbit was little more than a nice-sounding gimmick. It did nothing other than cost me about $8 (or about an hour's wages). That screw will have to be removed the traditional way - with a drill bit! Then I felt wobbly and sick after my not too strenuous exertions and had to lie down in the cool for a couple of hours.
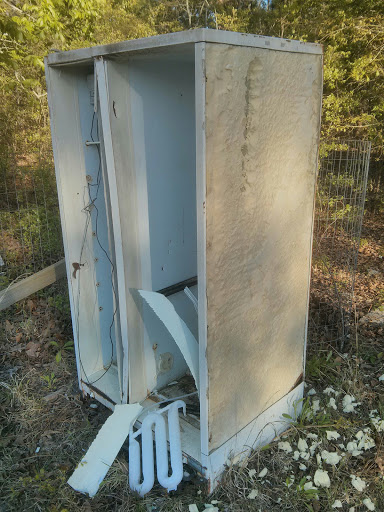
Returning to the fray, I attacked an old fridge that was dumped on m'lady's land. That yielded a nice piece of steel even though it went through 3 cutting disks on my angle grinder. There's plenty steel left too! It's a little thinner than I would like but on the other hand, it is free and welded to the back door, will make the door much more secure than a solitary pane of glass.

I did take a photo of the fridge lying amidst the foliage but for some unknown reason my phone told me it had taken the picture but had not in fact done so. I could say Bah Humbug but that being a little Dickensian should be more replaced by the modern equivalent of "bloody technology". I mean, seriously, what's the point of these wonderful electronic gizmos if they don't work ALL the time?
As an aside, I did mention that I am living way out in the backwoods of South Carolina. Remember the TV series The Dukes of Hazard? Remember the rebel flag I showed you a few days ago? Today I show you the mailbox. It doesn't get much use and hence is more of a bird's nest. That's how far into the backwoods I live!

After another trip inside to rest, I found the old U bend or S bend - whichever you want to call it - that I had put under the handbasin. It seems to be 1.5 inches. My task will be to find something that'll bring that down to 1 inch to fit my standard plumbing. Moving swiftly on, I took two photos of the old fridge - one to show where it's located.
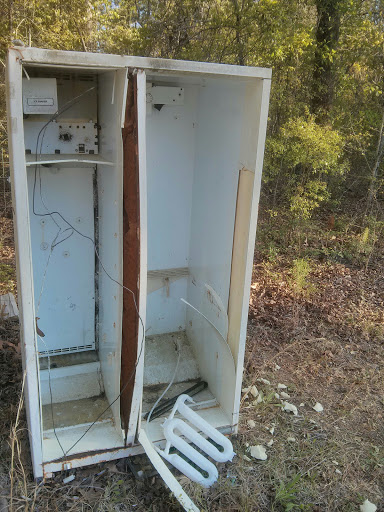
Then I took another photo - of the side I had removed. The inside is steel also which means it could be useful. The left hand side of the fridge which is up against a tree, I didn't start to cut but looking at it, there wouldn't have been much point as that side has a rather large calibre bullet hole through it at a strange angle!
Having done that, my attention turned to the school bus flashers. The screw that wouldn't come out eventually did after I used an angle grinder at a shallow angle so as not to damage the bus. It transpired that this screw could have been ignored. It held only the lens in place. Four other screws held the flasher lens in place.

If I am careful, I can probably replace the amber lenses with arrows with the amber lenses of the flashers. That makes my indicators much more visible. Anyway, having removed the light assembley - which wasn't that hard, I cut the push fit connectors off and screwed on some wire nuts. It turned out that there were two wires and two elements inside the light. It was a most peculiar affair. Having removed it, I've taped over the aperture for now but this is what it looks like without tape.

What surprised me was not just the huge size of the aperture but the cobweb behind it! Using the lens as a template, I marked out some disks on a sheet of aluminum, ready to cut them out to cover the holes.

Having marked the circles I realise that cutting 4 circles is going to be challenging. Rather than delegate that, instead I might use steel and make two sheets of steel with vaguely rounded ends cut to as close as possible, the same dimensions. Then after painting them, simply put silicone seal behind them and rivet them into place. If I pre-drill both sheets and put the holes in the same places, it should look quite tidy.
Meanwhile, tomorrow's task - assuming I feel better which I suspect I will - is to get the plumbing completed for the shower side of the bus, including removing the nuts that I put Thread Locker on and replacing them with two sets of stop nuts. That means a trip to Lowes (hiss, spit) for a 3/4 inch to 1/2 inch Pex fitting that I can glue into place. While I'm there I might as well get the stuff for the other side of the bus too. Having done that, if there's time left, I'll add a second set of stop nuts to the handbasin side of the bus. Ideally I'd like to get the blanks put up to replace the top flashers but that might be a pipe dream for this weekend.
Meanwhile, I totally forgot to say but the AA powered phone chargers arrived yesterday. These are really nifty because it means I can charge a phone using rechargeable AA batteries or via disposeable AA batteries. Basically, that pretty much takes care of all of my electrical requirements. I just don't need electricity for anything other than lighting and my phone, tablet or mifi pad.
No comments:
Post a Comment