There was no set plan of action for today so I chose the most attractive of all my options which was to build the bathroom vanity. I didn't want to start drawers because I know it'll take a while to do them all and its a series of small tasks I can do when I don't have much time. It also doesn't need much space.
The bedroom desk or table is low priority as is the closet rail. I didn't have enough wood to do the front closet door. Thus the ideal candidate was the bathroom vanity.
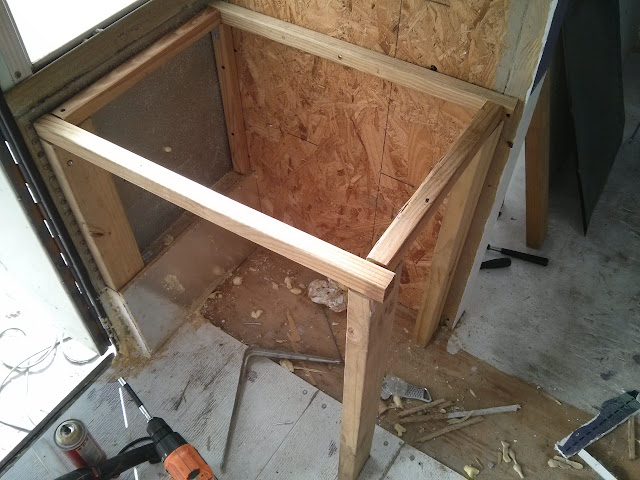
I'd already fastened a horizontal strip of 2x2 to the wall between the bathroom and the toilet, ready for the vanity. Thus, I started with that as my starting point. I added a leg underneath it onto which I could rest a horizontal. As I'm unlikely to put much weight on the vanity, I'm using mostly 2x2.
The next step was a 2x2 leg between the horizontal and the old seat rail. That was followed by a piece of 2x4 perched on the seat rail. Now I should have used 2x4 for all the legs but since I'm running low on supplies, I'm using what I have. I don't want to end up with a surplus!
The 2x4 gave me the most problems. It had to sit flush on the seat rail but there were round headed screws on the seat rail. Rather than remove them, I dabbed nail polish on them then while it was still wet, placed the 2x4 in place. Now I had nail polish indicating where the screws were. It was simple - I used a countersink drill to make space for the screw heads. The 2x4 fitted nicely then. The next problem was it needed to be secured to the side of the bus a bit higher. To that end, I drilled a hole through the 2x4 and through the inside skin of the bus. That's when the drill bit broke. Unwittingly I'd drilled through one layer of steel and was just on the edge of a second layer. Of course the drill bit snagged, pulled the power drill and broke. Fortunately I could put a screw in without a problem.
That left me with a 3 legged vanity. It's beginning to look like something now! Of course I doubt the vanity will actually be rectangular. I rather suspect it'll end up as some sport of polygon!

The next leg was interesting as it isn't the same length as any of the others. This was cut from 2x4 in order to make construction easier and less reliant upon brackets which are almost all used. Of course, I completed the leg and got a bracket in order to screw it to the floor and found my self drilling screws were too short. Beneath that leg, the floor is 1/4 inch thicker. That part of the floor is my famous PVC planks. At the time I ran out of 2.5 inch self drilling screws. That was months ago!
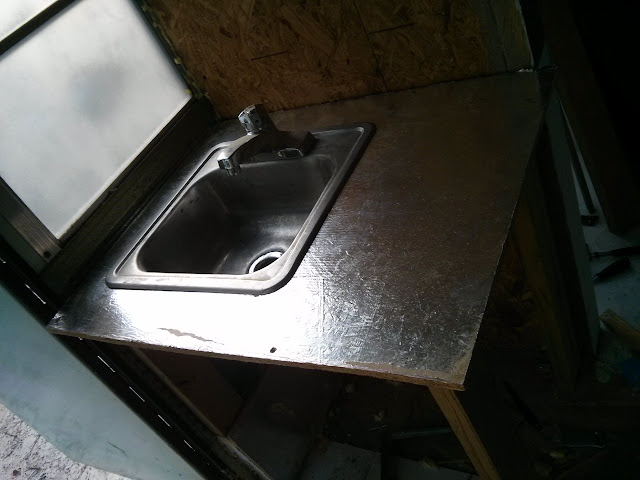
Thus I did not quite complete my vanity. Placing a section of OSB cut from the old kitchenette that I built, with the hole for the handbasin in place and the handbasin in place, I can see roughly what it's going to look like.
Of course a loose leg is not desirable so I headed off to the store. There, I got the screws I needed plus some alternatives. I also got some wood so I can complete the closet door. Typically, I think I forgot to get hinges though.
While at Lowe's, I looked at paint for the bathroom. The bedroom is Valspar Cosmic Pink. The dinette is Sherwin Williams purple though right now I can't recall which purple. My original idea had been to have a yellow ochre color but looking at the yellows, browns and oranges, I felt that another warm color might be excessive. I wanted to stay away from bright yellow and from blue - even though my purple is slightly cool. In the end I decided to go for another Valspar color - Lime Passion. After that I have to match the Carpenter blue and I'll be done with paint!
Tomorrow will be a continuation of today, working on the bathroom vanity. As I didn't buy brackets, it might be difficult to build the toilet so I might do the closet door or the bedroom table/desk. Construction is definitely drawing to a close.
One of the other things I did today was to remove the shade over the drivers mirror. Now I don't have anything to whack my head on!
The bedroom desk or table is low priority as is the closet rail. I didn't have enough wood to do the front closet door. Thus the ideal candidate was the bathroom vanity.
I'd already fastened a horizontal strip of 2x2 to the wall between the bathroom and the toilet, ready for the vanity. Thus, I started with that as my starting point. I added a leg underneath it onto which I could rest a horizontal. As I'm unlikely to put much weight on the vanity, I'm using mostly 2x2.
The next step was a 2x2 leg between the horizontal and the old seat rail. That was followed by a piece of 2x4 perched on the seat rail. Now I should have used 2x4 for all the legs but since I'm running low on supplies, I'm using what I have. I don't want to end up with a surplus!
The 2x4 gave me the most problems. It had to sit flush on the seat rail but there were round headed screws on the seat rail. Rather than remove them, I dabbed nail polish on them then while it was still wet, placed the 2x4 in place. Now I had nail polish indicating where the screws were. It was simple - I used a countersink drill to make space for the screw heads. The 2x4 fitted nicely then. The next problem was it needed to be secured to the side of the bus a bit higher. To that end, I drilled a hole through the 2x4 and through the inside skin of the bus. That's when the drill bit broke. Unwittingly I'd drilled through one layer of steel and was just on the edge of a second layer. Of course the drill bit snagged, pulled the power drill and broke. Fortunately I could put a screw in without a problem.
That left me with a 3 legged vanity. It's beginning to look like something now! Of course I doubt the vanity will actually be rectangular. I rather suspect it'll end up as some sport of polygon!

The next leg was interesting as it isn't the same length as any of the others. This was cut from 2x4 in order to make construction easier and less reliant upon brackets which are almost all used. Of course, I completed the leg and got a bracket in order to screw it to the floor and found my self drilling screws were too short. Beneath that leg, the floor is 1/4 inch thicker. That part of the floor is my famous PVC planks. At the time I ran out of 2.5 inch self drilling screws. That was months ago!

Thus I did not quite complete my vanity. Placing a section of OSB cut from the old kitchenette that I built, with the hole for the handbasin in place and the handbasin in place, I can see roughly what it's going to look like.

Of course a loose leg is not desirable so I headed off to the store. There, I got the screws I needed plus some alternatives. I also got some wood so I can complete the closet door. Typically, I think I forgot to get hinges though.
While at Lowe's, I looked at paint for the bathroom. The bedroom is Valspar Cosmic Pink. The dinette is Sherwin Williams purple though right now I can't recall which purple. My original idea had been to have a yellow ochre color but looking at the yellows, browns and oranges, I felt that another warm color might be excessive. I wanted to stay away from bright yellow and from blue - even though my purple is slightly cool. In the end I decided to go for another Valspar color - Lime Passion. After that I have to match the Carpenter blue and I'll be done with paint!
Tomorrow will be a continuation of today, working on the bathroom vanity. As I didn't buy brackets, it might be difficult to build the toilet so I might do the closet door or the bedroom table/desk. Construction is definitely drawing to a close.
One of the other things I did today was to remove the shade over the drivers mirror. Now I don't have anything to whack my head on!
No comments:
Post a Comment